







How to Draw a House Finch
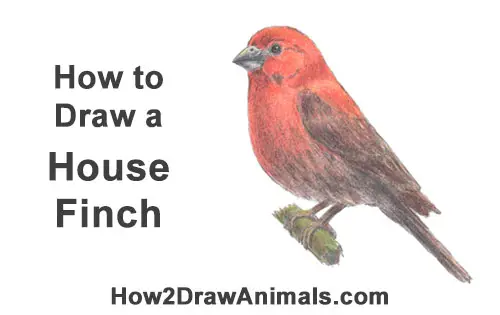
Please PAUSE the "How to Draw a House Finch" video after each step to draw at your own pace.
Time-Lapse (Speed Drawing) video:
Written step-by-step video tutorial:
For the first few steps, don't press down too hard with your pencil. Use light, smooth strokes to begin.
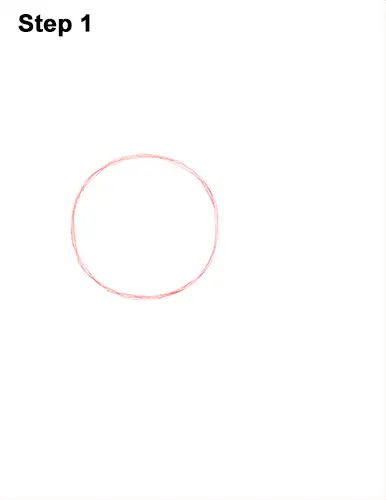
Step 1: Draw a circle near the middle of the paper as a guide for the first part of the house finch's body. First draw four small marks to indicate the height and width of the circle, then connect the marks using curved lines. Sketch lightly at first so that it's easy to erase if you make a mistake. But the circle doesn't have to be perfect. It's just a guide. If you're having a hard time drawing the circle, trace the outer rim of a glass, a lid or any other object with a circular edge.
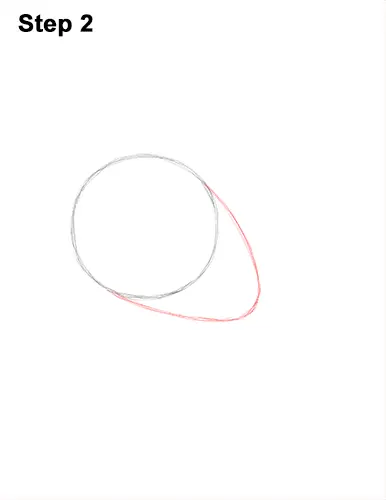
Step 2: Now draw the second part of the house finch's body by first making a small mark on the lower, right side. Now connect the small mark to the circle using curved lines so that you end up with an arc. The shape of the guides combined should be similar to an egg.
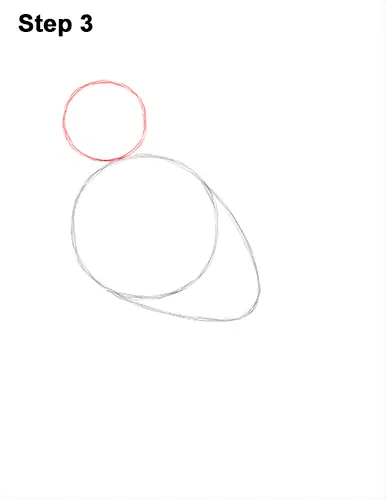
Step 3: Draw another circle on the top, right side as a guide for the house finch's head. Draw this circle the same way as the first one. Start with marks indicating the height and width, then connect the marks with curved lines. This circle should be about one- third the size of the first one. The edges of the circles should touch.
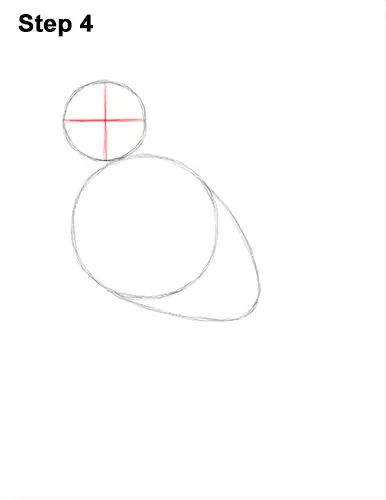
Step 4: Inside the house finch's head, draw two intersecting lines. These construction lines will help you place the bird's facial features later.
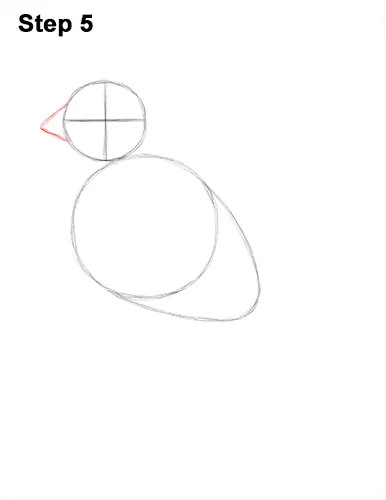
Step 5: On the left side of the head, draw a line that's similar to a less- than sign (<) as a guide for the house finch's beak.
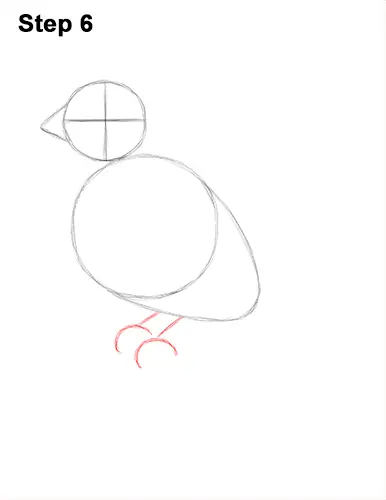
Step 6: Draw the guides for the house finch's feet using a series of short lines under the body. First draw a short, diagonal line for the top part. Then below it, draw a C-shaped line for the bird's foot. Add a similar set of lines to the left but make them smaller because of the perspective.
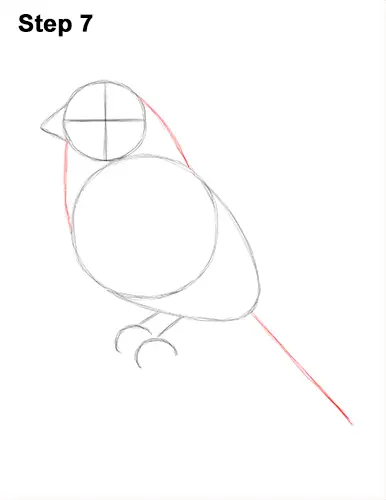
Step 7: Draw two curved lines that connect the head to the body create the guide for the neck. Pay attention to the width of the neck. Don't make it too skinny. Draw a long line with a diagonal orientation on the lower, right side of the body as a guide for the house finch's tail.
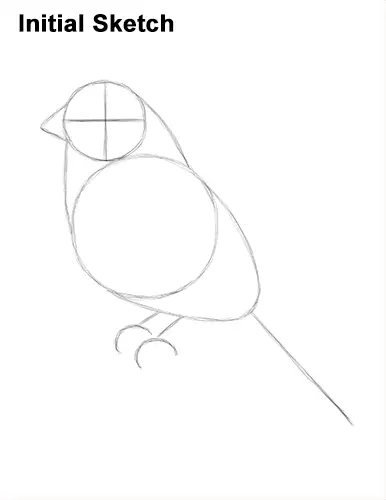
That's it for the initial sketch! From this point on, press harder with your pencil to get a more defined sketch.
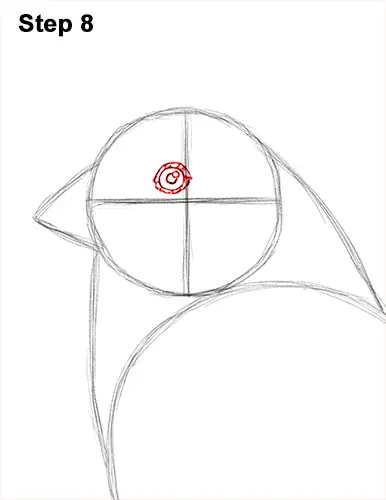
Step 8: Inside the head, lightly sketch a small circle for the eye. Use the lines as guides for placement. When you get the size and placement of the eye right, darken the lines. Inside the eye, off to the side, draw a tiny circle to represent glare. In the middle, add another circle for the pupil. Shade in the house finch's eye if you're not going to color it later. Add a few curved lines around the eye for the bare skin.
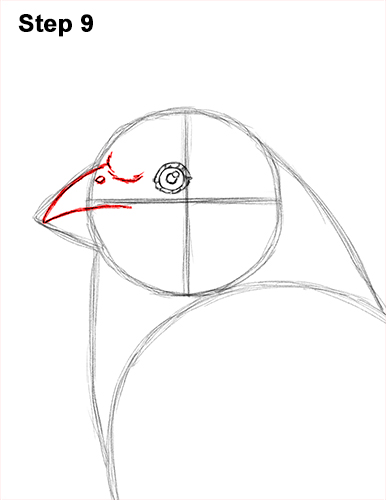
Step 9: Use the angled line on the left as a guide to draw the top part of the beak. Follow the path of the guide but curve it more as you darken it. Add a curved, horizontal line in the middle for the mouth. Use the construction lines in the head as guides. Draw a curved line between the top of the beak and the eye for the feathers on the house finch's head. Add a small circle at the top of the beak for the nostril.
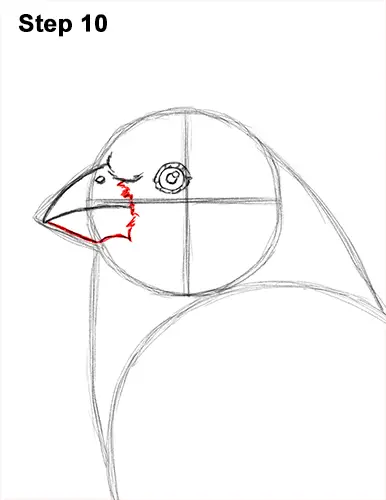
Step 10: Draw a series of quick, short strokes on the right side of the beak for the feathery base. Darken the bottom half of the angled line on the left to create the bottom of the house finch's beak. The right side of the bottom part of the beak curves up slightly.
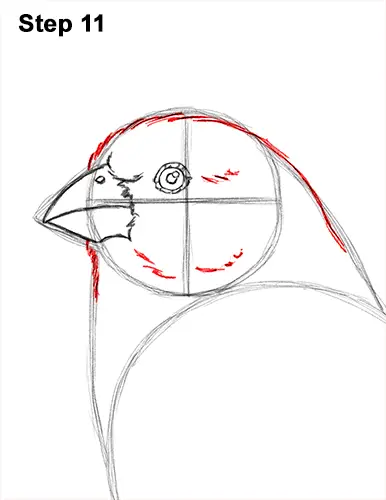
Step 11: Use the initial circle as a guide to draw the rest of the house finch's head. Follow the basic edge of the circle as you use quick, short strokes to create the shape of the head. Continue to follow the guide toward the right to create the neck. Add some strokes under the beak too. Add a few quick, short strokes inside the head as well to emphasize the feathery texture.
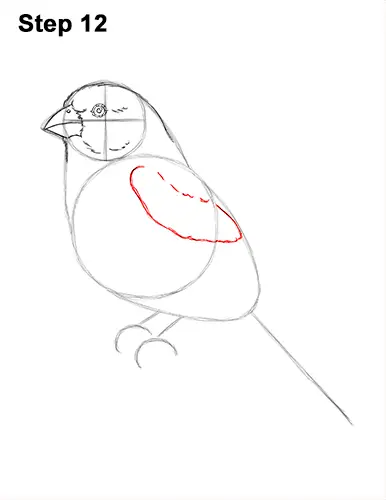
Step 12: Draw the first part of the house finch's folded wing within the shape of the body using a long, curved line. The overall shape of this part of the wing is similar to a long letter C that's kind of wavy. Pay attention to how far down this line goes before curving back to the top. Add a few quick, short strokes at the top for the top part of the folded wing.
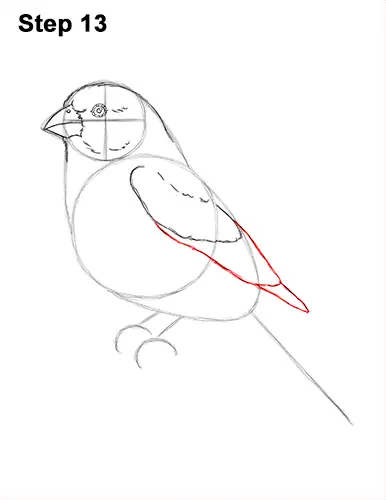
Step 13: Now draw the lower half of the bird's folded wing using more curved lines right underneath. The lower half of the wing should extend toward the outside of the initial guides. The shape should be similar to an arc. The tip of the wing should be thin. Add an extra curved line at the bottom for the tip of the wing. Pay attention to how much the wing sticks out of the body.
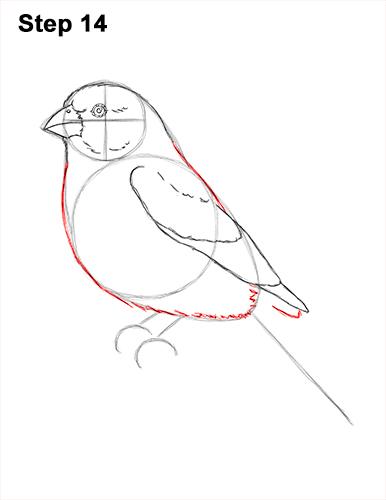
Step 14: Darken the outer edges of the initial guides to create the shape of the house finch's body. Use a series of quick, short strokes for the fluffier feathers found on the bird's underside.
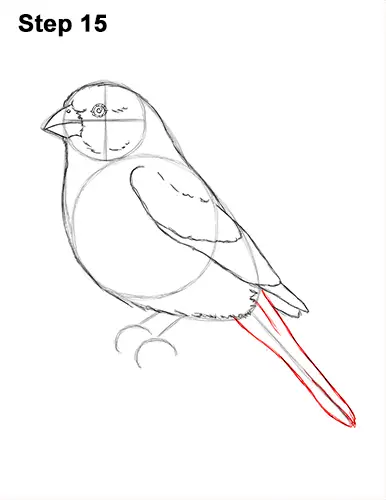
Step 15: Use the diagonal line on the lower, right side as a guide to draw the house finch's tail. Follow the path of the guide as you draw the shape of the tail around it. The top or base of the tail should be thick, and the shape should gradually get thinner at the bottom. Add a few more lines inside the bird's tail for extra detail.
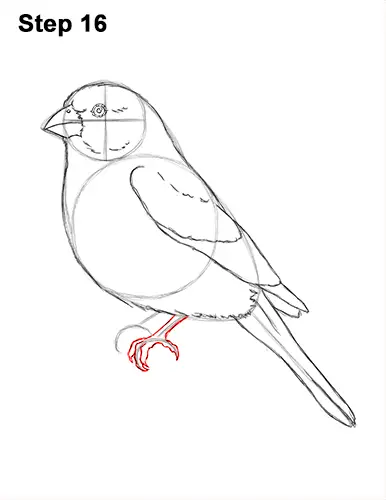
Step 16: Use the set of lines under the body on the right side as guides to draw the house finch's first foot. Draw a couple of short lines parallel to the initial guide for the top part of the leg. Now use the C- shaped line as a guide to draw the short toe pointing backward and the longer toe pointing forward. The tip of the bird's toes should come to a point. Draw two more to the left for a total of three pointing forward.
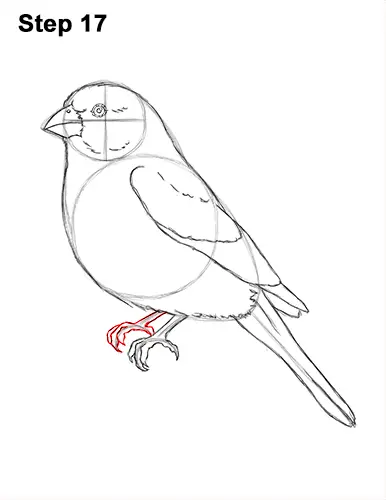
Step 17: Use the set of lines on the left as guides to draw the house finch's other leg the same way. Follow the path of the guides and draw the shape of the toes around it. The toes pointing forward should overlap each other somewhat because of the perspective.
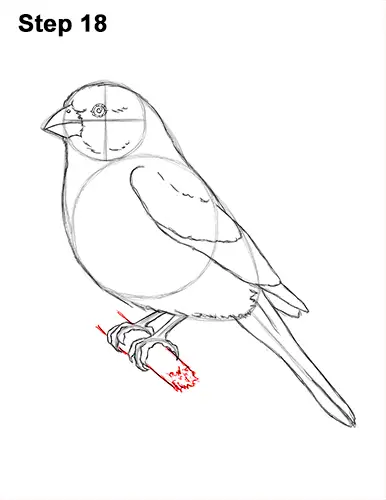
Step 18: Use a couple of diagonal lines under the house finch's feet to create a branch. Don't overlap the lines for the feet. On the lower part of the branch, draw a few jagged lines to make it look like it's broken off.
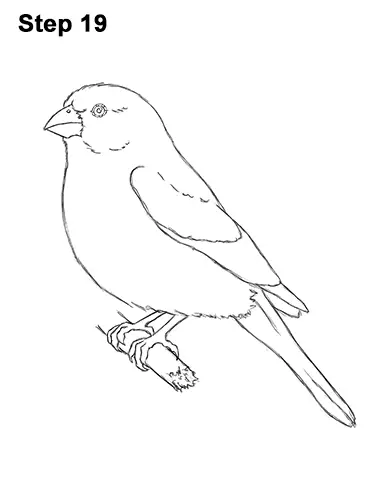
Step 19: For a cleaner look, erase as much as you can of the initial guide lines. You can also LIGHTLY erase some of the final lines so that the colors don't get too muddled with the graphite in the next step. Re-draw any final sketch lines you may have accidentally erased.
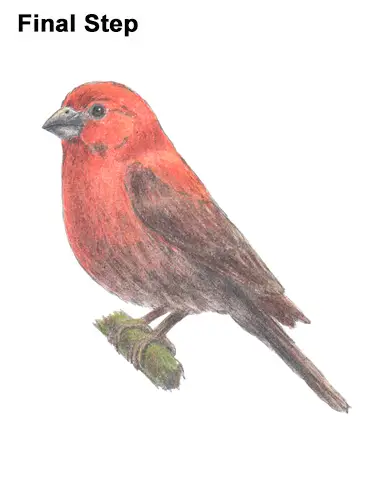
Final Step: House finches are colorful, so instead of the usual shading, color your drawing. Use brown to draw a series of stripes along the wing and for the feet and branch. Use brown to draw a few spots along the underside. Use a bit of gray on top of the brown too.
Use a bit of gray on the house finch's beak and color the pupil black. Use black and dark brown for the rest of the eye but leave the circle that represents glare blank. Now start coloring in the red section using red-orange. Lightly apply different shades of red right on top of each other until you get the color you like. Use red, red-orange, yellow-orange, brown and even pink! With every layer you add, press down a little harder with your pencil to blend the colors together.
Add dark brown and gray to the underside to create shadows. Use more gray for the beak too. Continue to add different shades of red to the top, and grays and browns to the bottom until the colors are blended. Coloring is time- consuming, so be patient and take breaks. For a simpler house finch drawing, just use a single shade of red. Use green, peach, and yellow for the branch and feet. Remember to pause the video to draw at your own pace.
Thanks for visiting! Subscribe to the How2DrawAnimals YouTube Channel for a new tutorial every Tuesday.
To learn how to draw popular cartoon characters, visit EasyDrawingTutorials.com.
RELATED TUTORIALS
 |
 |
 |
Visit the Amazon affiliate links below for helpful books that you can use as reference when drawing birds!