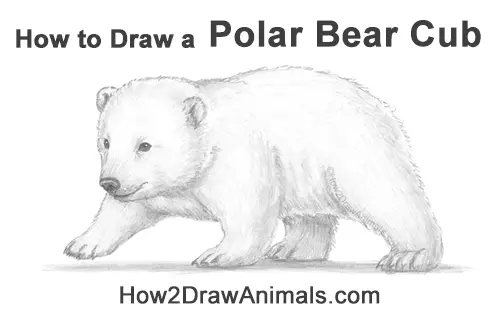
In this free art lesson, you'll learn how to draw a Polar Bear Cub step-by-step.
Stay tuned for more free drawing lessons by:
Liking us on Facebook>>
Subscribing on YouTube.com>>
Following us on Instagram>>
All of the tutorials on How2DrawAnimals.com are good drawing tutorials for beginners and experienced artists alike. The online tutorials are easy to follow; they teach you the how to draw basics while showing you how to draw animals step by step. Each animal has a video drawing tutorial option, as well as step-by-step photos and written text to follow.
RELATED TUTORIALS
 |
 |
 |
To draw this Polar Bear Cub step by step, follow along with the video tutorial below and pause the video after each step to draw at your own pace. You may find it easier to follow the step-by-step drawings below the video. The new lines in each step are shown in red, so you'll know exactly what to draw next. You may want to open the video in a new tab and use both drawing methods. Take your time and draw at your own pace.
Below you can watch a Narrated step-by-step video tutorial:
For the first few steps, don't press down too hard with your pencil. Use light, smooth strokes to begin so that it's easy to erase if you make a mistake.
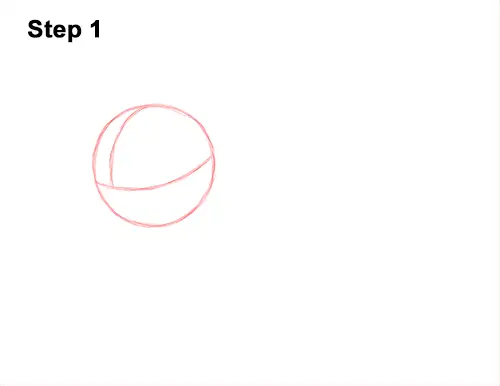
Step 1: Start by drawing a circle as a guide for the polar bear cub's body. To draw the circle, first make four marks to determine its height and width. Then connect the marks using curved lines. If you're struggling to draw the circle, just trace the outer rim of a circular objects like a coin or a bottle cap. For a more detailed guide on the different ways to draw a circle check out this tutorial: Four simple ways to draw a circle. Inside the circle draw two curved lines as guides to help you place the facial features later on.
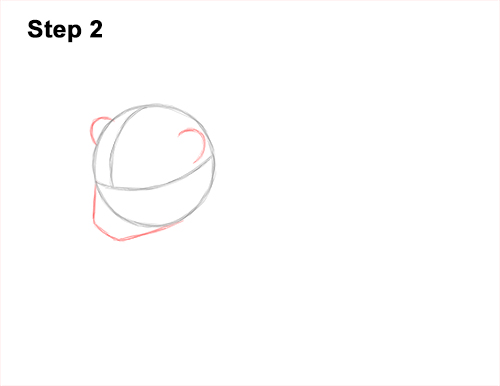
Step 2: On the bottom, left side of the head, draw an angled line as a guide for the polar bear's muzzle. Pay attention to the size of this guide in relation to the head circle. The shape should be similar to a trapezoid. At the top, draw two small arcs as guides for the ears.
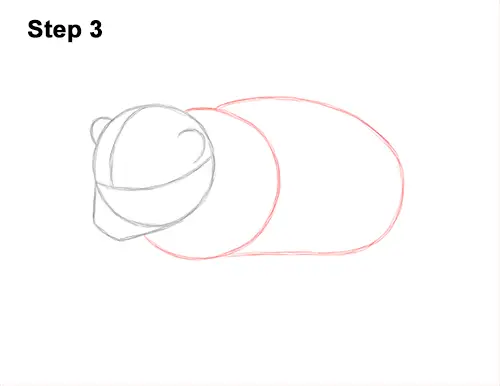
Step 3: To the right of the head, draw a circle as a guide for the front part of the cub's body. Don't overlap the head as you draw this circle. Farther left, draw a long, curved line as a guide for the back portion of the body. Don't make these shapes too big or the body will be too long.
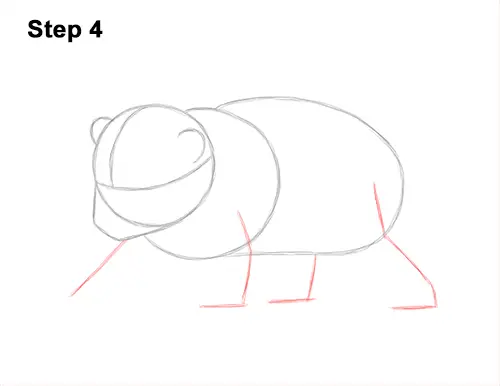
Step 4: Under the body, draw four lines as guides for the polar bear cub's legs. Bend the lines to indicate the feet and joints. The line on the far left should be straight to indicate the bear stepping forward.
That's it for the guidelines! From this point on, press down harder with your pencil for a more defined drawing of a polar bear cub.
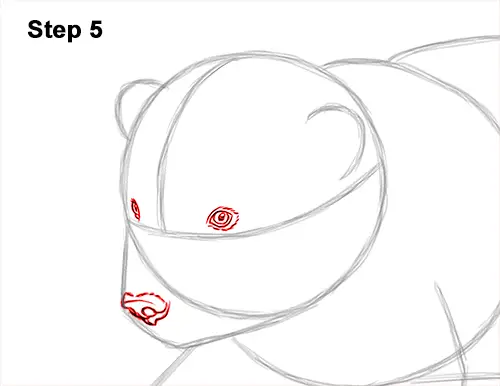
Step 5: Inside the head, draw two small circles for the bear's eyes. Use the lines as guides to help you position the eyes inside the head. Make the sides of the shapes pointy for the corners of the eyes. Inside each eye, draw two small circles for the pupils and for highlights. Shade in the pupils. Draw a few lines around the eye for fur. On the tip of the muzzle, draw an oval as a guide for the nose. Use curved lines along the bottom of the shape to create the nostrils and a wavy line for the top of the nose.
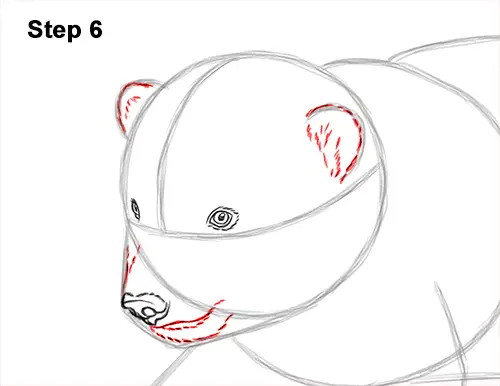
Step 6: Draw a line under the nose to create the cub's mouth. Under the mouth, draw another curved line for the chin. Add a couple of lines on top of the nose for the top of the muzzle. Use short strokes as you darken the lines to create a furry texture. Darken the shapes on top of the head using short strokes to create the ears. Add a few more short strokes within the shapes for the furry ear openings.


