







How to Draw a Cat (Stretching)
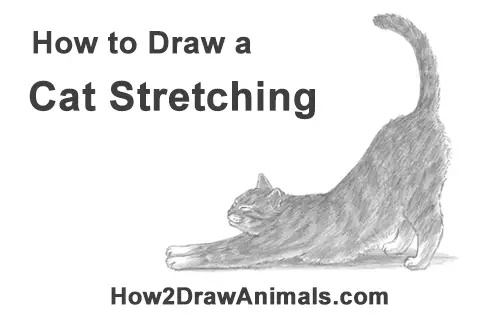
Please PAUSE the "How to Draw a Cat (Stretching) Playing" video after each step to draw at your own pace.
Time-Lapse (Speed Drawing) video:
Written step-by-step video tutorial:
For the first few steps, don't press down too hard with your pencil. Use light, smooth strokes to begin.
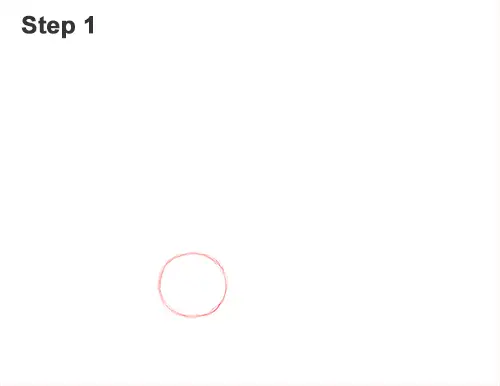
Step 1: Draw a circle near the bottom of the paper as a guide for the stretching cat's head. First make four small marks to indicate the circle's width and height. Then connect the marks using curved lines to form the rest of the circle. If you're struggling drawing the circle, trace the outer rim of a coin, a button or any other object with a circular edge.
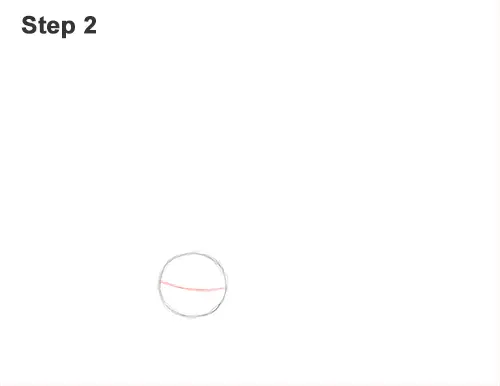
Step 2: Draw a curved horizontal line across the head. This construction line will help you place the cat's facial features later.
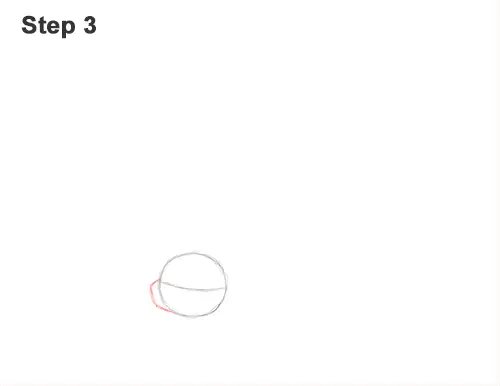
Step 3: Outside of the head, on the left side, draw a short, angled line as a guide for the cat's muzzle. This line should be similar to the letter C but more angular.
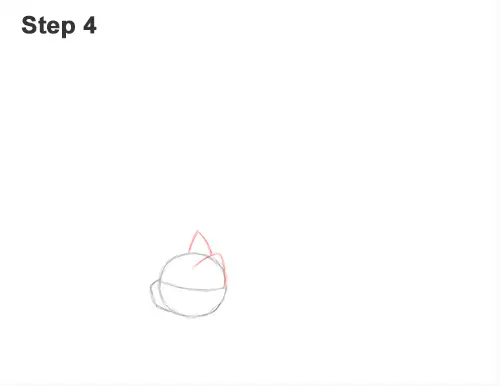
Step 4: Above the construction line, near the right side, draw a triangle-like line as a guide for the first ear. On top of the cat's head, draw a thinner triangle-like line as a guide for the other ear.
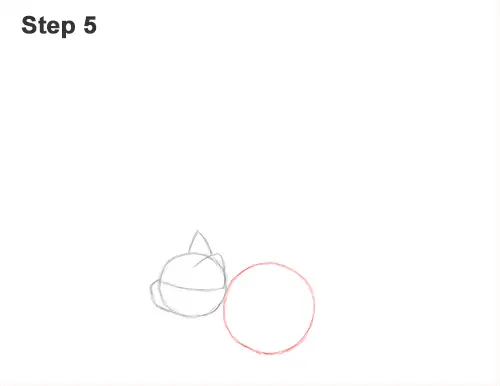
Step 5: To the right of the head, draw another circle as a guide for the front part of the cat's body. First make four small marks for the circle's height and width, then connect the marks using curved lines. This circle should be almost twice as big as the head, and their edges should touch.
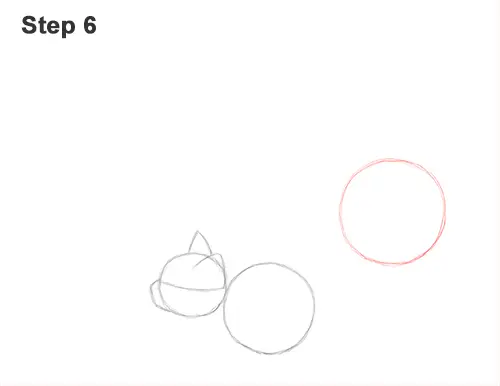
Step 6: On the upper, right side of the head, draw another circle as a guide for the back portion of the body. Don't place this circle too high up, otherwise the stretching cat's body will be too long. This circle should be almost twice as big as the circle for the front part of the body.
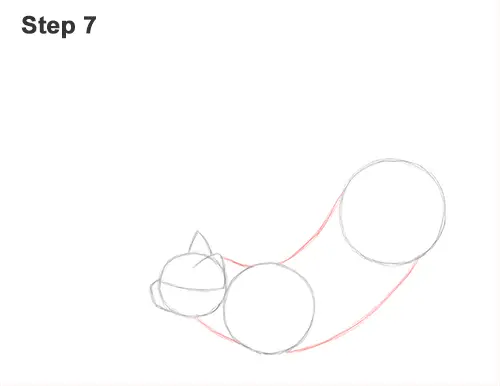
Step 7: Draw two short lines that connect the head to the second circle to form the cat's neck. Draw two more lines to connect the other two circles to form the rest of the body. The line at the bottom should be longer and curvier than the line at the top.
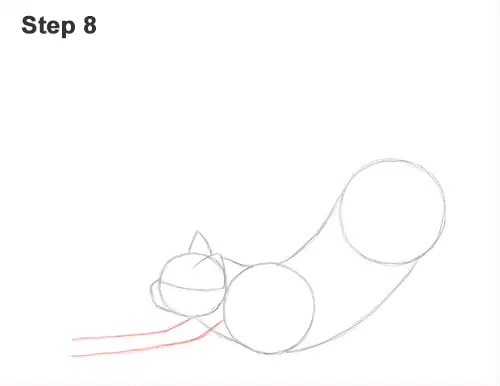
Step 8: Starting at the neck, draw a long horizontal line as a guide for the first outstretched front leg. The line angles a bit on the right side. Add a parallel line above it for the cat's other front leg.
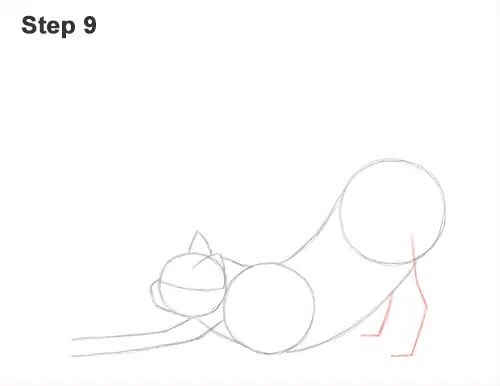
Step 9: Under the circle on the right, draw long vertical line as a guide for the stretching cat's first hind leg. This line should angle near the middle and at the tip for the joints. Add a similar line on the left for the other leg.
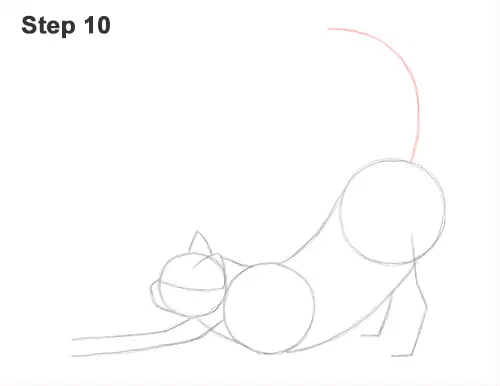
Step 10: On top of the circle on the right, draw a long, curved line as a guide for the tail. The cat's tail can go in any direction, so feel free to change this guide if you'd like.
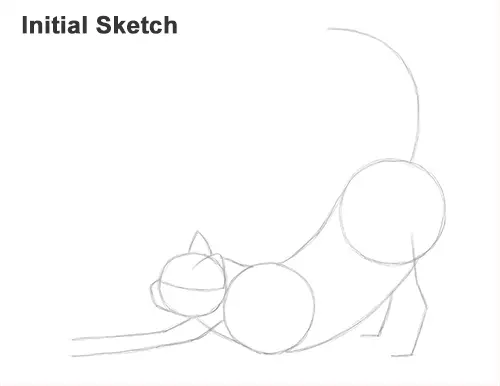
That's it for the initial sketch! From this point on, press harder with your pencil to get a more defined sketch.
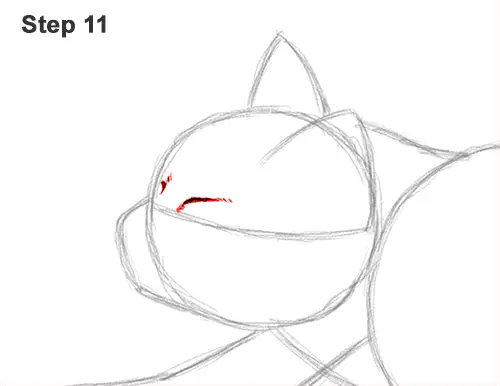
Step 11: Above the construction line, near the left side, draw a short line for the cat's closed eye. Make the line thick and pointy at the ends. Pay attention to the size of this line in relation to the rest of the head. Add a few quick, short strokes on the sides to represent fur. Draw an even shorter line on the left for the other closed eye that's barely visible.
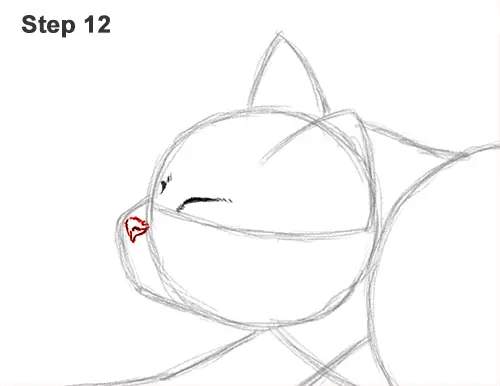
Step 12: Lightly sketch a couple of lines so that they form a triangle-like shape with the tip of the cat's muzzle for the nose. When you get the size and placement of the nose right, darken the lines. Draw a wavy line inside the nose, on the right side, for the nostril.
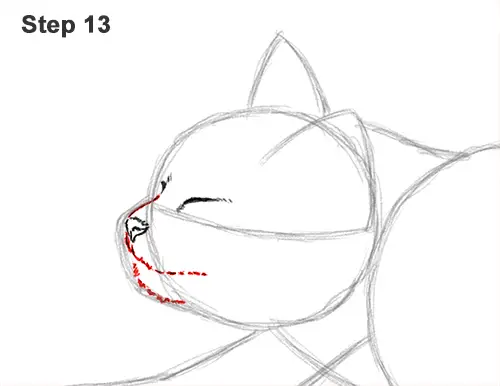
Step 13: Use the small angled line as a guide to draw the rest of the cat's muzzle. Draw a line under the nose that's made up of quick, short strokes for the mouth. The mouth should stretch to the right until it's under the closed eye. Use quick, short strokes as you follow the bottom edge of the guide to create the chin.
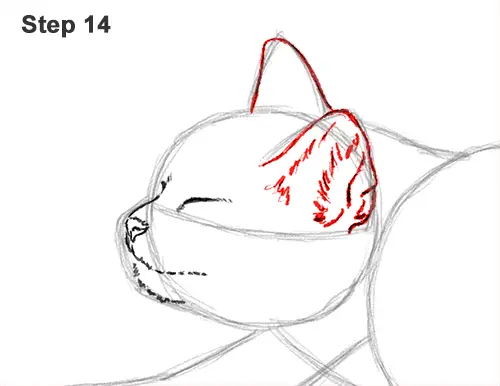
Step 14: Use the triangle-like lines on the head as guides to draw the cat's ears. Darken the lines but make them wavier to give them a more organic feel. Inside the ear on the right, draw a series of short lines to indicate the structure and fur.
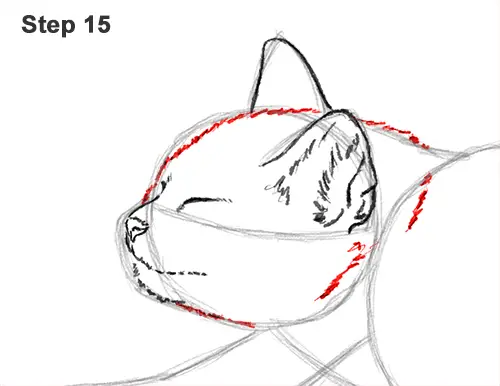
Step 15: Use the initial circle as a guide to draw the rest of the head. Draw quick, short strokes along the basic path of the initial circle to create the shape of the cat's head. Leave a gap along the lower, right side to indicate where the head connects to the neck and body. Add a few strokes along the guides to the right of the ears for the neck.
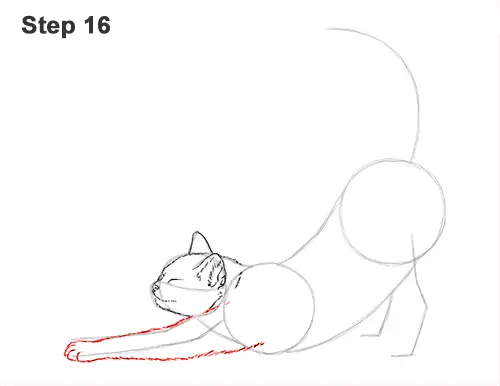
Step 16: Use the long horizontal line on the bottom, left side as a guide to draw the cat's first leg. Follow the path of the guide and lightly sketch the shape of the leg around it. The top edge of the leg should overlap the guide line for the other front leg. When you get the shape of the leg right, darken the lines. The base or right side of the leg should be thick, and it should gradually get thinner toward the foot. Add a couple of curved lines at the tip for the toes and use quick, short strokes on the bottom for fur.
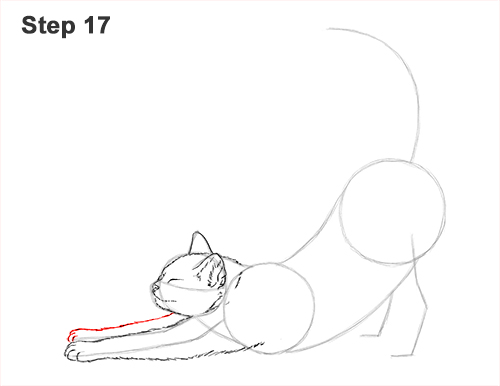
Step 17: Draw the other front leg the same way, except the bottom portion will be behind the first leg. The base of this leg should end under the head. The top edges of the legs should be parallel.
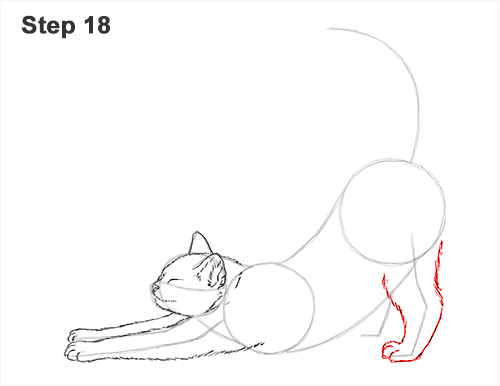
Step 18: Use the line under the body, on the far right side, as a guide to draw the stretching cat's first hind leg. Sketch lightly at first as you draw the leg around the guide. Curve the shape to indicate the joints. When you get the structure of the leg right, darken the lines. Use quick, short strokes at the top of the leg for the fur, and a couple of curved lines at the tip of the foot for the toes. The top of the cat's leg should be wide, and it should gradually get thinner at the bottom.
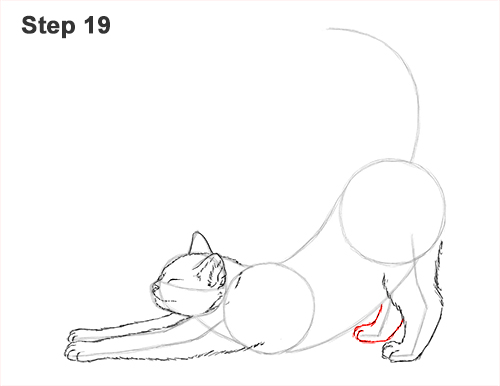
Step 19: Use the last line under the body as a guide to draw the cat's other hind leg. The top portion of the leg will be behind the body, so just draw the visible bottom half.
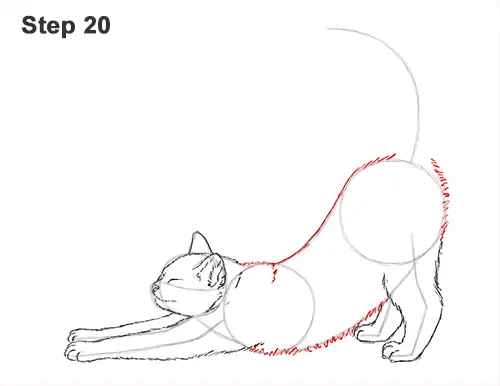
Step 20: Use the remaining lines and shapes as guides to draw the rest of the stretching cat's body. Simply darken the outer edges of the guides to create the shape of the body. Use quick, short strokes mainly along the underside to represent the fur. Add a few strokes along the back, near the head, to emphasize the skin folds among the fur.
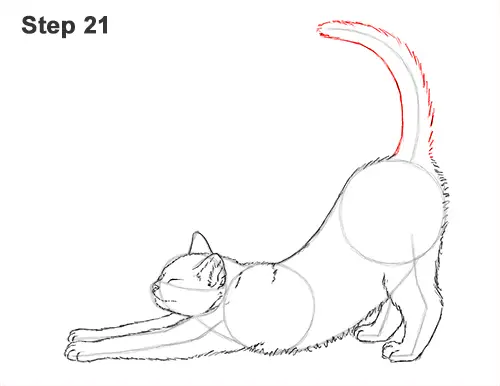
Step 21: Use the curved line on top of the body as a guide to draw the cat's tail. Follow the path of the guide and draw the shape of the tail around it. Use quick, short strokes on the tip and on the right side of the tail for the fur.
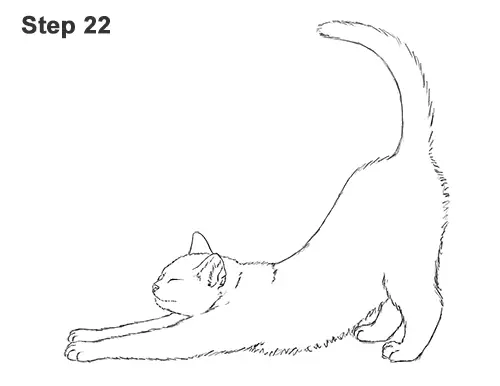
Step 22: For a cleaner look, erase as much as you can of the initial guide lines. Don't worry about erasing all of the guides. It's okay to leave some behind. Re-draw any final sketch lines you may have accidentally erased.
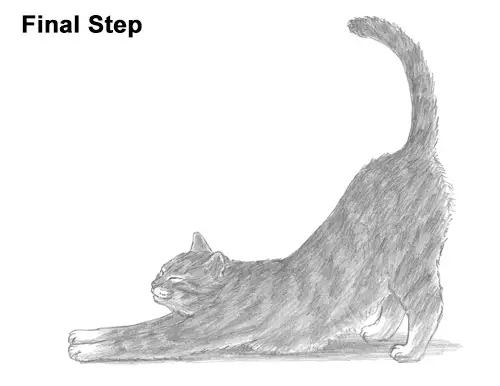
Final Step: Add some shading to your stretching cat drawing to give it more dimension and volume. Pick the direction of the light source when shading so that the shadows are consistent with it. Vary the pressure on your pencil to get different degrees of tonal value.
Add a cast shadow underneath. This helps ground the cat so it doesn't appear to be floating.
You can add even more value throughout your drawing for extra detail. You can also skip this step entirely if you prefer a white cat instead. For a tabby cat like this, use a medium value as a base and add a dark value on top for stripes. The area around the eyes and muzzle should be white.
Add the base and stripes to the body too. As you add the value to the body, use strokes that go in the general direction of the fur. As you add the value to the body, use strokes that go in the general direction of the fur. Cats have a variety of coat patterns, so feel free to shade yours differently. You can even color it!
Shading can be very time-consuming, so be patient and take breaks. It's always a good idea to use reference as you draw. If you have a pet cat, try to duplicate its coat pattern on your drawing. Don't forget to pause the video after each step to draw at your own pace.
Thanks for visiting! Subscribe to the How2DrawAnimals YouTube Channel for a new tutorial every Saturday.
To learn how to draw popular cartoon characters, visit EasyDrawingTutorials.com.
RELATED TUTORIALS
 |
 |
 |