







How to Draw an Octopus
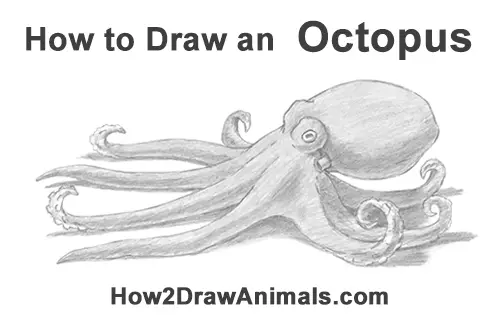
Please PAUSE the "How to Draw an Octopus" video after each step to draw at your own pace.
Time-Lapse (Speed Drawing) video:
Written step-by-step video tutorial:
For the first few steps, don't press down too hard with your pencil. Use light, smooth strokes to begin.
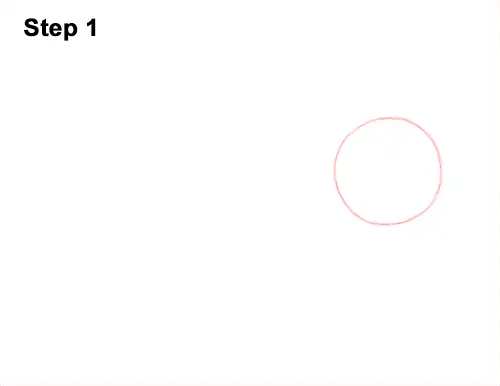
Step 1: Draw a circle near the right side of the paper as a guide for the main part of the octopus's body. First draw four small marks to indicate the height and width of the circle, then connect the marks using curved lines. Sketch lightly at first so that it's easy to erase if you make mistake. But the circle doesn't have to be perfect. It's just a guide. If you're having a hard time drawing the circle, trace the outer rim of a glass, a lid or any other object with a circular edge. For a more detailed guide on the different ways to draw a circle check out this tutorial: Four simple ways to draw a circle.
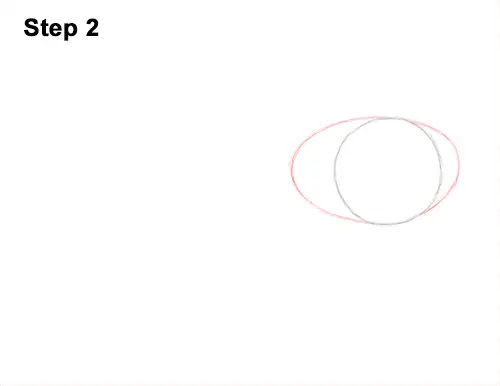
Step 2: Draw an arc on either side of the body as a guide for the second part of the octopus's body. First make a small mark to indicate the height of the arc, then connect the mark to the circle using curved lines. The arc on the right side of the circle should be a lot shorter. The end result should look like a giant eye.
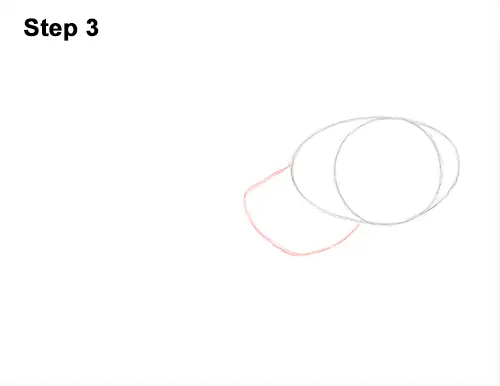
Step 3: Add the lower half of the body by first drawing two sloping lines on the left side. Then draw another curved line on the left side to close up the shape and complete the guide for the octopus's body.
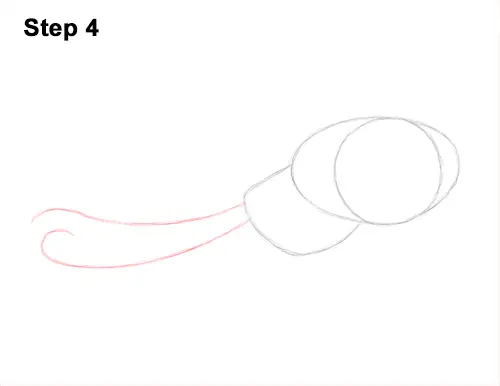
Step 4: Draw the guide for the octopus's first tentacle as a long line the stretches toward the left. Sketch the line lightly at first to determine where the tentacle will go, then darken the guide. Add another line above for another tentacle. For an easier drawing, don't curve the tips of the guide lines.
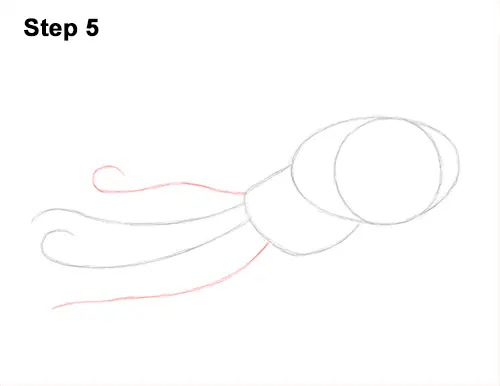
Step 5: Add two more lines to the left of the octopus's body two more tentacles. Make the guide lines curve more or wavier if you'd like. You can also draw them longer.
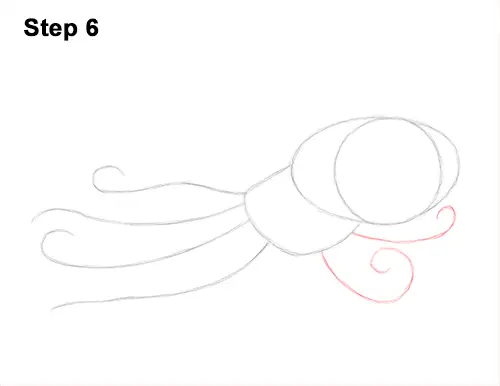
Step 6: Draw a couple more lines on the right side of the octopus's body for more tentacles. To make it more challenging, curve the guides into a spiral. For an easier drawing, make the lines straight. You can also make the guide lines shorter if you don't have enough room on the paper.
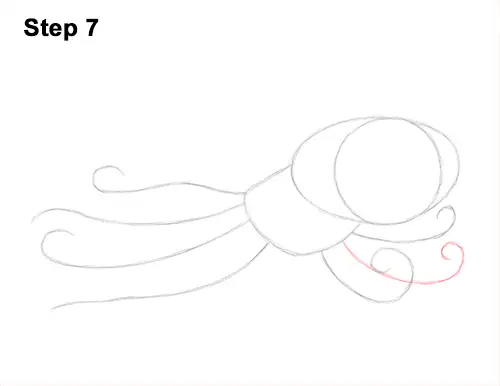
Step 7 (optional): If you'd like, you can draw another guide line that overlaps the others. You can also skip this step and pretend that the other two of the eight tentacles are behind the octopus's body :)
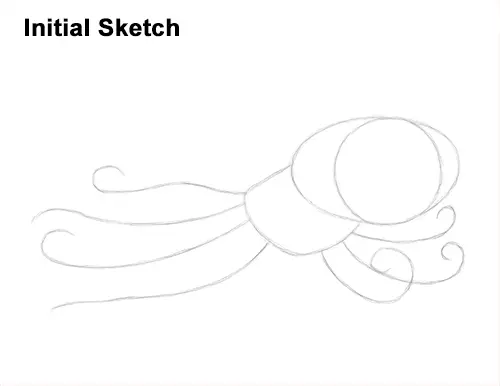
That's it for the initial sketch! From this point on, press harder with your pencil to get a more defined sketch.
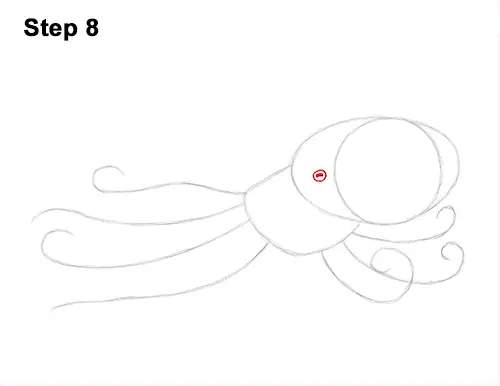
Step 8: Outside of the first circle, on the left side, draw a small circle for the octopus's eye. Sketch lightly at first. When you get the size and placement right, darken the line. Inside the circle, draw a small rectangular shape and shade it in for the pupil.
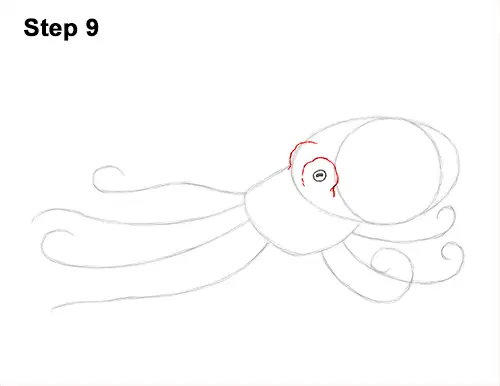
Step 9: Draw a circular line around the eye for the fleshy structure that surrounds it. Make the line a bit wavy as you draw it around the eye to make it more organic. Along the edge of the initial arc, draw another wavy line for the octopus's eye on the other side.
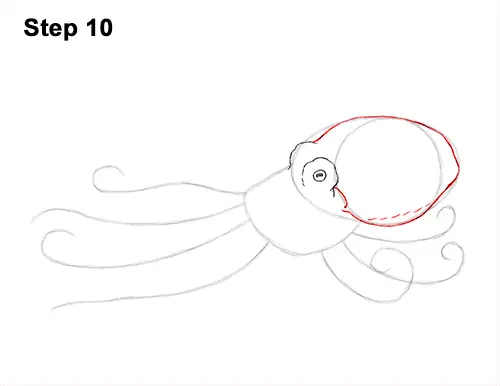
Step 10: Use the initial circle and arcs as guides to draw the rest of the mantle. Simply darken the outer edges of the initial guides to create the shape of the octopus's mantle. Add a small curved line below the eye as the opening for the siphon.
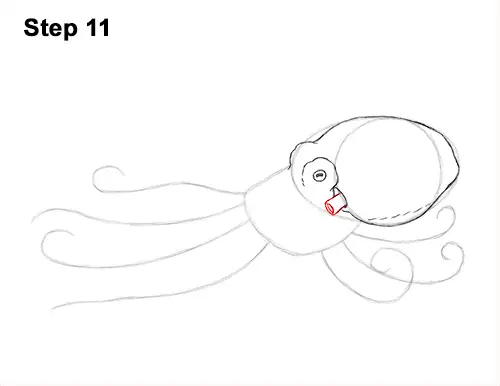
Step 11: Below the eye, draw the siphon or funnel using a few short, curved lines. Octopuses expel water out of the siphon for locomotion. The siphon should be similar to a cylinder.
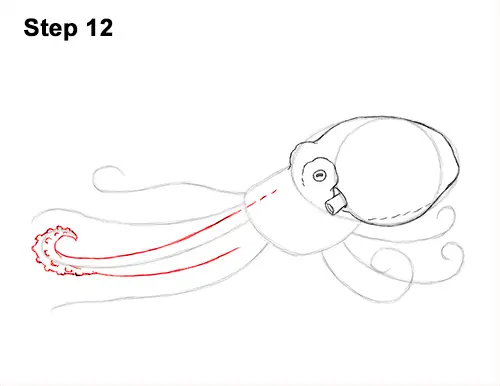
Step 12: Use the long lines as guides to draw the tentacles. Start with the lower lines because they will overlap the top lines. Follow the path of the guide as you draw the shape of the tentacle around it. Use light strokes at first, and then darken the lines when you get the shape of the tentacle right. Curve the shape of the tentacle along the path of the guide. Add some curved lines on the outer edge for the suction cups. The suction cups are on the underside of the octopus's tentacles, so they should only be visible on the tip that's curved. The base of the tentacle should be thick, and it should gradually get thinner toward the tip.
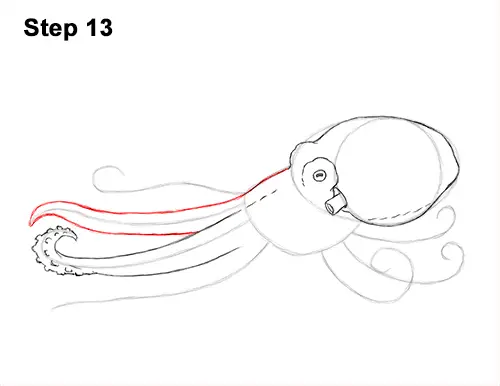
Step 13: Use the line above as a guide to draw the next tentacle. Follow the path of the guide as you draw the shape of the octopus's tentacle around it. Make the base thick and the tip thin. If you chose to not curve your guide lines in the initial steps, drawing the tentacles will be a lot easier.
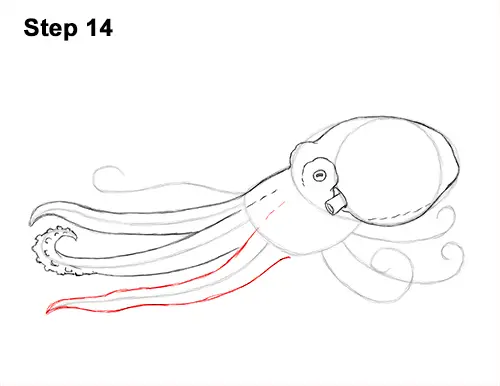
Step 14: Use the bottom line as a guide to draw the octopus's third tentacle. Remember to sketch the shape of the tentacle lightly at first and only darken the lines when you like the structure. Make the lines wavier for a more organic, less rigid structure.
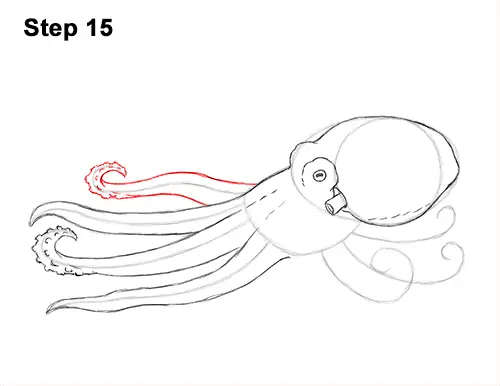
Step 15: Use the line at the top as a guide to draw the fourth tentacle the same way. Be sure to draw the base thick and gradually make it thinner toward the tip. Because this tentacle is curved, add a few short, curved lines along the outer edge for the suction cups. Octopuses have two rows of suction cups per tentacle, so add a few short, curved lines within the shape as well.
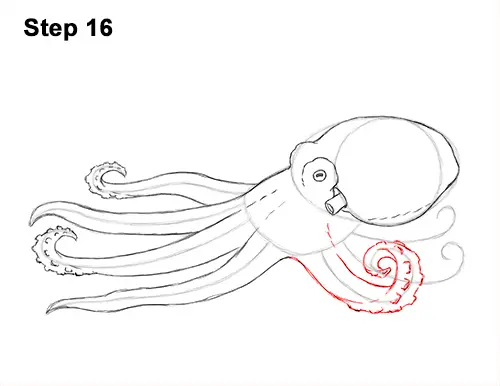
Step 16: Use the lowest line on the right side as a guide to draw the octopus's next tentacle. If you curved your initial guide line like this one, drawing the tentacle can be tricky, but just follow the path of the guide. This tentacle is curved in a way that the bottom section is facing us, so some lines will overlap.
Pause the video to draw at your own pace. If the tentacle is getting too complicated, you can always straighten it out. This tentacle is curling a lot more than the previous ones, so the suction cups will be at the tip and on the right side. Make the right, curved edge of the tentacle bumpy for the suction cups. Add a series of short, curved lines within the octopus's tentacle for the second row of suction cups.
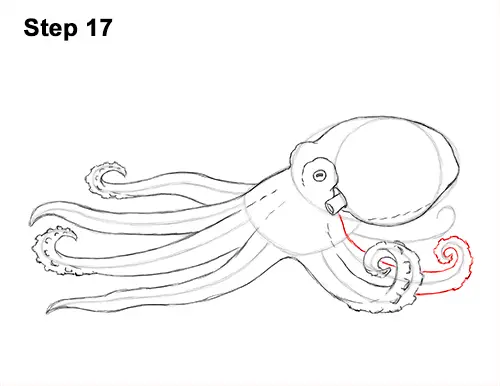
Step 17: Use the next line up as a guide to draw the octopus's sixth tentacle. For an easier way to draw a curved tentacle, draw it in profile or the side of it and don't worry about the underside. Using this method, you just draw the side of it without much of the bottom and suction cups showing.
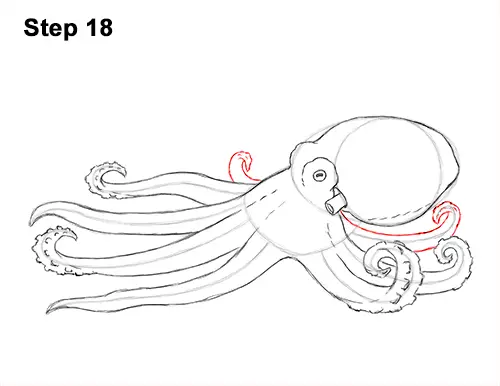
Step 18: Use the last line as a guide to draw the final tentacle. This tentacle is stretching away from the body, so the underside shouldn't be too visible. You can stop here and assume that the last tentacle is stretched out behind the octopus's body. If you'd like all the tentacles to show, you can add one more somewhere else around the body. You can either freehand the eighth tentacle or start with a guide line like with the others.
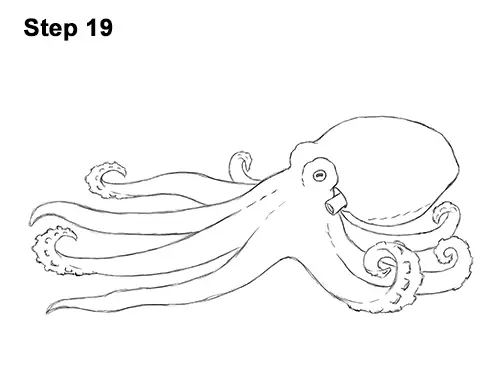
Step 19: For a cleaner look, erase as much as you can of the initial guide lines. Don't worry about erasing all of the guides. It's okay to leave some behind. Re-draw any final sketch lines you may have accidentally erased.
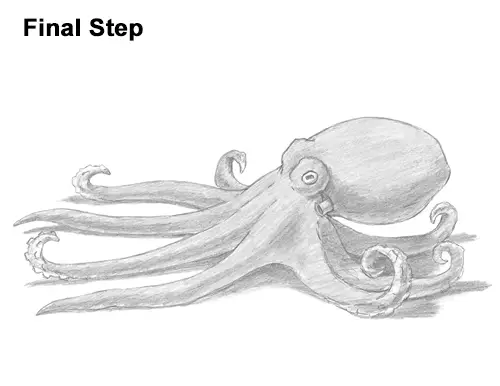
Final Step (optional): Add some shading to your octopus drawing to give it more dimension and volume. Pick the direction of the light source when shading so that the shadows are consistent with it. Because the octopus will be at the bottom of the ocean floor, the light will come from the top, so the shadows will be mainly near the bottom. Vary the pressure on your pencil to get different degrees of tonal value. Try to add the value smoothly for an even surface and avoid a rough, gritty texture. For a more detailed guide on how to shade, check out this tutorial: How to shade.
Add a cast shadow underneath. This helps ground the octopus so it doesn't appear to be floating. You can also skip this step and instead draw a few circles around the octopus to represent bubbles as it floats in the ocean.
You can add even more value throughout your drawing for extra detail. Octopuses can change the appearance of their skin, so you can shade yours any way you want. For a simpler drawing, add a medium value all over the body except to the underside of the tentacles. Adding the value can be time- consuming, so be patient and take breaks. It's always a good idea to use reference as you draw. And don't forget to pause the video to draw at your own pace.
Thanks for visiting! Subscribe to the How2DrawAnimals YouTube Channel for a new tutorial every week.
To learn how to draw popular cartoon characters, visit EasyDrawingTutorials.com.
RELATED TUTORIALS
 |
 |
 |