







How to Draw a Faun / Satyr
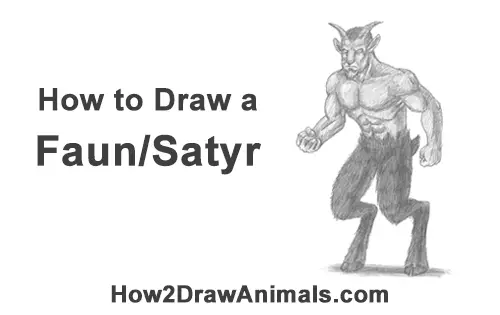
Please PAUSE the "How to Draw a Faun/Satyr" video after each step to draw at your own pace.
Time-Lapse (Speed Drawing) video:
Written step-by-step video tutorial:
For the first few steps, don't press down too hard with your pencil. Use light, smooth strokes to begin.

Step 1: Draw a small circle near the top of the paper as a guide for the faun or satyr's head. First make four small marks to indicate the circle's height and width. Then connect the marks using curved lines. If you're struggling drawing the circle, trace the outer rim of a coin, a lid or any other object with a circular edge.
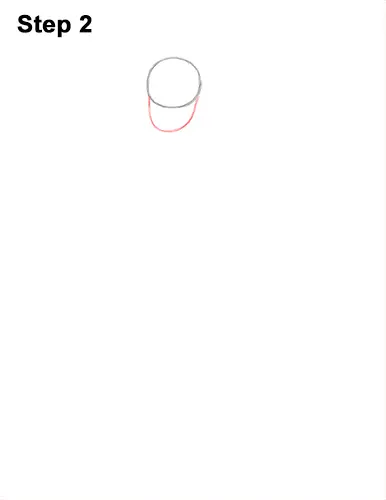
Step 2: Draw a small, U-shaped line under the circle as a guide for the lower part of the faun's head. The farther down this curved line is, the longer the head will be.
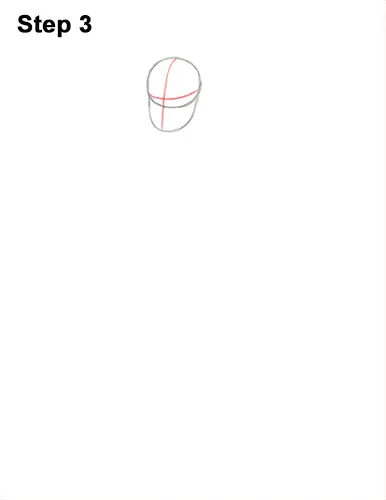
Step 3: Draw a long, vertical line across the whole head for a construction line. Curve the line a bit to contour to the shape of the head. Now add a horizontal line. These construction lines will help you place the faun's facial features later.
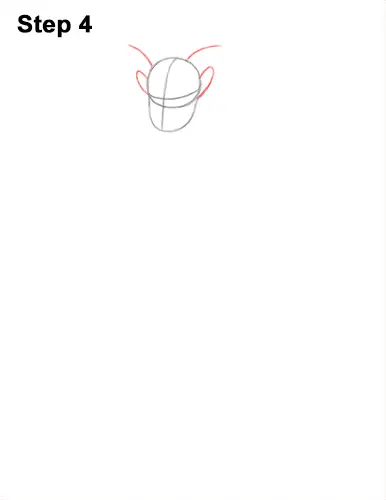
Step 4: On either side of the head, draw two short arcs as guides for the faun's ears. The bigger you make these arcs, the bigger the ears will be. At the top of the head, draw two curved lines as guides for the horns. Draw the lines for the horns longer or shorter depending of whether you want a faun or satyr.
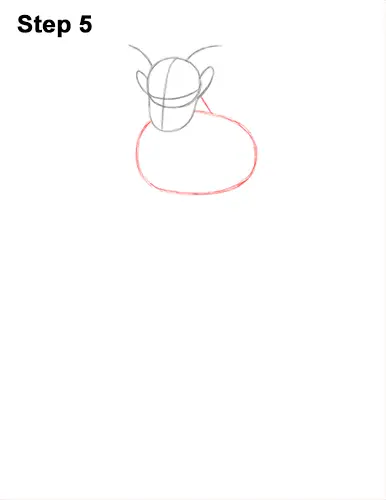
Step 5: Under the head and to the right, draw a big oval as a guide for the top part of the torso. Just like with the circle, first make a few marks to indicate the oval's width and height. Then connect the marks using curved lines. Pay attention to the size of the oval in relation to the head. Add a short, sloping line at the top as a guide for the faun's neck.
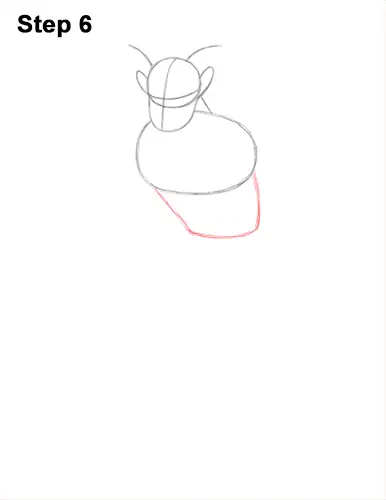
Step 6: Under the oval, draw the guide for the middle of the faun's torso using a few lines. This guide consists of a sloping line on either side connected by a curved line at the bottom.
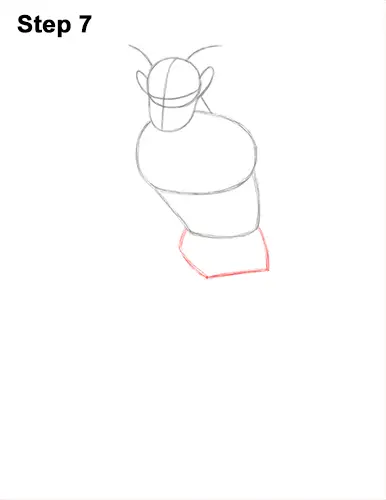
Step 7: Add the guide for the faun's lower torso by first drawing a short line on either side. Then draw two sloping lines below that come to a point at the bottom.
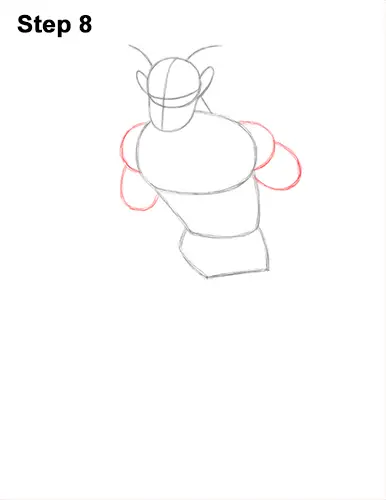
Step 8: On the top, left side of the torso, draw a small half-circle as a guide for the faun's first shoulder. Now add another half-circle on the top, right side as a guide for the other shoulder. Below each half- circle, draw a U- shaped line as a guide for the middle of the arms. The U-shaped guide on the right should be tilted more.
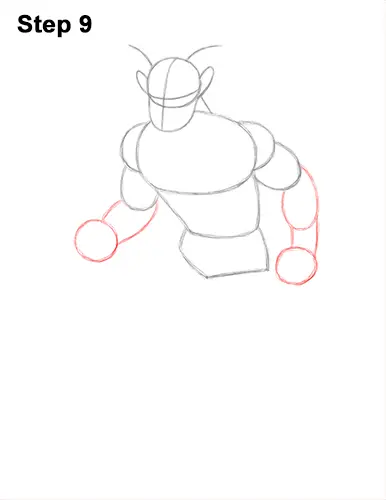
Step 9: On the left side, draw two short lines for the faun's forearm. These lines should curve to the left. Pay attention to their length. At the end of the lines, draw a small circle as a guide for the fist. On the right side, draw a small, oval- like shape as a guide for the other forearm. Below the faun or satyr's forearm, draw another small circle as a guide for the other fist.
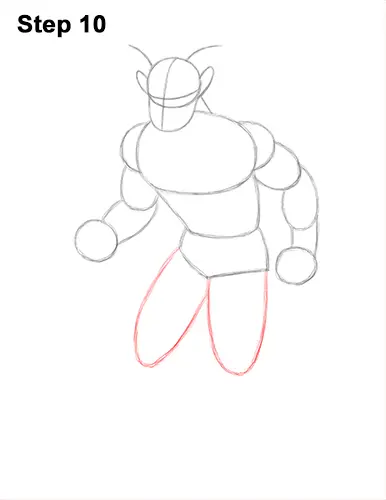
Step 10: Draw the leg on the right by first making a small mark at the bottom to indicate its length. Now connect the mark to the torso using long, curved lines so that it ends up looking like the letter U. Draw the guide for the faun's other leg the same way, except it should slope to the left a bit more.
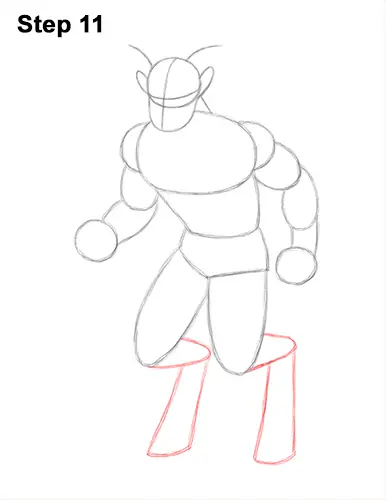
Step 11: Under each U-shaped line, draw a vertical arc for the middle part of the faun's leg. These arcs emphasize the way the legs angle backward before going down. Now add the bottom of the legs by drawing a series of long, vertical, sloping lines below. These shapes should be a bit wider at the bottom. Close the bottom off with a curved line.
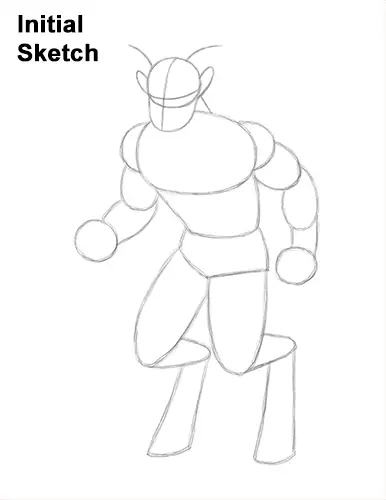
That's it for the initial sketch! From this point on, press harder with your pencil to get a more defined sketch.
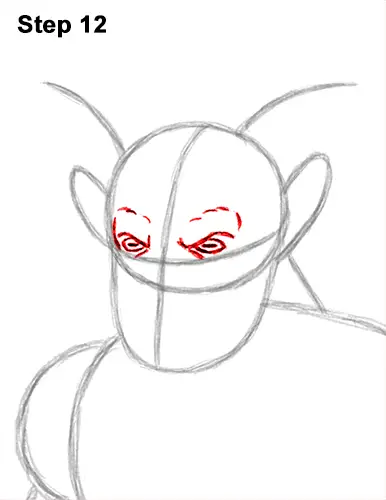
Step 12: Lightly sketch the faun's eyeballs inside the head as two small ovals. Use the initial lines as guides for the size and placement of the eyes. Above each eye , draw a short, diagonal line for the eyebrows. Darken the shape of the ovals under the eyebrows. Add a few more lines around the eyes to emphasize the thick brow. Add a few more lines around the eyes for extra detail on the wrinkles. Add a slit inside each eyeball for the goat-like pupils. You can also leave them blank for a more menacing look.
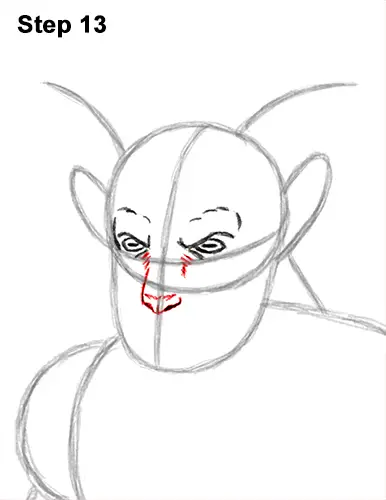
Step 13: Lightly sketch a small, triangle-like shape below the circle guide for the faun's nose. When you get the size and placement right, darken the sides of the triangle for the nostrils. Darken the rest of the nose. Add a couple of lines on the sides that lead up to the eyes. Use a series of short strokes to create a fur-like texture on the bridge of the faun or satyr's nose.
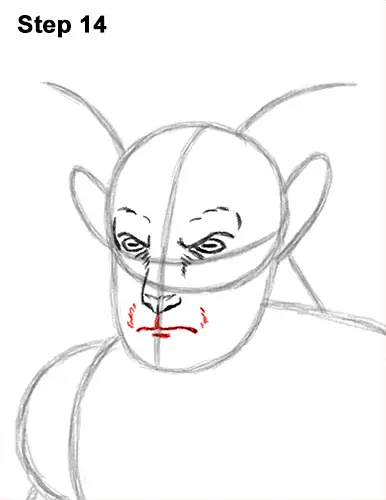
Step 14: Under the nose, draw a wavy, horizontal line for the mouth. The faun's mouth should connect to the nose with a short line in the middle. Add a series of short strokes on the sides for the muzzle and a line at the bottom for the lip.
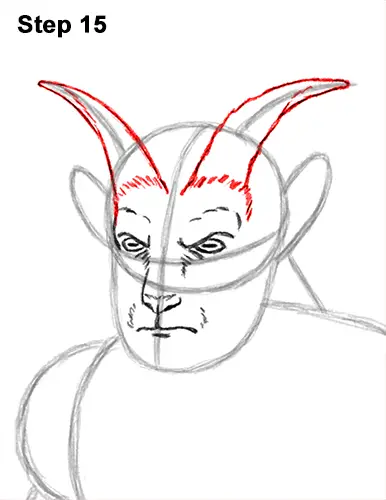
Step 15: Above the eyes, draw a series of short strokes for the base of the faun's horns. The strokes should form an arc over the eyes and below the guides for the horns. Now use the lines on top of the head as guides to draw the shape of the horns. Follow the basic path of the guide as you draw the shape of the horn around it. Make the tip of the horns pointy and the bases thick. Fauns and satyrs are mythical creatures, so you can make the horns as long or short as you'd like.
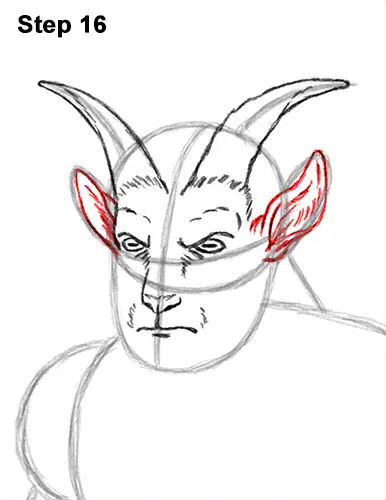
Step 16: Use the arcs on the sides of the head as guides to draw the faun's ears. Darken the arcs and add a few lines inside the shape for a fur-like texture. The base for the ear on the right should be inside the head.
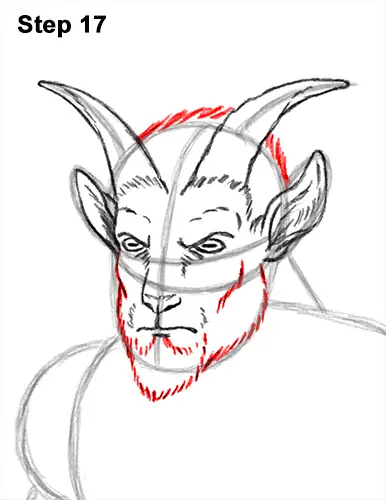
Step 17: Use the remaining lines as guides to draw the rest of the faun's head. Use a series of short strokes along the top edge of the initial circle for the hair. Darken the sides of the head to create the cheekbones. Under the mouth, draw a series of short strokes for a goatee. The bottom part of the goatee should extend farther out than the original guides. Darken the sides of the guides using short strokes for the jawline.
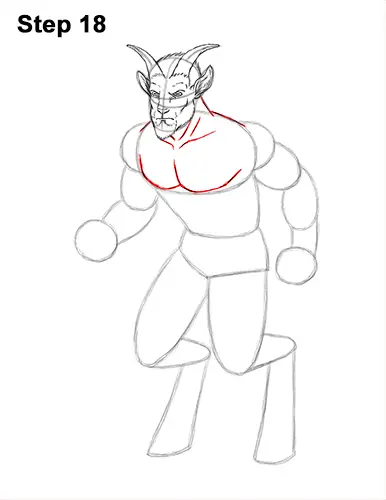
Step 18: Darken the line to the right of the head to create the neck. Use the initial oval under the head as a guide to draw the top part of the torso. Draw a series of lines under the head for the neck muscles and the clavicle. Split the shape of the oval to create the middle of the pectoral muscles. Darken the lower edge of the oval to create the bottom of the faun's chest.
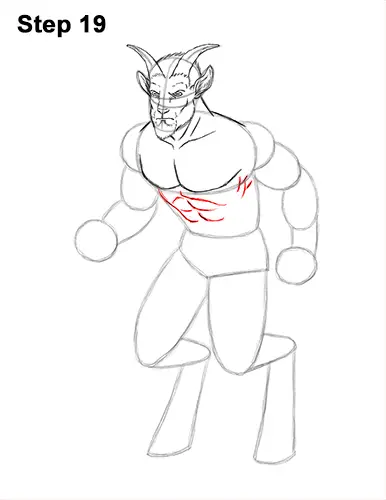
Step 19: Below the faun's chest, draw two sloping lines for the bottom of the rib cage. Darken the left side of the guide. These rib lines should be on the left side of the torso. Under the rib cage, draw four short, curved lines for the ab muscles. On the right side, under the chest, draw a series of tiny curved lines for the rib muscles.
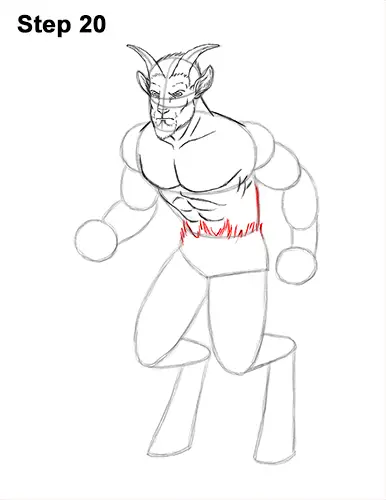
Step 20: Darken the right side of the initial guide to complete the middle section of the torso. Draw a series of short, vertical strokes along the path of the initial guide for the lower half of the torso.
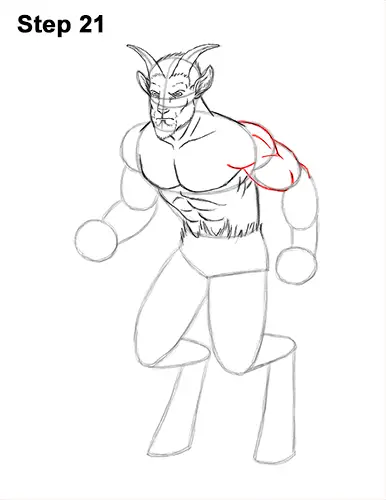
Step 21: Use the shapes on the top, right side of the body as guides to draw the shoulder. Darken the outer edges of the guides to create the basic shape of the shoulder and top part of the arm. Add a few curved lines inside the shape of the faun's arm to define the muscle structure.
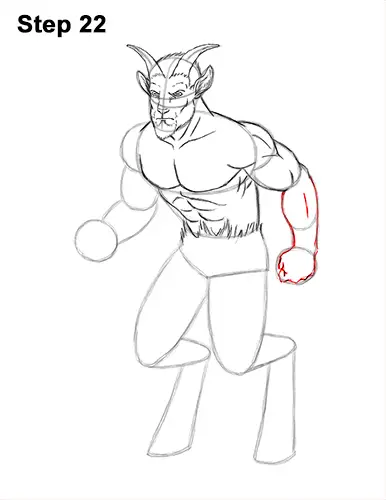
Step 22: Use the other shapes on the right as guides to draw the rest of the arm and fist. Darken the outer edges of the guides to create the shape of the forearm and fist. As you darken the bottom edge of the small circle, make the line wavy for the knuckles. Draw a series of curved, overlapping lines on the left side of the fist for the faun's folded fingers.
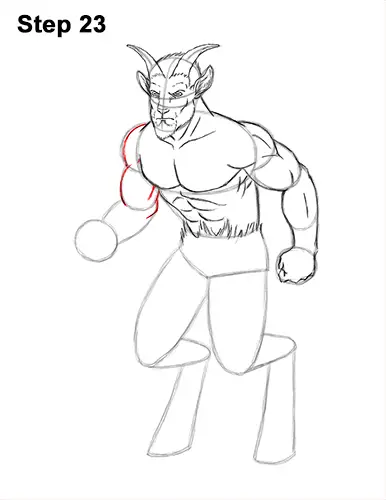
Step 23: Use the shapes on the top, left side as guides to draw the faun's other arm the same way. Darken the outline of the guides and add a few lines inside to define the muscles.
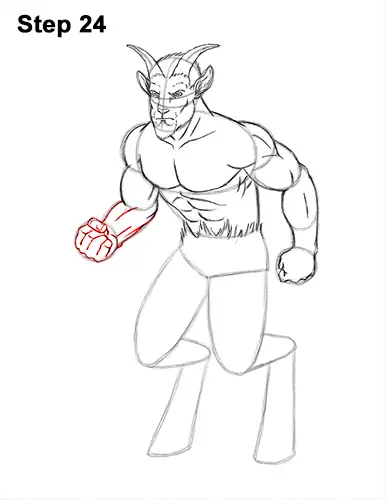
Step 24: Use the shapes to the left of the body as guides to draw the rest of the arm and fist. First draw a small rectangular shape at the top of the circle for the thumb. Now darken the outer edge of the circle but make the bottom part wavy for the knuckles. Darken the initial sloping lines to create the faun's forearm and add some lines inside for the muscles. Add a few more lines under thumb for the folded fingers. Bend the small lines to create the joints in the fingers. The shape on the right of the fist should be small because that is the pinky.
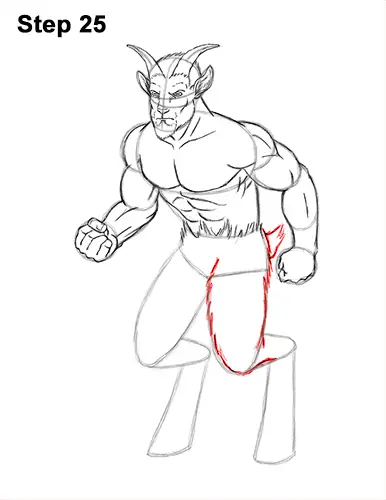
Step 25: Darken the big U-shaped line on the right to create the top part of the faun or satyr's leg. Use short strokes along the path for to create a fur-like texture. On the top, right side of the torso, draw a small triangle-like shape made up of short strokes for the tail.
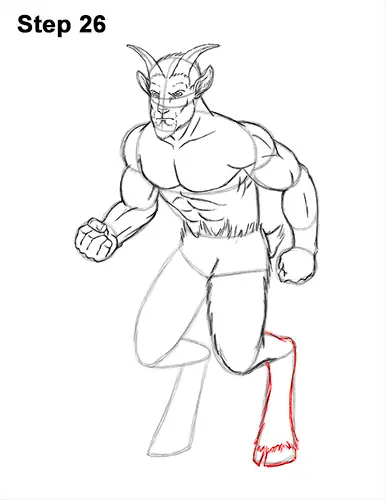
Step 26: Darken the guides on the lower, right side to create the lower part of the leg. Make the shapes a bit thinner and more curved than the guides. Add short strokes at the bottom for the edge of the fur, and split the faun's hoof with short lines.
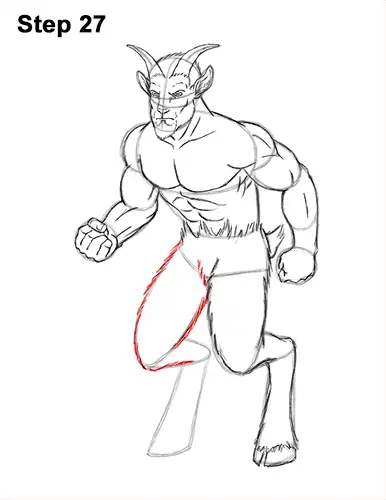
Step 27: Use the U-shaped line on the left as a guide to draw the top of the faun's other leg. Simply darken the path of the guide using short strokes for a fur-like texture.
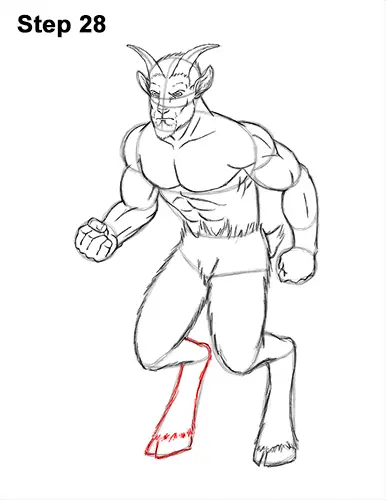
Step 28: Darken the outer edges of the remaining guides to create the bottom part of the faun's leg. Make the shape of the leg curvier. Use short strokes at the bottom for the furry texture. Split the hoof at the bottom using a few short, vertical strokes.
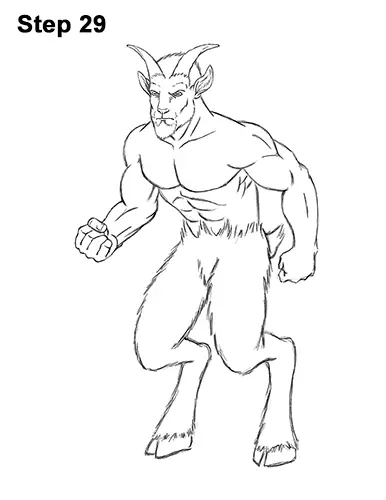
Step 29: For a cleaner look, erase as much as you can of the initial guide lines. Don't worry about erasing all of the guides. It's okay to leave some behind. Re-draw any final sketch lines you may have accidentally erased.
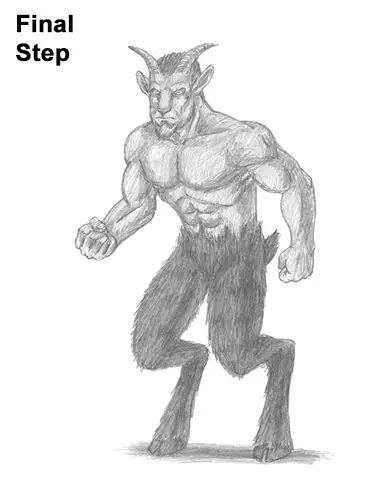
Final Step: Add some shading to your faun or satyr drawing to give it more dimension and volume. Use a dark value around the eyes to make them stand out. On the horns, alternate between a dark and light value. Use a dark value on the hair. For the face, use a medium value but a dark value for the shadows. Pick the direction of the light source when shading so that the shadows are consistent with it. Vary the pressure on your pencil to get different degrees of tonal value.
Add the value lightly at first, then gradually build up to the level of darkness that you want. Fauns and satyrs are mythical creatures, so you can shade yours differently if you'd like. You can actually give your drawing stripes or spots or even color it! For a more classic look, use a very dark value for the lower half of the body. Shading can be time-consuming, so be patient and take breaks. Continue shading until the entire body is covered.
Add a cast shadow underneath. This helps ground the faun or satyr so it doesn't appear to be floating.
Thanks for visiting! Subscribe to the How2DrawAnimals YouTube Channel for a new tutorial every Tuesday.
To learn how to draw popular cartoon characters, visit EasyDrawingTutorials.com.
RELATED TUTORIALS
 |
 |
 |