







How to Draw a Tiger Head (Cartoon)
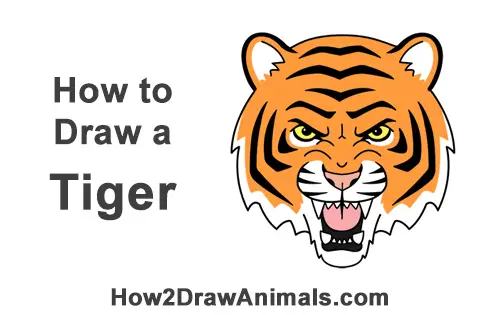
Please PAUSE the "How to Draw a Tiger Head (Cartoon)" video after each step to draw at your own pace.
Written step-by-step video tutorial:
For the first few steps, don't press down too hard with your pencil. Use light, smooth strokes to begin.
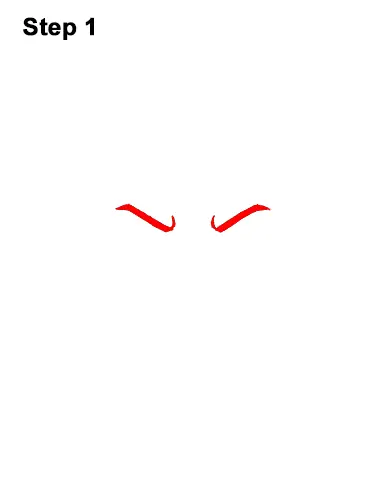
Step 1: Draw two short, sloping lines for the tiger's eyebrows. Sketch lightly at first and when you get the angles right, darken the lines. Curve the inner tip of each eyebrow up for a furrowed brow. Make the eyebrows thicker by adding more value at the tops. Try to make the tiger's eyebrows symmetrical.
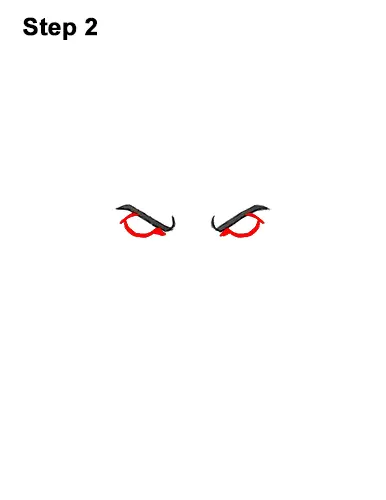
Step 2: Under each eyebrow, draw a small oval for the eyes. Sketch lightly at first and when you get the size and position of the eyes right, darken them. As you darken the ovals, make the sides pointier. Make the outline for the tiger's eyes thick and bold. Make the inner corner of each eye extra long. The corners of the eyes should be pointing toward where the nose will be.
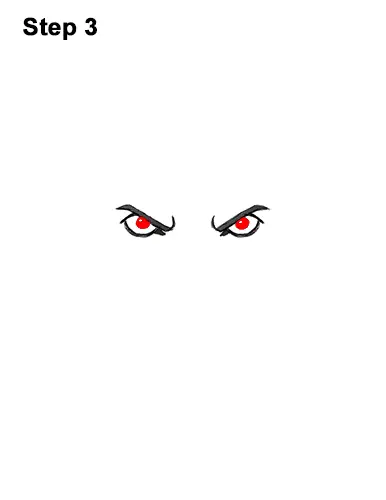
Step 3: Inside each eye, draw a small circle for the pupils. Shade in the tiger's pupils except for a tiny circle to represent glare.
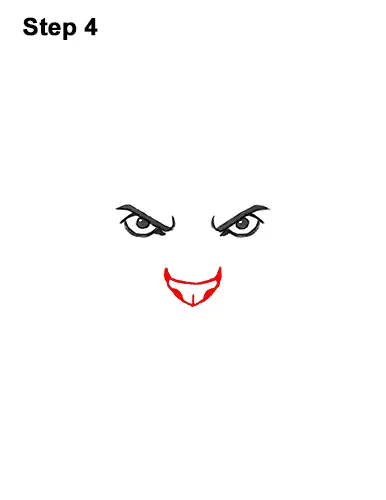
Step 4: Add the tiger's nose under the eyes by first drawing a V- shaped line. Close off the top of the V- shaped line with a horizontal line. Make the top corners of the nose thicker and darker. Draw a short line at the bottom of the nose and the nostrils on the sides.
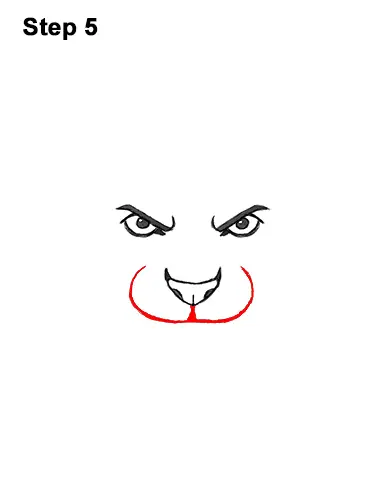
Step 5: Add the muzzle under the nose. First draw a short vertical line, then a horizontal line under that. On either side of the tiger's nose, draw a big, curved line that meets the horizontal line at the bottom. Notice how wide the muzzle is in relation to the nose and eyes.
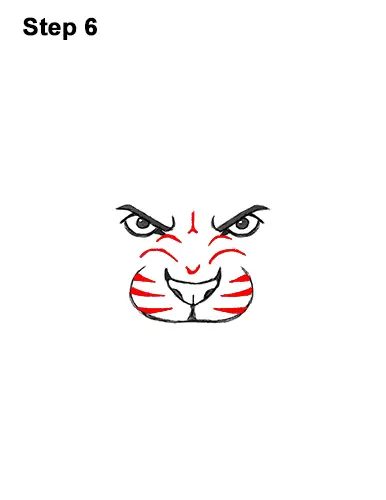
Step 6: On either side of the tiger's muzzle, draw three pointy lines for stripes. The stripes should be similar to long triangles on their sides. Shade in the stripes. Don't push down too hard if you're going to ink your drawing later. Add a few curved lines above the muzzle for wrinkles. Draw a short, curved line under the corner of each eye and another line in between the eyes. Add a couple more lines right above the nose.
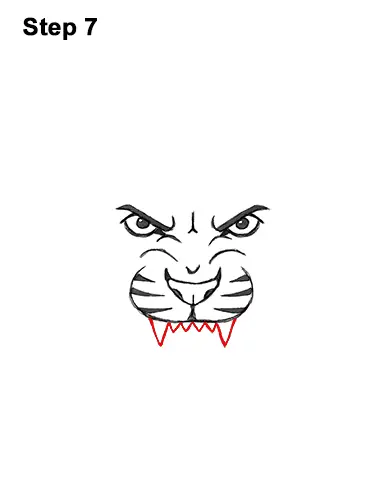
Step 7: Under the muzzle, draw a series of V-shaped lines for the tiger's teeth. The teeth on the sides should be longer than the ones in the middle. You can also make the teeth longer if you'd like.
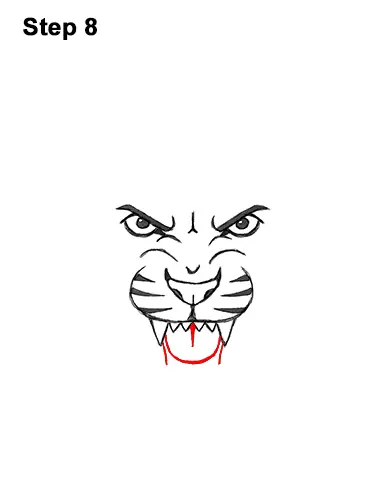
Step 8: Under each canine, draw a short line for the sides of the open mouth. Inside the mouth, draw a big U-shaped line for the tiger's tongue.
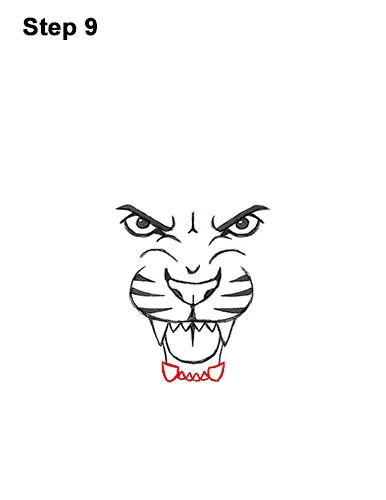
Step 9: Below the tongue draw a series of triangle- like shapes for the lower row of teeth. The tiger's teeth on the sides should be bigger than the teeth in the middle.
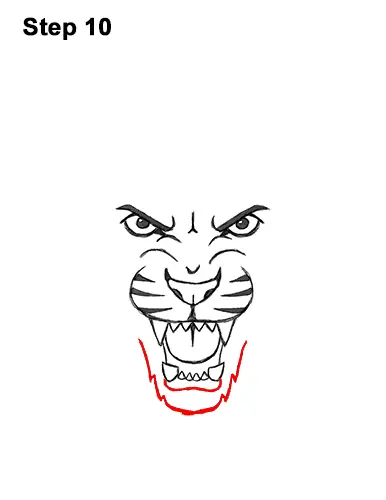
Step 10: Under the bottom row of teeth, draw a wavy line for the gums. Below the gums, draw long line similar in shape to the letter U for the tiger's jaw/chin. As you draw this line, add a few jagged, spike-like shapes along the way to represent fur.
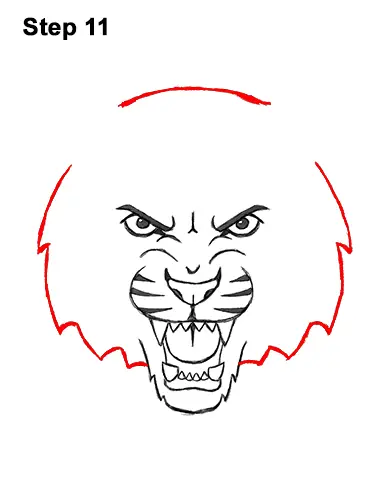
Step 11: High above the eyes, make a small mark for the top of the tiger's head. When you get the height right, make the mark longer and curvier. Now draw the sides of the head as a series of long curved lines. Make a small mark first to help you draw the sides an equal distance from the middle. Add a few spike- like lines along the way for the fur. Curve the side in toward the chin/jaw. Leave gaps at the top for the ears. Try to make the sides symmetrical.
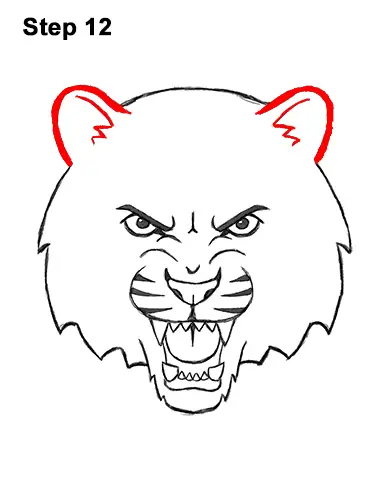
Step 12: Draw a small arc on each gap on the head for the tiger's ears. Don't make the ears too big. They should also be round, not pointy. Make the outline for the ears thick and dark. Inside the ears, draw a series of lines for structure and fur.
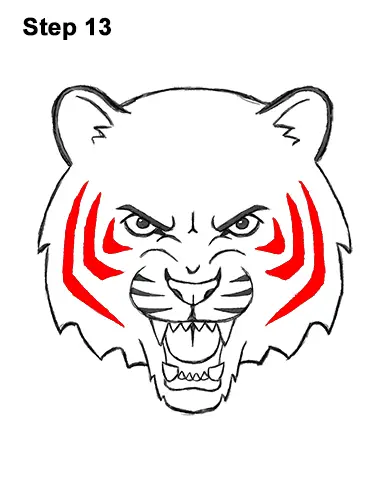
Step 13: Add the stripes next to the tiger's eyes using curved lines. This first set of stripes should be small and moon-like in shape. Add another set of stripes farther out using longer curved lines. The bottom tip s of these lines should curve in toward the muzzle. Remember to make these stripes as symmetrical as you can. Now draw the outermost stripes using really long curved lines. These lines should be almost as long as the whole side of the face. As you draw the stripes, sketch lightly at first to get the shapes right, then darken the lines. Shade in each stripe to make them stand out. Don't shade in too dark if you're going to ink your tiger drawing later.
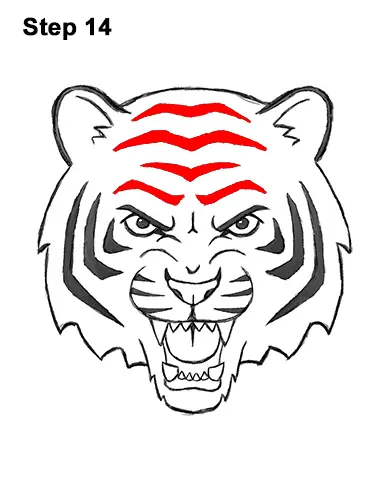
Step 14: Now add the stripes on the forehead the same way. Above the eyebrows, draw two thick shapes similar to the eyebrows for the first set of stripes. Above that, draw a shape similar to a wide letter V for the next stripe. The next line up will be similar in shape as the previous line but a lot longer. The stripe at the very top should be similar in shape as the one below it but smaller. Now shade in the tiger's stripes to make them stand out more.
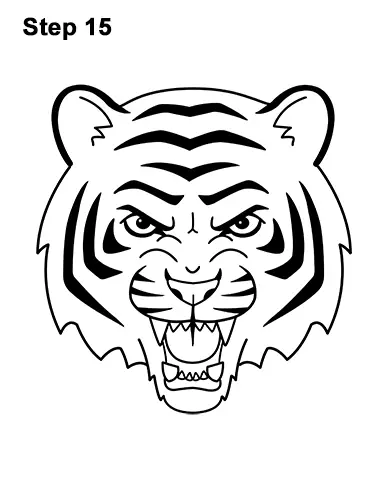
Step 15: Using a pen or marker, carefully go over the lines to make your tiger drawing permanent. After inking, get rid of every pencil mark with an eraser.
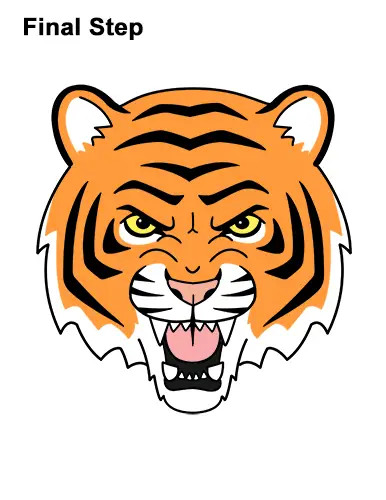
Final Step: Color your tiger drawing using color pencils, markers or even crayons! Use orange but leave the ears, muzzle and bottom of the head and eyes blank. Outline these areas first to make it easier to color. Use peach and pink for the nose and tongue, and black for the inside of the mouth. Color the tiger's eyes yellow. Don't forget to pause the video to draw at your own pace.
Thanks for watching! Subscribe to the How2DrawAnimals YouTube Channel for a new tutorial every Tuesday.
To learn how to draw popular cartoon characters, visit EasyDrawingTutorials.com.
RELATED TUTORIALS
 |
 |
 |