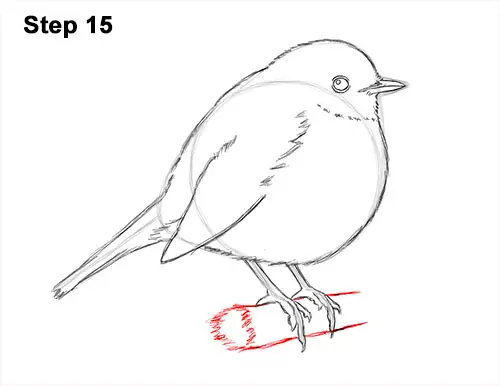
Step 15: Under the toes, add a branch for the robin to stand on by using a couple of lines. The lines should be almost horizontal. They should be closer together on the right side. As you draw the lines, be sure to not overlap the feet. On the left side, draw a series of jagged lines to create the broken end of the branch. You can also skip these jagged edges and just draw the two lines for the branch.
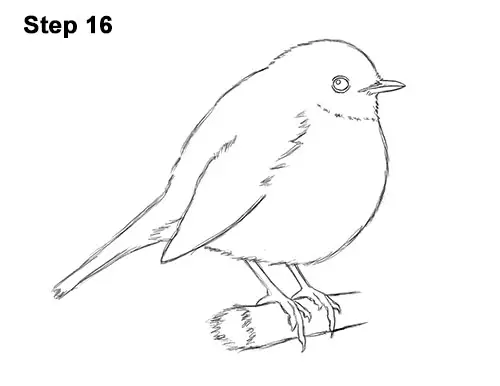
Step 16: For a cleaner look, erase as much as you can of the initial guide lines. Don't worry about erasing all of the guides. It's okay to leave some behind. You can also lightly erase some of the final lines so that the colors don't get too muddled with the graphite in the next step. Re-draw any final sketch lines you may have accidentally erased.
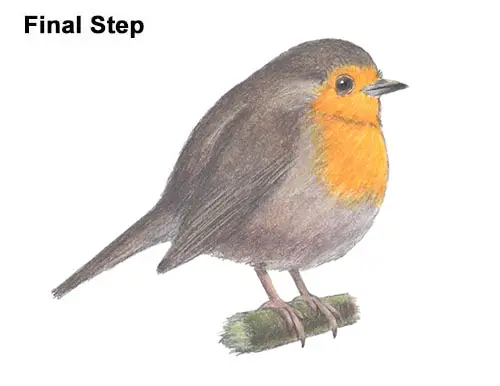
Final Step: Color your European robin drawing! Use black and dark brown for the eye. Don't overlap the tiny circle. Use gray to outline the color separation on the face and chest. Then mix gray and brown throughout the body except for the face and chest. Use dark brown, light brown and even a bit of dark red to color the bird's body. Add the colors lightly at first, then push down harder until you get the level of darkness that you want.
Continue to add browns and grays to the robin's body and gradually blend them together. Coloring can be very time- consuming, so be patient and take breaks. Use dark brown to draw a few stripes near the bottom of the wing for feathers. Use gray and black for the beak. Leave a small strip blank at the top to indicate shine. Use a blend of peach, light brown and dark brown to color the legs.
Use a blend of green, brown and gray to color the branch. Use curved vertical strokes so that the color contours to the shape of the branch. Remember to add the colors lightly at first and then gradually darken and blend them. Add a bit more dark brown to the bird's legs to emphasize the shadows.
Now add the European robin's colorful chest and face colors! Use orange, yellow, red- orange and yellow-orange. Use a variety of orange-like colors. Simply pick a color and add it lightly to see if it works. Experiment! Add some reds and browns too. It doesn't have to be perfect. Have fun with it!
Continue adding color throughout the robin's body until you achieve the hue you like. As you color, use strokes that go in the general direction of the feathers. It's always a good idea to use reference for a more accurate drawing. Don't forget to pause the video to draw at your own pace. Use a bit of purple at the bottom for the shadows and yellow at the top for highlights.
Thanks for visiting! Subscribe to the How2DrawAnimals YouTube Channel for a new tutorial every Saturday.
To learn how to draw popular cartoon characters, visit EasyDrawingTutorials.com.
RELATED TUTORIALS
 |
 |
 |
Visit the Amazon affiliate links below for helpful books that you can use as reference when drawing birds!


