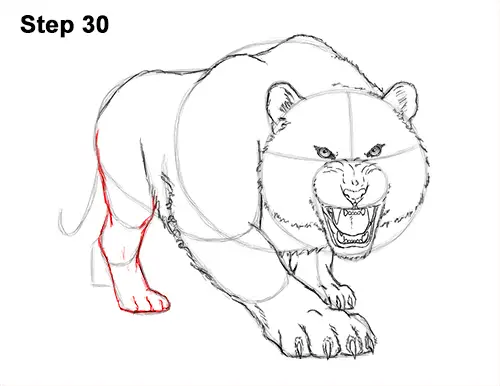
Step 30: Use the initial shapes on the left side as guides to draw the tiger's first hind leg. Simply darken the outer edges of the initial guides to create the shape of the leg. Add a few short lines at the bottom to separate the toes and a few more lines within the leg for extra detail.
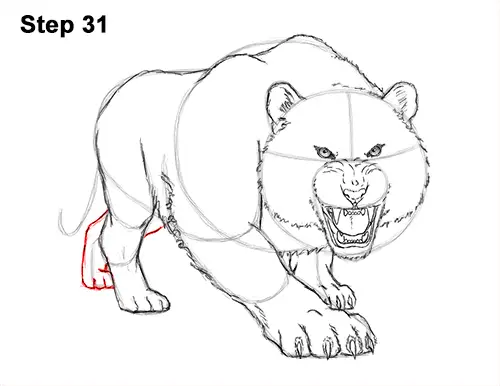
Step 31: Use the short, angled line on the lower left side as a guide to draw the tiger's other hind leg. Draw the shape of the leg around the guide and add a couple of curved lines at the bottom for the toes.
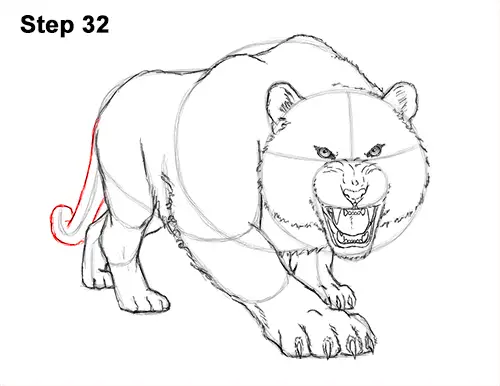
Step 32: Use the J-shaped line on the left as a guide to draw the tiger's tail. Make the shape of the tail thicker as you follow the path of the initial guide.
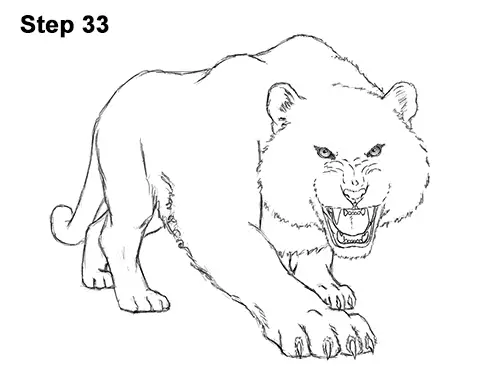
Step 33: For a cleaner look, erase as much as you can of the initial guide lines. Don't worry about erasing all of the guides. It's okay to leave some behind. Re-draw any final sketch lines you may have accidentally erased.
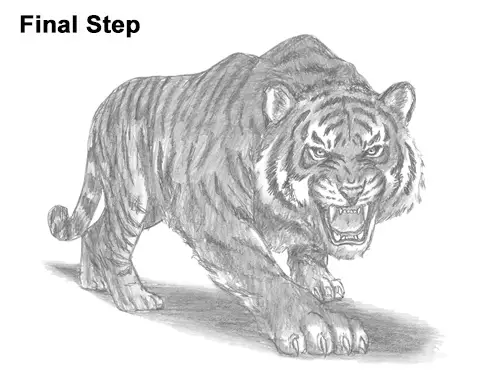
Final Step: Hmm, something's missing... the stripes! Start by adding a few stripes under the eyes. To draw tiger stripes, first sketch a thin, curved shape that's pointy on both ends, then shade it in. The pattern above the eyes should consist of thick, short shapes. The stripes get longer the farther back they go. The face should be symmetrical, so whatever you draw on one side, try to duplicate its mirror image on the opposite side.
To draw the longer stripes, use a series of quick strokes that form the shapes of the stripes to give them a furry texture. It's a good idea to look at reference images to accurately depict the tiger's stripes. Or pause the video often to get them right. Notice how the chin doesn't have any stripes and the top of the muzzle only has a few on the sides.
Adding the tiger's stripes can be very time-consuming, so be patient and take breaks. You can add the stripes on a certain section, then take a break and do another section later so it's not too overwhelming.
The stripes on the body are basically random curved vertical lines made up of quick, short strokes. Notice how the stripes curve and bend to conform to the shape of the torso, legs and tail. The stripes on the tiger's body should be thin and close together because of the perspective. There's really no trick or shortcut for adding the stripes. You just have to be patient and add them one at a time.
Add more value to your growling tiger drawing for extra detail. Don't add value to all of the face. The lower half, the muzzle and the area around the eyes should be white. As you shade, use a value that's lighter than the stripes. If you make it too dark, then make the stripes even darker. Don't worry about shading too smoothly. The rough value gives the tiger's coat a furry texture. Use strokes that go in the general direction of the fur as you add the value. Just like drawing the stripes, drawing can be very time-consuming, so take a break every once in a while. Continue adding the value until the appropriate sections of the tiger's body are covered.
Add a cast shadow underneath. This helps ground the tiger so it doesn't appear to be floating. Use a darker value near the middle of the shadow and a lighter value along the edge for the shadow's diffusion.
Thanks for watching! Subscribe to the How2DrawAnimals YouTube Channel for a new tutorial every Tuesday.
To learn how to draw popular cartoon characters, visit EasyDrawingTutorials.com.
RELATED TUTORIALS
 |
 |
 |


