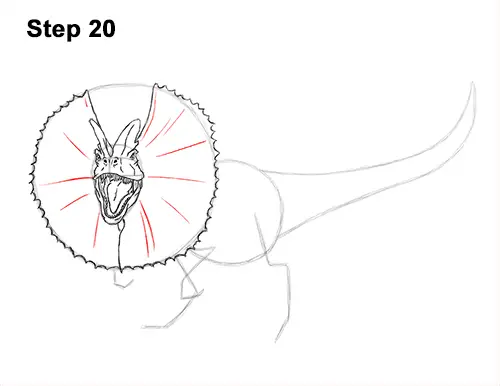
Step 20: Add a few lines within the shape of the frill for the folds of the skin. As you draw these, lines make sure to angle them correctly so that they radiate from the middle of the Dilophosaurus' head. The lines in the middle should be horizontal then become more diagonal as they move up and down on the frill until they're almost vertical.
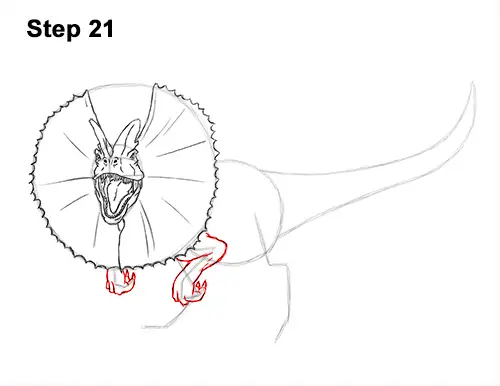
Step 21: Use the angled lines under the frill as guides to draw the Dilophosaurus' arms. Follow the path of the guide shaped like a Z as you make the top part of the arm thicker. The arm is folded back toward the body. The top of the arm will overlap the bottom as it bends at the joint. The three digits also curve backward, so add three short curved lines at the bottom for the dinosaur's knuckles. Most of the digits are hidden behind the hand, but add the small visible one on the right side as a curved line.
Draw the Dilophosaurus' hand on the other side using the other anged line as a guide. The digits should point backward, so add a few curved lines on the right side of the hand for the visible digits.
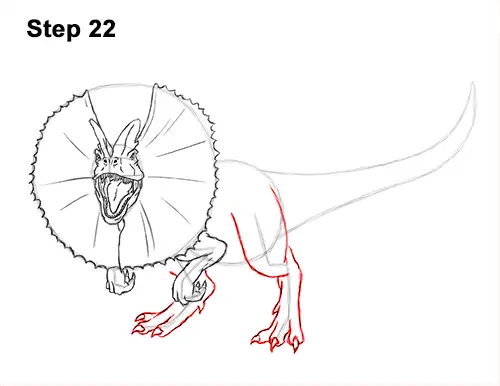
Step 22: Use the angled line on the right as a guide to draw the Dilophosaurus' hind leg that's on this side of the body. Use long curved lines to make the top part of the leg thick. It should take up a big portion of the body. The bottom part of the dinosaur's leg should be thinner and placed off to the right so that the thicker top part appears to be in front of it.
Add a small dewclaw near the middle of the bottom part of the leg and start adding the toes at the bottom. Draw three curved lines at the bottom for the Dilophosaurus' toes. The toe on the right should point to the right while the other two should point down. On the tip of each toe, draw a short, curved spike for the sharp claw.
Draw the visible part of the other hind leg using the initial line as a guide. Draw the long middle toe and claw first. This foot is facing sideways, so not all three toes are visible. Just draw two and the small dewclaw. Don't overlap the lines for the dinosaur's hand and arm. The hind leg should be behind them.
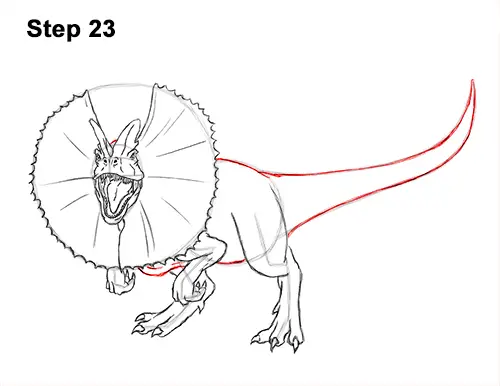
Step 23: Use the remaining guides to draw the rest of the Dilophosaurus' body. Start by adding a curved line under the frill for the loose skin or dewlap. Then darken the outer path of the initial guides to create the shape of the body. Darken the lines for the dinosaur's tail too. The tail should point up to counter balance the front part of the body and the head.
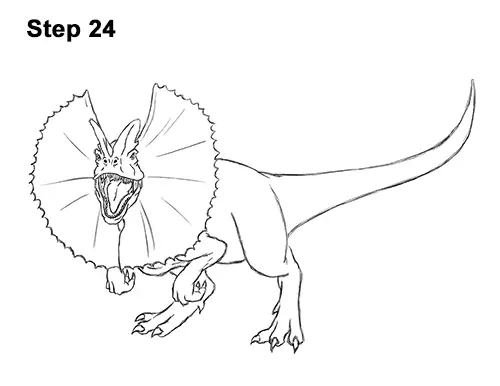
Step 24 (optional): For a cleaner look, erase as much as you can of the initial guide lines. Don't worry about erasing all of the guides. It's okay to leave some behind. Re-draw any final sketch lines that you may have accidentally erased.
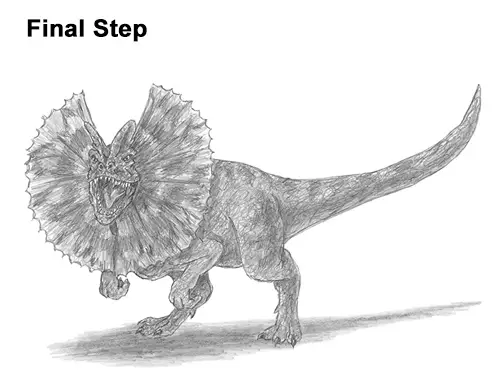
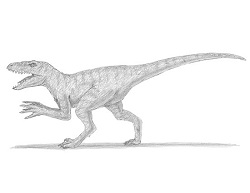
Final Step (optional): Add some shading to your Dilophosaurus drawing to give it more dimension and volume. The inside of the mouth should be especially dark. As you shade the frill, use strokes that radiate from the center of the head toward the outer edge of the frill. Follow the path of the lines inside the frill as you shade. You can turn the paper around to make it easier. Pick the direction of the light source when shading so that the shadows are consistent with it. Vary the pressure on your pencil to get different degrees of tonal value.
Add a cast shadow underneath your Dilophosaurus dinosaur. This helps ground the dino so it doesn't appear to be floating. Use a darker value near the middle of the shadow and a lighter value along the edge for the shadow's diffusion.
You can add even more value throughout your Dilophosaurus drawing for extra detail. As you shade, use a series of tiny squiggly lines all over the face to give the skin a rough, scaly texture. Don't overthink it. Just add random tiny squiggly lines all over the face to create texture. When you shade the dinosaur's frill, remember to use strokes that radiate outward from the head to the edge of the frill. If you use strokes that go in different directions, there won't be as much emphasis of the frill fanning out. The pattern on the frill consists of random stripes everywhere. But you can make yours different if you'd like.
This is the Jurassic Park version of Dilophosaurus. There's no evidence that the real dinosaur had a frill. It's purely artistic license. You can do the same and shade your frill differently. Add a lighter value to the background of the frill so that the pattern stands out more. Like the head, shade the dinosaur's body using a series of tiny squiggly lines to give the skin a rough and scaly texture.
Adding the texture to the Dilophosaurus' skin can be very time- consuming, so be patient and take breaks. You can add the texture to different sections of the body at a time to break up the process. You can also add a darker value inside the body to create a striped pattern. Don't forget to pause the "How to Draw a Dilophosaurus Dinosaur" video after each step to draw at your own pace.
Thanks for watching! Subscribe to the How2DrawAnimals YouTube Channel for a new tutorial every Tuesday.
To learn how to draw popular cartoon characters, visit EasyDrawingTutorials.com.
RELATED TUTORIALS
 |
 |
 |


