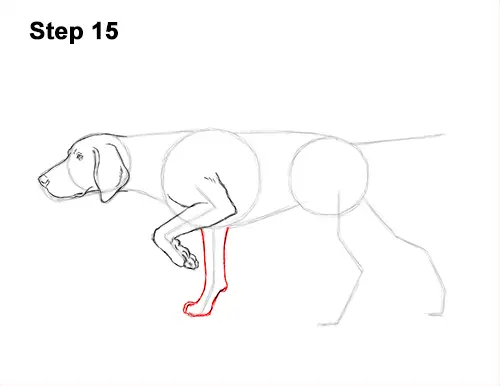
Step 15: Use the line on the right as a guide to draw the dog's other front leg the same way. Lightly sketch the shape of the leg around the guide. Bend the leg at the joint and make the paw curvier. Draw a curved line at the tip of the paw at the bottom for the toes. Darken the rest of the pointer's leg when you get the shape right.
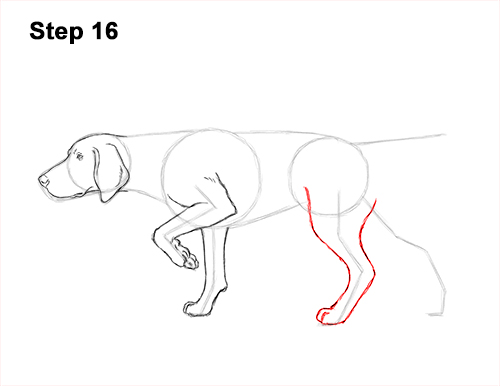
Step 16: Use the angled line to the right as a guide to draw the first hind leg. Just like before, follow the path of the guide and lightly sketch the shape of the leg around it. The top of the leg should be wide. The leg should bend twice for the joints, and the paw should be curved at the bottom. When you get the shape of the leg right, darken the lines. Draw a short, curved line at the tip of the paw to separate the dog's toes.
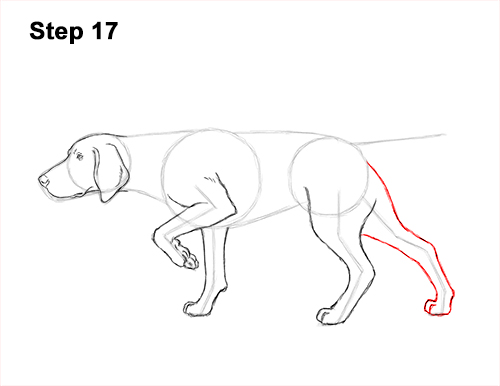
Step 17: Use the angled line on the far right side as a guide to draw the pointer's other hind leg. Draw this leg like the others. Sketch lightly at first and only darken the lines when you get the shape right. The dog is in pointing position, so this leg should be stretched out and slope toward the right. Pay attention to how the shape curves in the middle to create the stretched-out joints. The shape should be similar to the other hind leg, except it should be less curved. Add the toes at the bottom using a short, curved line. The top should almost touch the tail.
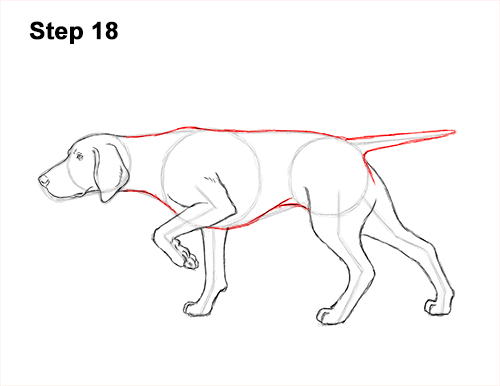
Step 18: Use the remaining lines and shapes as guides to draw the rest of the pointer's body. Simply darken the outer edges of the initial guide lines to create the shape of the body. Don't overlap the shape of the front leg that's on this side of the body. Curve the bottom line inward for a thinner torso. Use the line at the top as a guide to draw the dog's tail. Draw the shape of the tail around the guide. The tip should be pointy.
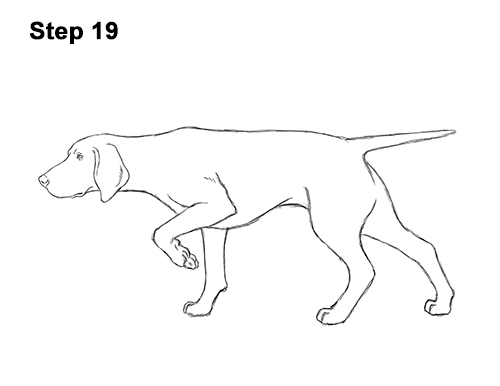
Step 19: For a cleaner look, erase as much as you can of the initial guide lines. Don't worry about erasing all of the guides. It's okay to leave some behind. Re-draw any final sketch lines you may have accidentally erased.
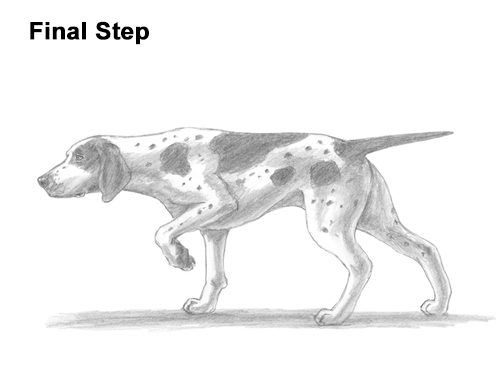
Final Step: Add some shading to your pointer drawing to give it more dimension and volume. Pick the direction of the light source when shading so that the shadows are consistent with it. Vary the pressure on your pencil to get different degrees of tonal value. For a more detailed guide on how to shade, check out this tutorial: How to shade.
Add a cast shadow underneath. This helps to ground the dog so it doesn't appear to be floating.
Add some spots throughout the pointer's body for a typical English pointer pattern. You can also skip this step for a white pointer dog. For this look, encircle an area around the eye and add a medium value to it. Shade the ear using a medium value too. For the pattern on the body, simply draw large random shapes and shade them in with a medium value. If you have a pet English pointer or a similar dog breed, try to duplicate its coat pattern on your drawing. Make the shadows darker to emphasize the muscle structure more.
Shading can be time- consuming, so be patient and take breaks. Add smaller spots throughout the dog's body. For a German shorthaired pointer, you have to completely cover the body in smaller spots. Continue to darken the shadows and add spots until you're happy with the result. Don't forget to pause the video after each step to draw at your own pace.
Thanks for visiting! Subscribe to the How2DrawAnimals YouTube Channel for a new tutorial every week.
To learn how to draw popular cartoon characters, visit EasyDrawingTutorials.com.
RELATED TUTORIALS
 |
 |
 |


