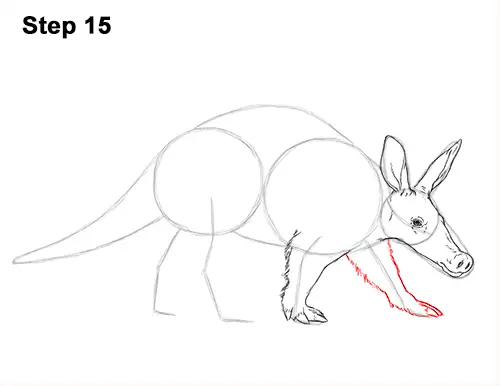
Step 15: Use the line on the far right side as a guide to draw the second front leg the same way. Lightly sketch the shape of the aardvark's leg around the guide. Darken the lines when you get the structure right. Use quick, short strokes on the left side of the leg and add the visible triangle-like claws at the bottom.
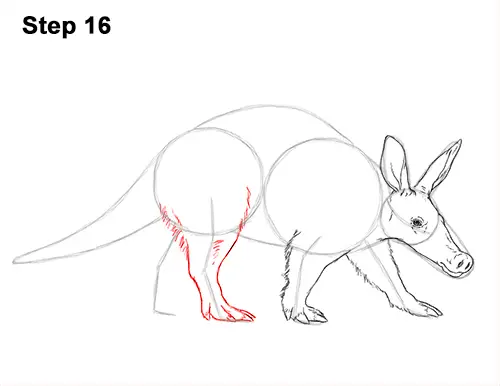
Step 16: Use the second line from the left as a guide to draw the hind leg that's on this side of the body. Lightly sketch the shape of the leg around the guide. Make the top part wide and the bottom narrow. Curve the shape of the leg where the guide line bends to indicate the joints. When you get the shape of the leg right, darken the lines. Use quick, short strokes at the top for the hair. The aardvark's hind legs should be thicker at the top than the front legs. Use a couple of sloping lines and triangle-like shapes to draw the toes and claws at the tip of the foot.
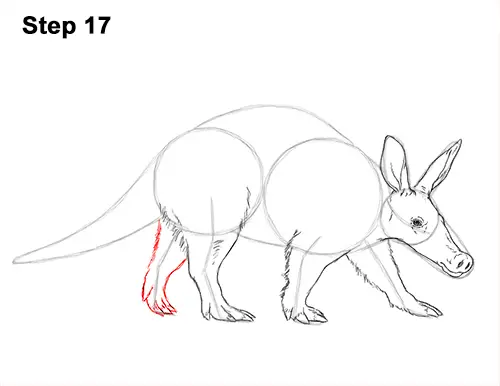
Step 17: Use the line on the far left side as a guide to draw the aardvark's other hind leg the same way. Draw the shape of the leg around the guide. Make the top part wide and the bottom narrow. The top part of this leg is hidden behind the other hind leg, so only draw the bottom half.
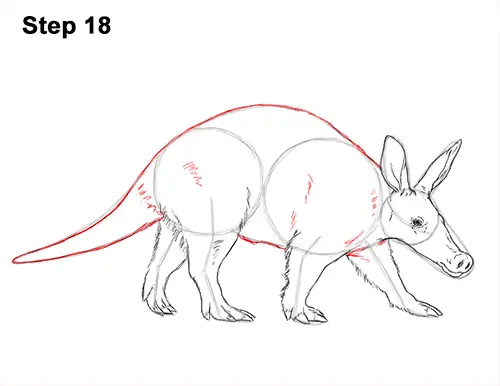
Step 18: Use the remaining lines and shapes as guides to draw the rest of the aardvark's body. Darken the outer edges of the initial guides to create the shape of the body. Don't overlap the shape of the legs that are on this side as you darken the body. Darken the shape of the tail too, and add a few quick, short strokes inside the body for extra detail.
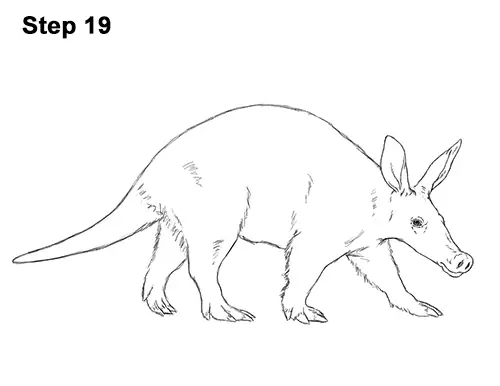
Step 19: For a cleaner look, erase as much as you can of the initial guide lines. Don't worry about erasing all of the guides. It's okay to leave some behind. Re-draw any final sketch lines you may have accidentally erased.
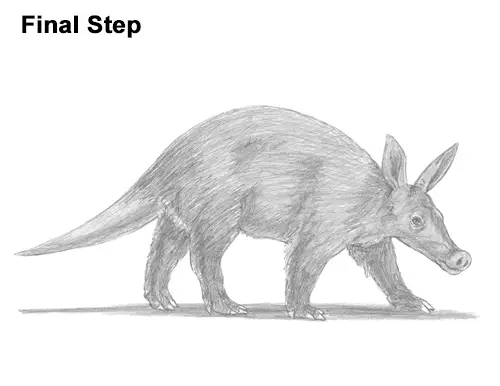
Final Step: Add some shading to your aardvark drawing to give it more dimension and volume. Pick the direction of the light source when shading so that the shadows are consistent with it. Vary the pressure on your pencil to get different degrees of tonal value. Add the value lightly at first, then gradually build up to the level of darkness that you want.
Add a cast shadow underneath. This helps ground the aardvark so it doesn't appear to be floating.
You can add even more value throughout your aardvark drawing for extra detail. As you shade the body, use strokes that go in the general direction of the fur. Separate each individual stroke a bit so that the white of the paper comes through to create the sparse hair on the body. The aardvark's legs should be darker, so push down a bit harder on your pencil to get a darker value.
Add a darker value on the shadows as well to make them stand out more. Shading can be time-consuming. Be patient and take breaks so that it's not too overwhelming. It's always a good idea to use reference for a more accurate drawing. Don't forget to pause the video after each step to draw at your own pace.
Thanks for visiting! Subscribe to the How2DrawAnimals YouTube Channel for a new tutorial every Tuesday.
To learn how to draw popular cartoon characters, visit EasyDrawingTutorials.com.
RELATED TUTORIALS
 |
 |
 |


