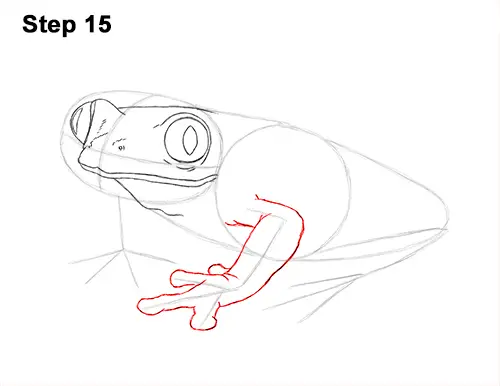
Step 15: Use the set of lines in the middle as guides to draw the first front leg. Lightly sketch the shape of the folded front leg as you follow the basic path of the guide line. Use curved lines as you draw the shape of the leg around the guide to emphasize the muscle structure. The top part of the leg should be overlapped at the bend a bit. When you get the shape of the frog's leg right, darken the lines.
The top part of the leg after the bend should be thick and the bottom thin to create a wrist-like segment. Use the shorter lines at the tip as guides to create the red-eyed tree frog's foot and digits. As you follow the path of the guides, draw the digits thin near the middle but wide and round at the tips. At the top of the foot, draw the tip of the fourth finger peeking from behind.
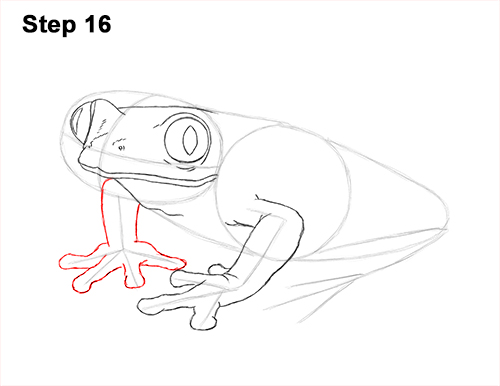
Step 16: Use the set of lines on the left side as guides to draw the other front leg the same way. Use a couple of curved vertical lines to create the shape of the leg. The top should be thicker than the bottom. Use the shorter lines at the end as guides to draw the foot and digits. Lightly sketch the shape of each individual digit around the guide. When you get the shapes right, darken the lines. The tree frog's digits should be thin around the middle, and the tips should be wide and round.
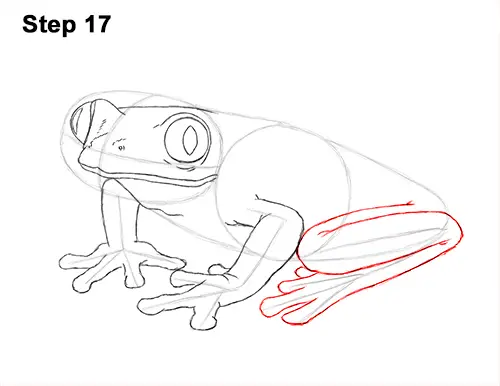
Step 17: Use the lines on the right side of the body as guides to draw the frog's folded hind leg. First draw the middle section of the leg by drawing a curved horizontal line above the guide. Add another curved horizontal line at the bottom that curves up on the left side to complete the middle section of the leg. Draw the bottom portion of the folded leg by continuing to draw the top line and curving it down and to the left.
Continue drawing the line on the left and curving it to the top and right. The end result of the whole folded leg should be similar to a squished letter S. Now use the shorter lines at the tip as guides to draw the red-eyed tree frog's thin, long toes. Remember to make each toe wide and round. Add the fourth toe peeking from behind at the top.
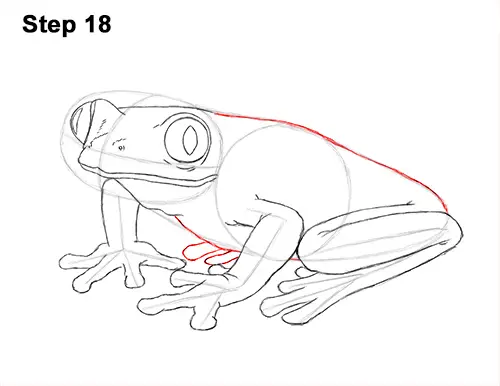
Step 18: On the left side of the first front leg, draw the toes form the other hind leg using a couple of curved lines. Darken the top portion of the initial guides to create the top part of the body. Darken the bottom part of the guides to finish up the body but don't overlap the lines for the tree frog's first leg.
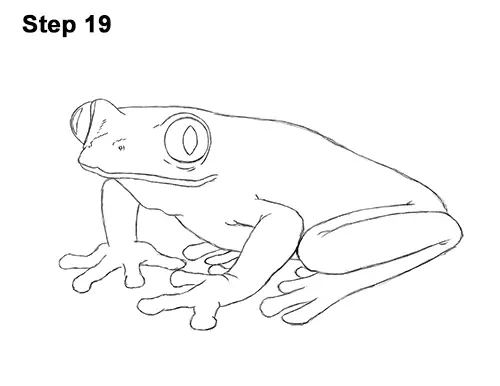
Step 19: For a cleaner look, erase as much as you can of the initial guide lines. Don't worry about erasing all of the guides. It's okay to leave some behind. Re-draw any final sketch lines you may have accidentally erased. You can also LIGHTLY erase some of the final lines so that the colors don't get too muddled with the graphite in the next step.
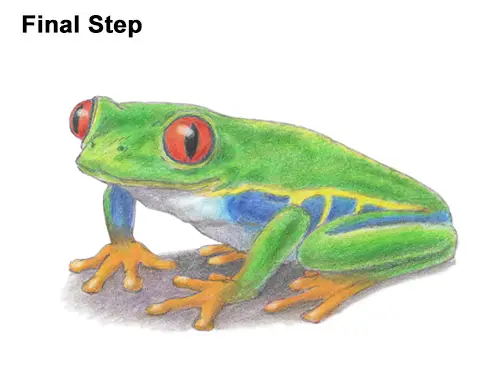
Final Step: Red-eyed tree frogs are colorful, so instead of the usual shading, try coloring your drawing. Using gray, add some shading to give your tree frog drawing more dimension and volume. Use a bit of blue or purple too.
Add a cast shadow underneath. This helps ground the red-eyed tree frog so it doesn't appear to be floating. The middle of the shadow should be darker, and the edges should be lighter for the shadow's diffusion.
Start adding dark green to the head and the top part of the body. Start adding the color lightly at first. You can draw a line across the body to indicate how far down the green should go. Add some green to the frog's legs as well.
Use different shades of green (yellow- green, blue-green etc.) lightly right on top of each other to give the drawing more variety. Red-eyed tree frogs are mainly yellow- green, so as you use the different shades of green, you'll decide which works best. As you layer the different shades of green on top of each other, push a little harder after each coat to blend the colors together.
Use dark shades of green for the shadows (mainly at the bottom) and light shades of green for the highlights (mainly at the top). Pay attention to where you add the green. Not all of it is green. Even the legs are only partly green. Adding different shades of green to the tree frog's body can be time-consuming, so be patient and take breaks. Add some yellow to the highlights too. Use black for the pupils but leave a portion at the tops blank to represent glare. Use red for the main part of the eyes. Just like with the green on the body, use different shades of red for the eyes. Make a portion at the top of each eye lighter for the glare and add yellow for the highlights too.
Use yellow to create a series of stripes along the side of the frog's body. Use blue for the legs and the sections between the yellow stripes. Remember to add the color lightly at first. Use multiple shades of blue and blend the colors together. You can also use a single shade of blue for an easier drawing.
Use shades of yellow and orange for the stripes along the red-eyed tree frog's body and for the feet. Color the tip of each toe lighter to represent the highlights of the shiny skin. You can add a bit more dark green along the body to emphasize the shadows. Use a bit of dark blue to outline the eyes and add a bit of yellow too. Don't forget to pause the video to draw at you own pace.
Thanks for watching! Subscribe to the How2DrawAnimals YouTube Channel for a new tutorial every Tuesday.
To learn how to draw popular cartoon characters, visit EasyDrawingTutorials.com.
RELATED TUTORIALS
 |
 |
 |


