







How to Draw a Wasp
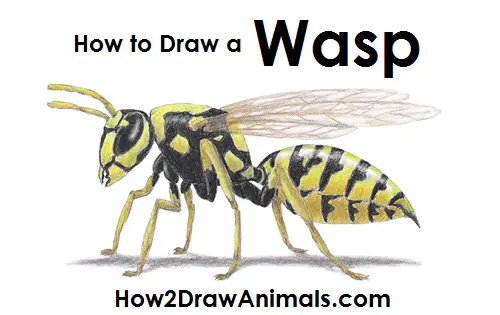
Please PAUSE the "How to Draw a Wasp" video after each step to draw at your own pace.
For the first few steps, don't press down too hard with your pencil. Use light, smooth strokes to begin.
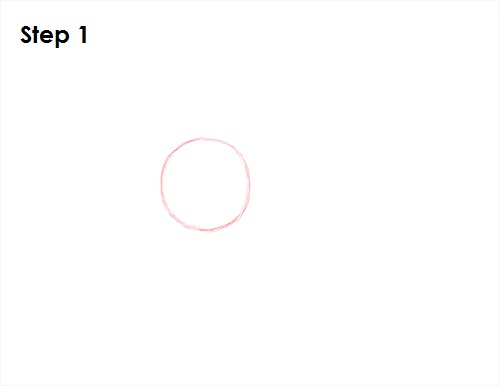
Step 1: Draw a circle as a guide for the front part of the wasp's body. The circle doesn't have to be perfect. It's just a guide. Leave enough room on the sides for the rest of the body and head.
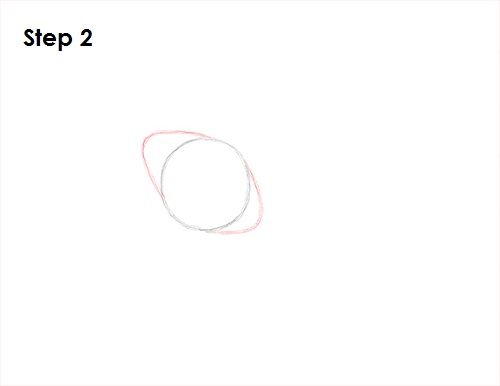
Step 2: Draw a couple of arcs on the sides of the circle to complete the guide for the front part of the wasp's body called the thorax. Don't draw the arcs too tall. The resulting shape should be similar to a fat diamond that's tilted on its side a bit.
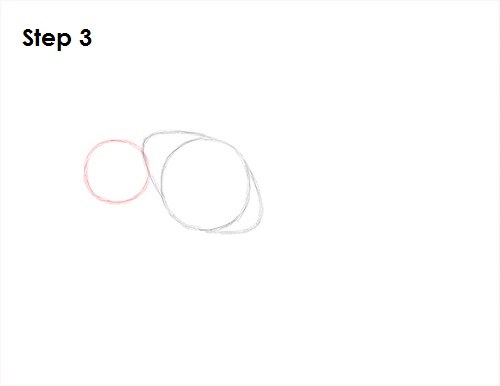
Step 3: Draw another circle on the left side as a guide for the top part of the head. This circle should be smaller than the first. The edges of the two shapes should touch.
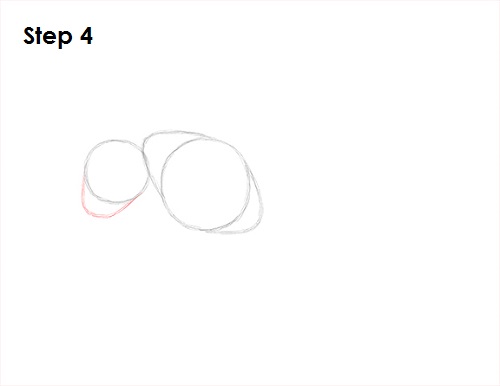
Step 4: Draw another arc below the circle as a guide for the bottom part of the head.
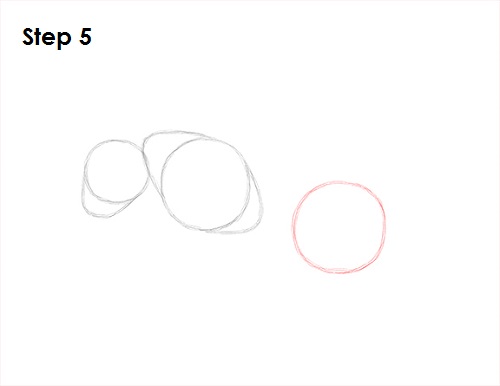
Step 5: Draw yet another circle on the right side as a guide for the first part of the bottom half of the body called the abdomen. This circle should be about the same size as the first one. Notice the spacing between the shapes.
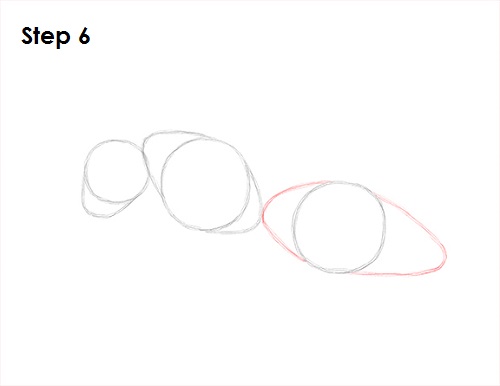
Step 6: Draw a couple more arcs on the sides of the circle to complete the guide for the abdomen. These arcs should be bigger than the ones for the thorax. The one on the right should be especially tall.
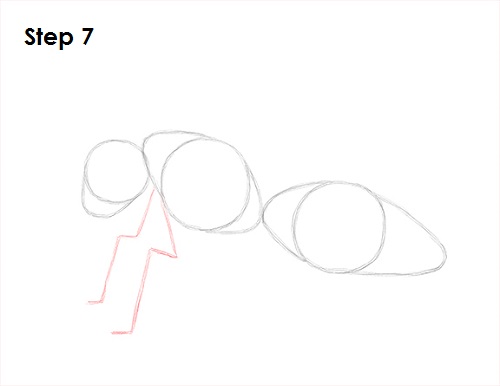
Step 7: Draw a couple of lines under the thorax near the front as guides for the first pair of legs.
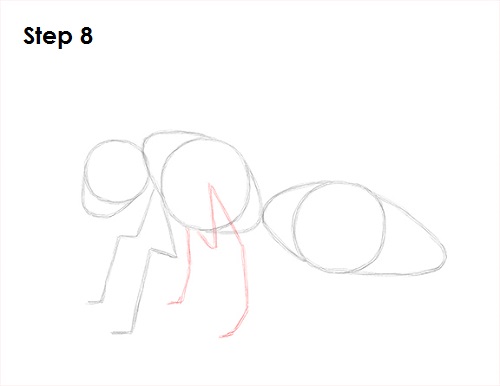
Step 8: Draw a couple of lines under the thorax near the middle as guides for the second pair of legs. Notice how the guide for the leg on this side bends up first. The guide on the other side isn't completely visible.
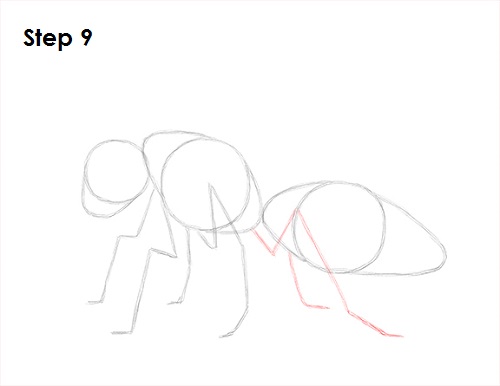
Step 9: Now draw two lines under the thorax on the far right side as a guide for the last pair of legs. these guides angle back a bit more and the lower sections have more of a diagonal orientation.
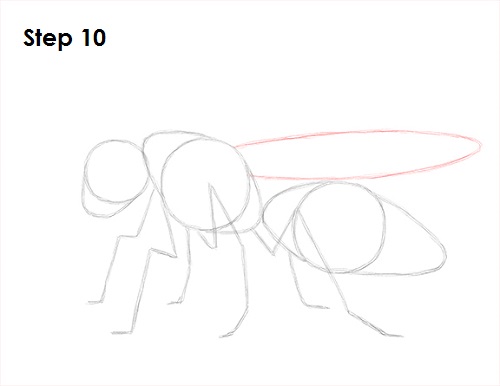
Step 10: Draw a long thin arc on top of the thorax as a guide for the wasp's wings. The bottom of the arc should graze the abdomen.
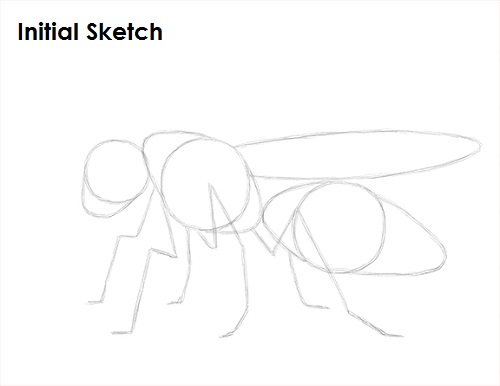
That's it for the initial sketch! From this point on, press harder with your pencil to get a more defined sketch.
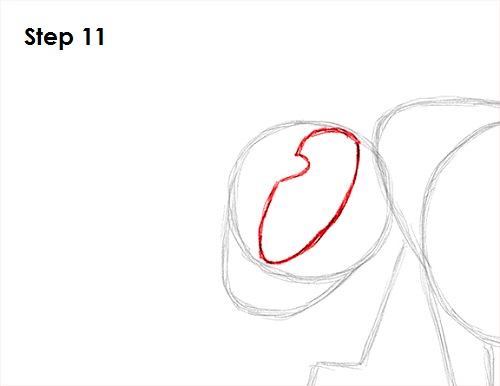
Step 11: Draw the eye inside the wasp's head by first lightly sketching a long, thin oval. Darken the oval when you get the shape just right but leave a small curved indentation on the upper left side.
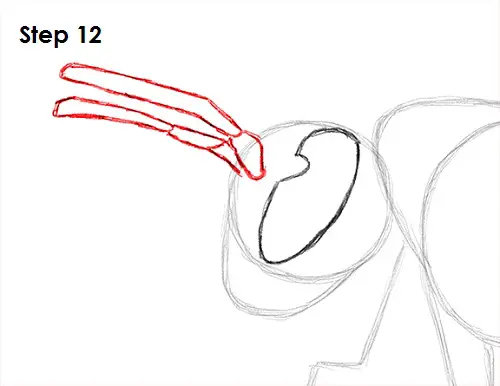
Step 12: Draw the wasp's antennae on top of the head on the left side. First lightly sketch the shape of the antennae to get the structure right. Wasps have thick antennae compared to other insects. Darken the shape of the antennae once you get the structure right. The antennae are composed of different segments, so add a few divisions within the shapes.
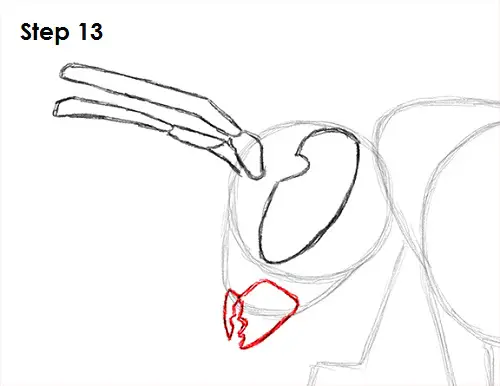
Step 13: Draw the mandible part of the mouthpart on the bottom where the initial arc is. The mandibles are thick at the top and pointy at the bottom. They have a serrated edge in the middle. Pause the video to get the shape right.
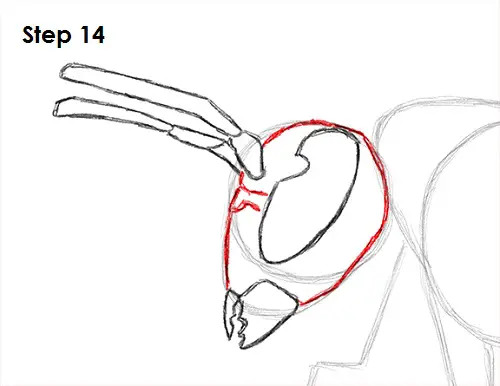
Step 14: Use the remaining shapes as guides to draw the rest of the wasp's head. Add a few lines within the shape of the head as an indication of the separation of color.
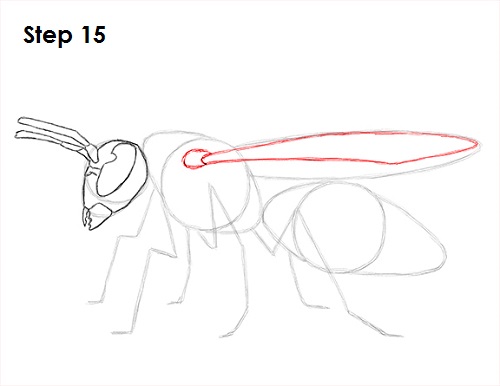
Step 15: Use the arc on top of the body as a guide to draw front wing called the fore wing. Draw a small circle on the left for the wing's base. Then follow the basic path of the guide but make the shape thinner at the bottom.
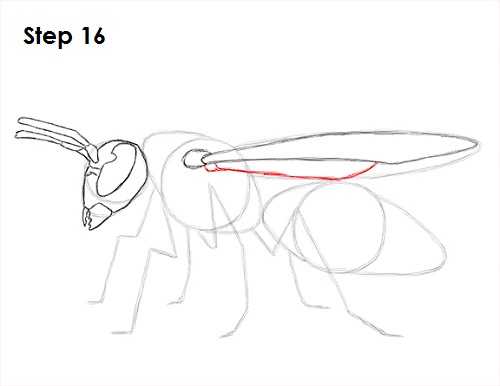
Step 16: Draw the other wing below it called the hind wing within the shape of the guide. Add the circular base too.
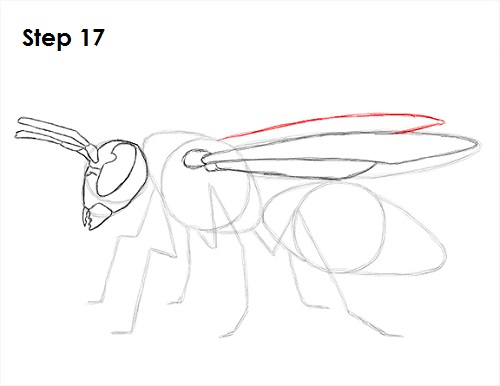
Step 17: Draw the visible portion of the fore wing on the other side. Simply add another curved line above the first fore wing.
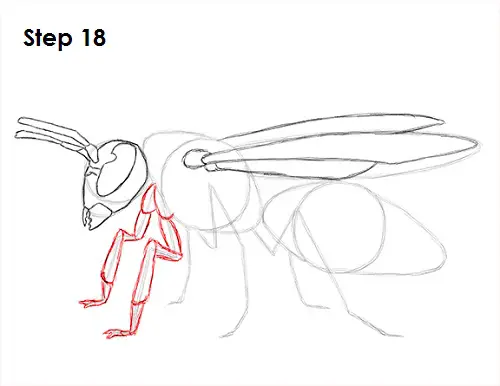
Step 18: Use the lines under the thorax on the left side as guides to draw the front legs. Follow the basic path of the guides as you darken the thick shape of the legs. The legs are segmented, so add the divisions as you draw the leg. The segments should vary in width and length. Draw the front leg on the other side by using the initial line as a guide too.
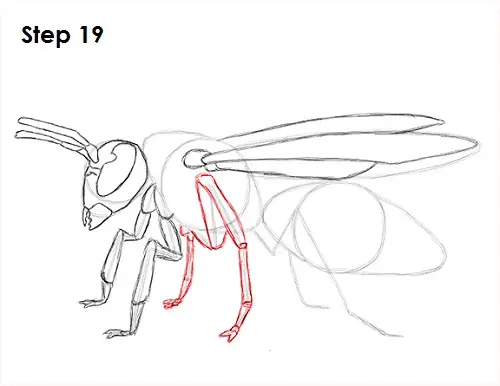
Step 19: Now use the lines in the middle as guides to draw the second pair of legs. Follow the path of the guides and give the leg a few segments as you draw it. Because the leg bends up first, the shapes overlap themselves a bit at the top. Draw the visible portion of the middle leg on the other side using the initial guide lines.
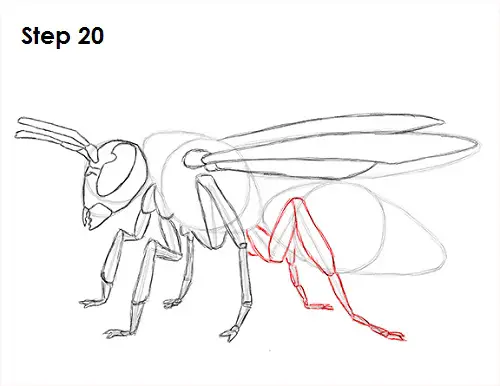
Step 20: Use the line on the rightmost side as guides to draw the third and final pair of legs. Draw these legs the same way as the first. Use segments to make up the shape of the leg and use the path of the initial lines as guides. A big part of the last leg is hiding behind the abdomen, so only draw the small visible portion of it.
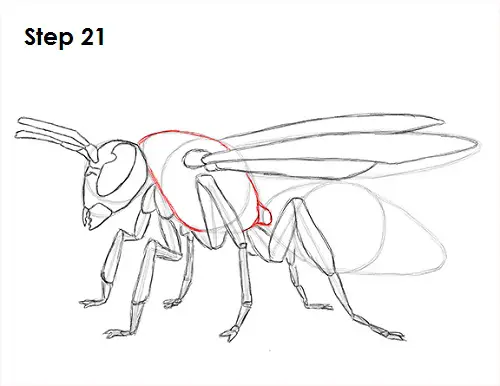
Step 21: Use the initial shapes and lines as guides to draw the wasp's thorax. Darken the lines to create the shape and add the small segment on the right that connects the thorax to the abdomen called the petiole.
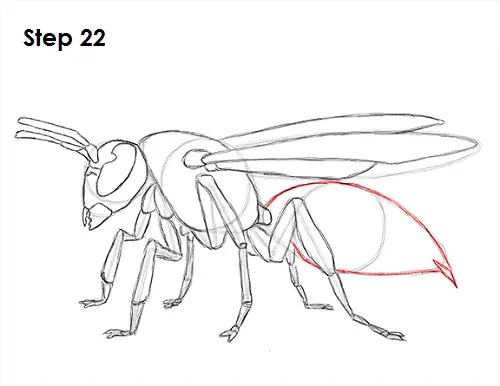
Step 22: Follow the basic path of the guides on the right and darken the lines to create the abdomen. Draw a pointed spike at the tip of the abdomen for the sting. You can also make the sting longer if you'd like.
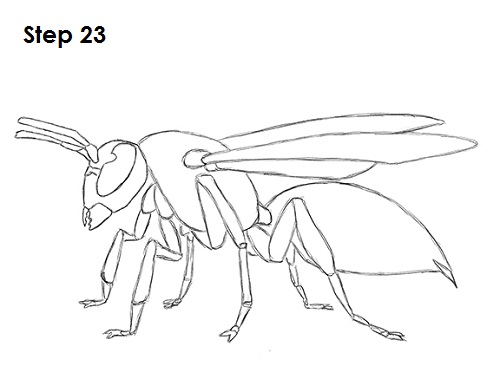
Step 23 (optional): For a cleaner look, erase as much as you can of the initial guide lines. Don't worry about erasing all of the guides. It's okay to leave some behind. Continue erasing as much as you can of the initial guides, and re-draw any final sketch lines that you may have accidentally erased.
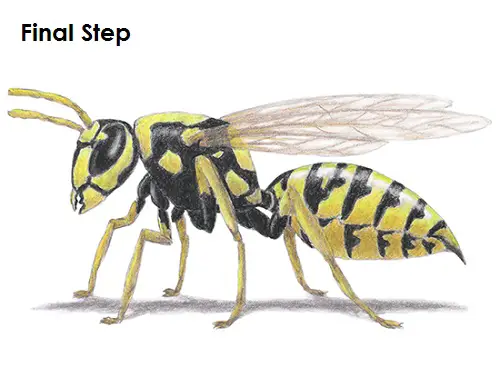
Final Step (optional): Wasps have bright colors, so instead of the usual pencil shading, try coloring your drawing. Using gray, add some shadows to give the drawing more dimension and volume. Shadows are generally at the cool end of the color spectrum, so add some blue or purple in the shaded area too. Start coloring the black sections of the body. Color in the shape of the eye first. Apply the color lightly at first and build up to the level of darkness that you want. Leave a thin section unshaded to represent shine. Now add the black section on the head. Most of the head is yellow, so the black portion is small. The black areas are mainly located on the outer sides of the head. The coloring also greatly depends on the type of wasp you're drawing.
Add the black to the thorax portion of the body as well. Some sections in the thorax are yellow. Outline these sections first before you start coloring so that you don't accidentally color them black. The yellow sections in the thorax differ between wasp species, so it's a good idea to use reference as you draw to get the coloring right. Add the black to the most of the thorax but be careful not to color over the outlines you created or over the wings. Now add the black portion and stripes to the abdomen. Make sure the black doesn't spill over to the legs as you color. Try to stay within the lines. The stripes aren't perfect bands on the abdomen. They're pretty irregular, so make them a bit splotchy as you add them. It's a good idea to first outline the interlocking sections of the exoskeleton in the abdomen. Pause the video to help you get the lines and the wasp's sting in its sheath correctly.
Add the blotchy stripes at the bottom of the abdomen too. A small section at the top of each stripe should be lighter to represent shine. Add black to the legs as well. Only the top portion of the legs is black, so don't color all the way down. Be careful to not add the black to the other sections. This process can be quite time-consuming, so be patient and take breaks. Finally add the yellow to the wasp's body! Start with a darker shade like yellow-orange or even brown at the bottom of the abdomen. Add on lighter shades of yellow as you go up higher on the abdomen. Leave a thin section blank at the very top to indicate the abdomen's shiny surface.
Add the yellow coloring to the legs and antennae the same way as with the abdomen. Start with a dark shade of yellow at the bottom and gradually move to a lighter shade the higher up you go. Continue to gradually add the different shades of yellow slowly until you get the result you're happy with. Add the yellow to the remaining parts of the body using the same technique. Remember to make the top portion very light or even leave it blank to represent the shiny texture. Add a bit of coloring to the wings. The wings are mostly see-through, so don't color them too much. Add some light brown to the outlines and for the many vein structures inside. The veins don't have to be perfect. Just add some random lines inside. Color the wings very lightly too. You can also draw a cast shadow underneath using gray and blue. The shadow helps ground the wasp so it doesn't appear to be floating. Don't forget to pause the "How to Draw a Wasp" video after each step to draw at your own pace.
Thanks for watching! Subscribe to the How2DrawAnimals YouTube Channel for a new tutorial every Tuesday.
To learn how to draw popular cartoon characters, visit EasyDrawingTutorials.com.