







How to Draw a Wolf Growling
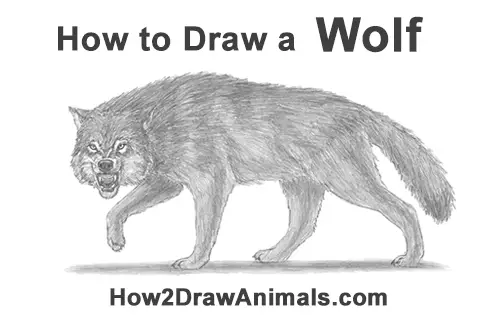
Please PAUSE the "How to Draw a Wolf Growling" video after each step to draw at your own pace.
Time-Lapse (Speed Drawing) video:
Written step-by-step video tutorial:
For the first few steps, don't press down too hard with your pencil. Use light, smooth strokes to begin.
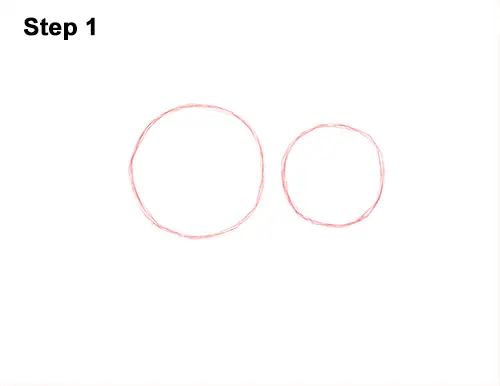
Step 1: Draw two circles as guides for the growling wolf's body. First draw four small marks for the height and width of the circle, then connect the marks using curved lines. Sketch lightly at first so that it's easy to erase if you make a mistake. But the circles don't have to be perfect. They're just guides. If you do want a perfect circle, trace the outer rim of a glass, a cup or anything else that's circular. The circle on the right should be smaller than the one on the left. Don't draw the circles too far apart, otherwise your wolf will be too long. Leave enough room on the sides and bottom for the wolf's head, tail and legs.
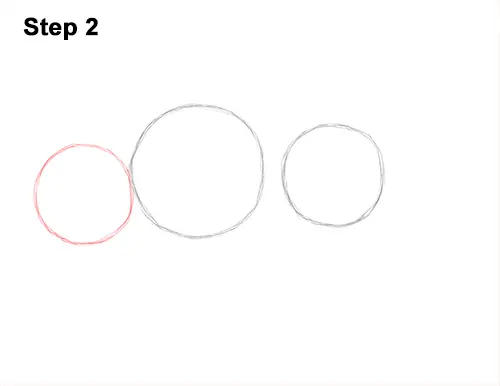
Step 2: Draw another circle on the left side as a guide for the growling wolf's head. Draw this circle the same way, starting with four marks and connecting them with curved lines. This circle should be about the same size as the the one on the far right, but place it a bit lower.
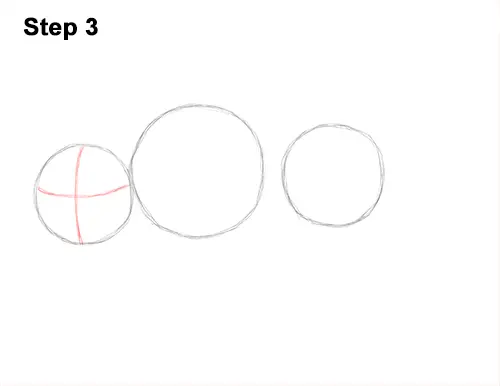
Step 3: Draw two curved intersecting lines (one vertical and one horizontal) inside the head. These are construction lines that will help you place the growling wolf's facial features later on.
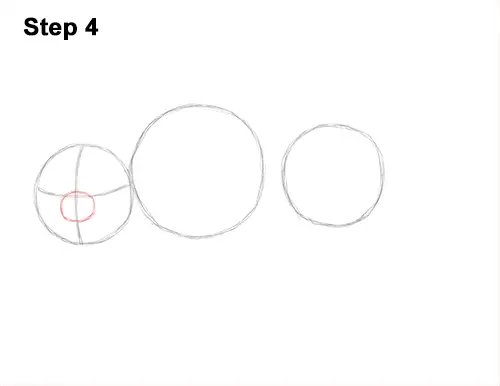
Step 4: Draw a small circle in the middle of the head as a guide for the top part of the wolf's muzzle. Use the construction lines as guides for placement and pay attention to the size of this circle in relation to the head.
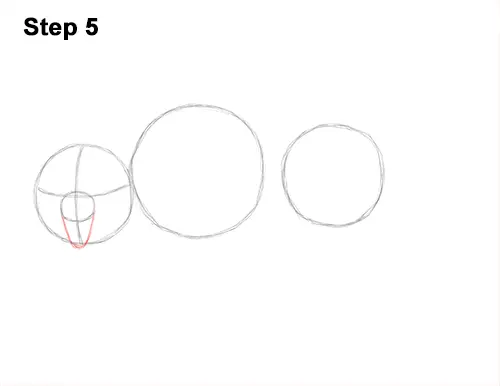
Step 5: Draw a small U-shaped arc under the small circle as a guide for the bottom part of the growling wolf's muzzle. The main part of the arc should stick out of the main circle a little bit.
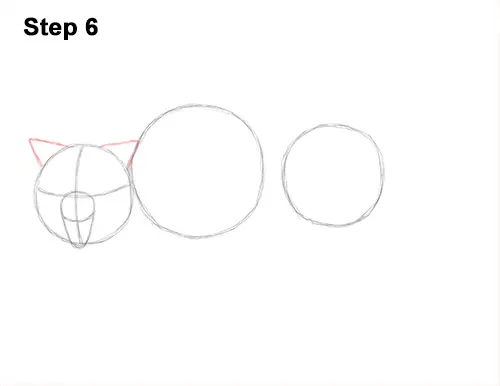
Step 6: Draw two triangle-like shapes on top of the head as guides for the wolf's ears. The tips of the triangles should point to the sides a bit because the ears will be turned back slightly.
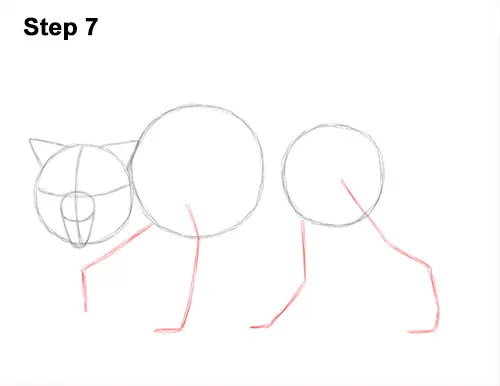
Step 7: Draw four lines under the body (two below each circle) as guides for the growling wolf's legs. Bend the line a bit at the top to indicate the joint and at the bottom to indicate the foot. The wolf will be stepping forward, so the line on the other side should bend downward. The guide for the hind leg on this side of the body should be long and stretch to the right. Bend the line a few times to indicate where the joints and the foot will be. The guide line for the hind leg on the other side should be shorter and point more toward the left.
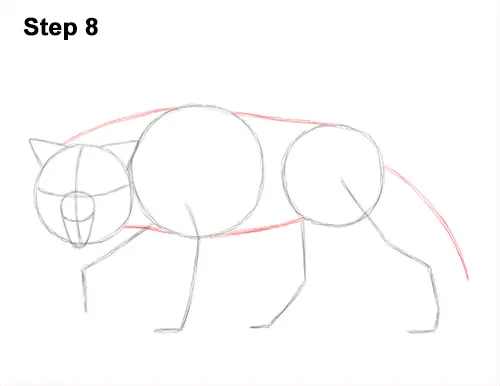
Step 8: Draw a series of curved lines that connect the major shapes to form the rest of the body. The lines on the left side create the wolf's neck, and the lines in the middle make up the torso. Add a long, curved line on the right side of the body as a guide for the tail.
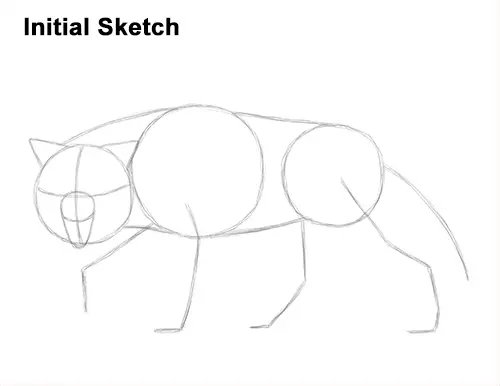
That's it for the initial sketch! From this point on, press harder with your pencil to get a more defined sketch.
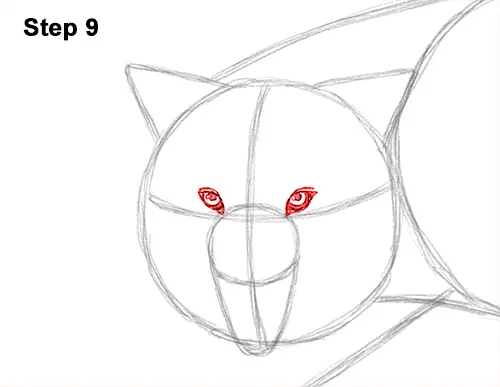
Step 9: Draw two short, curved lines right on top of the small circle in the middle of the head for the top part of the growling wolf's eyes. Pay attention to the distance between these lines and the vertcial guide line so that you get the placement right. Sketch the lines lightly at first so that they're easy to erase if you don't get them right. Draw a small circle under each line for the irises. Remember to sketch lightly at first and only darken the shape when you get it right. The top part of the circles should hide behind the curved lines. Don't draw the circles too big.
Inside each iris, draw a small dot in the middle for the pupils. Next to each pupil, draw a tiny circle to represent the glare in the wolf's eyes. Add a dark value on either side of the irises to create the corner of the eyes. The corners of the eyes should consist of dark, triangle-like shapes on the sides. Add a series of quick, short strokes above the eyes for a furry texture.
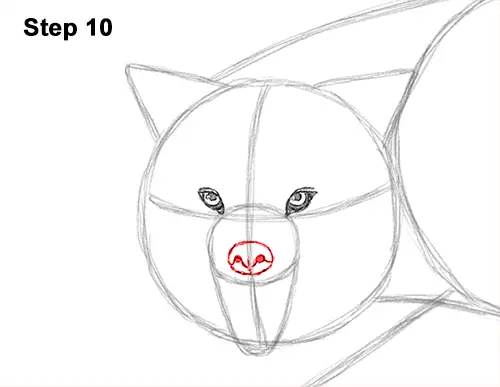
Step 10: Lightly sketch an oval inside the small circle, close to the bottom edge, for the wolf's nose. When you get the placement of the oval right, darken the top edge. Inside the oval, on either side, draw a small circle and shade it in for the nostrils. Split the bottom edge of the nose using a short line and add a few quick, short strokes along the bottom for fur.
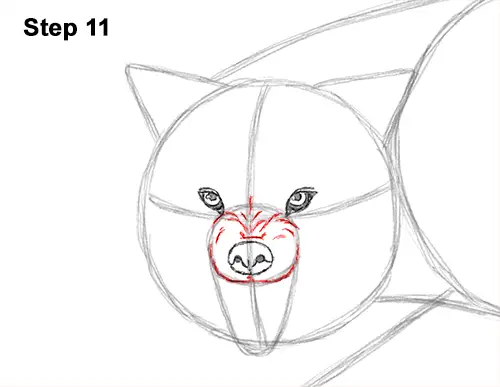
Step 11: Use the small circle as a guide to draw the top part of the growling wolf's muzzle. Darken the lower edge of the circle to create the bottom part of the muzzle. Draw a series of short curved lines above the nose to indicate the wrinkled skin. The lines should curl in from the sides to the top of the nose. Most of the wrinkles should stay within the small circle, but you can add a few outside too.
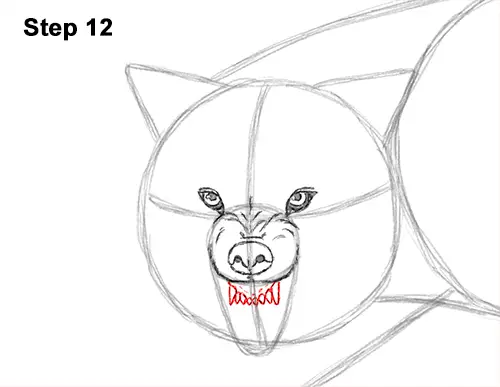
Step 12: Draw the teeth below the muzzle but leave a small space between them to indicate the gums. Start by drawing the long canine on the side as a triangle- like shape, then add the smaller teeth in the middle. There should be six teeth between the long canines on the sides, but you can draw only four to make it easier. The teeth should get progressively smaller until they reach the middle, then they should start increasing in size again. The shape of the teeth should be similar to traingles but with a slightly rounded tips.
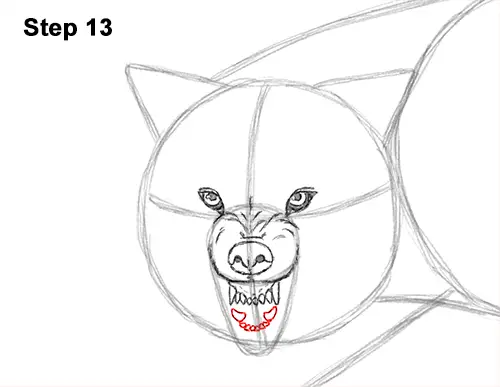
Step 13: Draw the bottom row of teeth a little bit higher than the lower edge of the initial circle. First draw the long canines on the side, then add the smaller teeth in the middle.
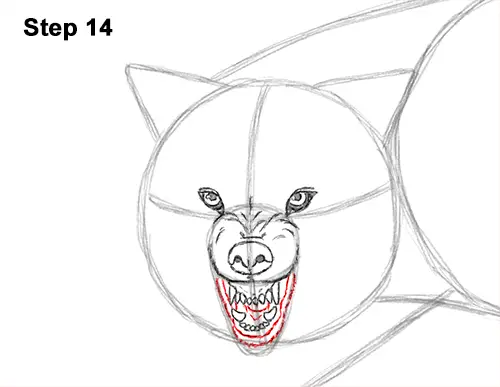
Step 14: Now draw the rest of the mouth. First draw a curved line under the top row of teeth for the tongue. Then follow the basic path of the U-shaped guide to draw the outer edge of the mouth. Darken the U- shaped line to create the lower jaw and chin. Use quick, short strokes to indicate fur.
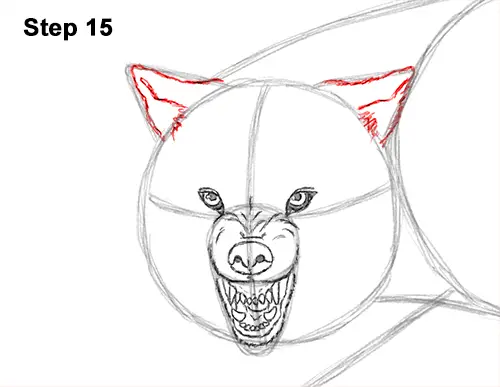
Step 15: Use the triangle-like shapes on top of the growling wolf's head as guides to draw the ears. First darken the outside shape using wavier lines, then add quick, short strokes inside for the fur. Draw the other ear the same way. Add a longer line in the middle of each shape to indicate the ear opening.
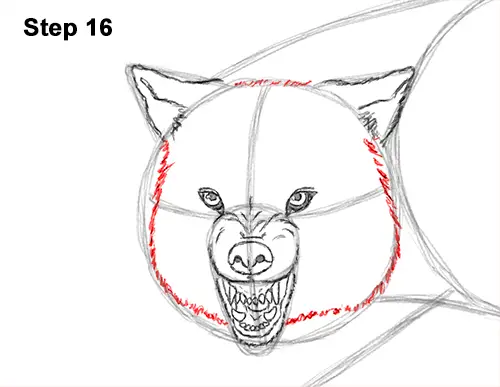
Step 16: Follow the basic path of the initial circle to draw the head. Use quick, short strokes for a furry texture. The top part of the head (closer to the eyes) should be narrower than the intial circle. The bottom part of the head should be wide and touch the edge of the initial circle. You can use longer strokes as you draw the shape of the head for shaggier fur.
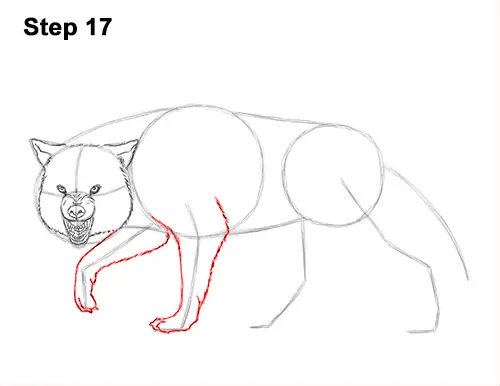
Step 17: Use the lines on the left side of the body as guides to draw the growling wolf's front legs. Lightly sketch the shape of the legs as you follow the path of the guide line. When you get the shape right, darken the lines using a series of quick, short strokes to indicate fur. The top part of the leg should be thick and get get narrower toward the bottom. The top part of the leg should bend. Add a curved line at the tip of the foot to indicate the two visible toes.
Now draw the front leg on the other side of the wolf's body by using the left-most line as a guide. Sketch the leg lightly as you follow the basic path of the guide. Darken the lines only when you get the shape right. Add a few curved lines at the tip of the foot for the toes. The toes should point down, and the foot should sort of dangle loosely as the wolf steps forward.
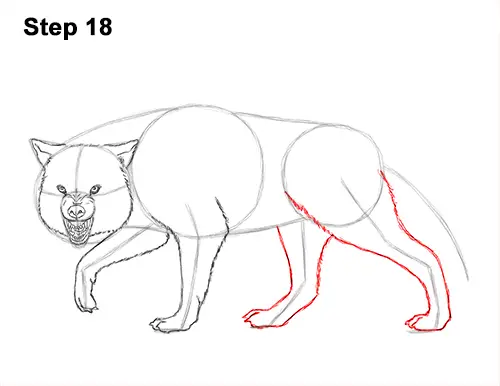
Step 18: Use the lines to the right as guides to draw the growling wolf's hind legs. Sketch lightly as you follow the basic path of the guide to create the shape of the leg. Make the top part wide. Pay attention to how the leg bends at the joints. Darken the lines when you have the shape right. Add a curved line at the bottom for the toes. The foot is facing forward, so only a couple of toes will be visible from this angle. Use quick, short strokes at the top of the leg for the longer fur found there.
Use the other line as a guide to draw the final leg. Remember to sketch lightly at first. When you get the shape of the leg right, darken the lines. Use quick, short strokes near the top for the fur. Use a curved line at the tip of the foot to create the toes and bend the leg where the joints are located.
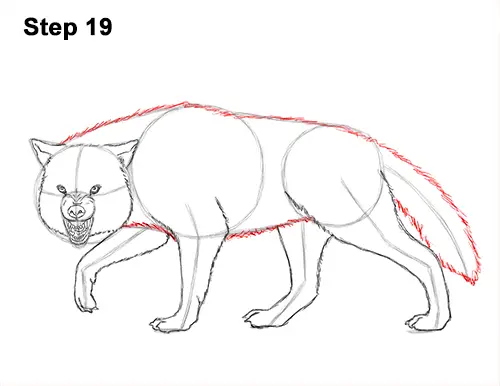
Step 19: Use the remaining lines as guides to draw the rest of the growling wolf's body and tail. Darken the outer edge of the guides using quick, short strokes to create the furry body. Use longer strokes on the underbelly to create a shaggier texture there. Use the curved line on the far right as a guide to draw the tail. Use quick strokes around the guide to create the tail. Make the base thinner and the bottom part wider.
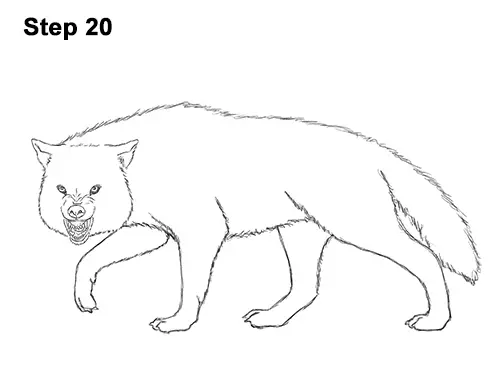
Step 20: For a cleaner look, erase as much as you can of the initial guide lines. Don't worry about erasing all of the guides. It's okay to leave some behind. Re-draw any final sketch lines that you may have accidentally erased.
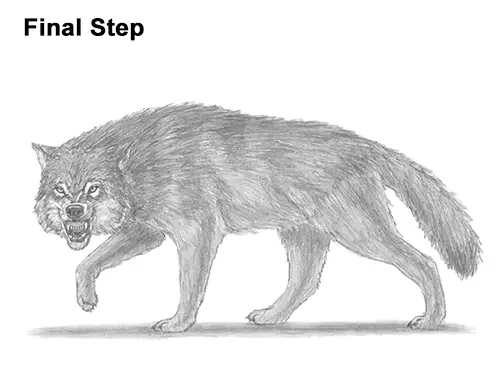
Final Step: Add some shading to your growling wolf drawing to give it more dimension and volume. Pick the direction of the light source when shading so that the shadows are consistent with it. Vary the pressure on your pencil to get different degrees of tonal value. As you add the shadows, use strokes that go in the general direction of the fur. You can stop here for a white wolf or you can skip the shadows and just use a single dark value all over the body for a black wolf.
Add a cast shadow underneath. This helps ground the wolf so it doesn't appear to be floating.
You can add even more value throughout your drawing for extra detail. Use shorter stokes when you add the value to the wolf's head as opposed to the longer strokes you will use for the body. Leave the space above and below the eyes blank for the white fur found there. The wolf's muzzle and the lower half of the face should be pretty white too, so add only a very light value there. As you add the value, separate each individual stroke a bit so that the white of the paper comes through and creates a furry-looking texture.
Adding the value can be very time- consuming, so be patient and take breaks. You can add the value to different sections of the body at a time to break up the shading process. Don't worry about shading too smoothly. The rough value gives the wolf's coat a furry texture. Instead focus on adding the strokes in the basic direction that the fur should go. The strokes on the torso should basically have a horizontal orientation, then gradually turn vertical toward the legs. Push harder on certain sections of the torso to give the fur a dark and light pattern.
Notice how the strokes start with a basic horizontal orientation on the body. They then gradually turn clockwise the closer they are to the bottom until they're more or less vertical on the legs. Use downward strokes for the wolf's tail as well. You can go through the body one more time and darken the dark values a bit more if you'd like. Just remember to separate each individual stroke a bit to get that furry look, and allow some of the paper's white to come through. It's always a good idea to use reference as you draw for a more accurate wolf. Don't forget to pause the video after each step to draw at your own pace.
Thanks for watching! Subscribe to the How2DrawAnimals YouTube Channel for a new tutorial every Tuesday.
To learn how to draw popular cartoon characters, visit EasyDrawingTutorials.com.
RELATED TUTORIALS
 |
 |
 |