







How to Draw a Butterfly (Blue Morpho)
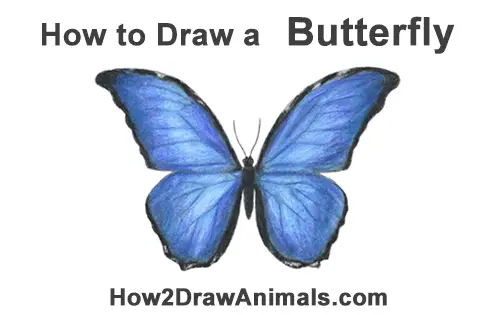
Please PAUSE the "How to Draw a Butterfly (Blue Morpho)" video after each step to draw at your own pace.
Time-Lapse (Speed Drawing) video:
Written step-by-step video tutorial:
For the first few steps, don't press down too hard with your pencil. Use light, smooth strokes to begin.

Step 1: Draw a very small oval near the middle of the page as a guide for the blue morpho butterfly's upper body or thorax. The oval doesn't have to be perfect. It's just a guide. Be sure to leave enough room on the sides for the big wings.

Step 2: Draw a small curved line or arc on top of the thorax as a guide for the blue morpho butterfly's head.
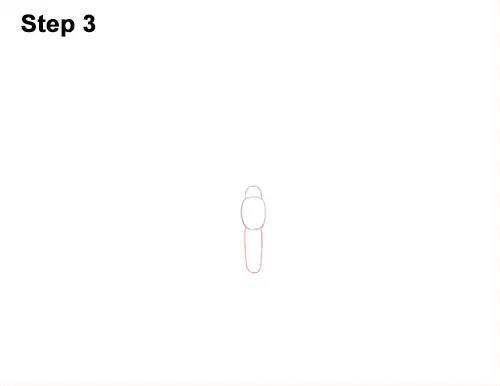
Step 3: Draw a long U-shaped line under the thorax as a guide for the lower half of the blue morpho butterfly's body or abdomen. The abdomen should be a little longer than the length of the thorax and head combined.
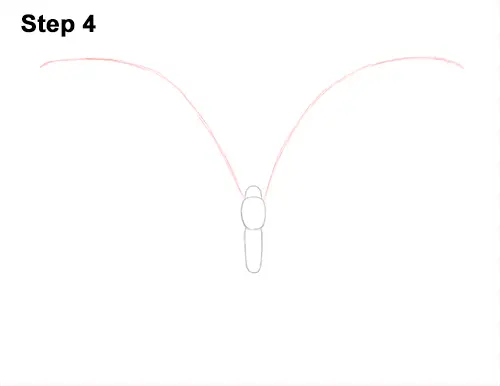
Step 4: Draw a long curved line on either side of the thorax, at the top, as a guide for the first part of the forewing. Sketch lightly at first so that it's easy to erase if you make a mistake. Butterflies have long wings in relation to their bodies, so make these guide lines long. As you draw the line on the right, try to make it as similar as you can to the one on the left for symmetry.
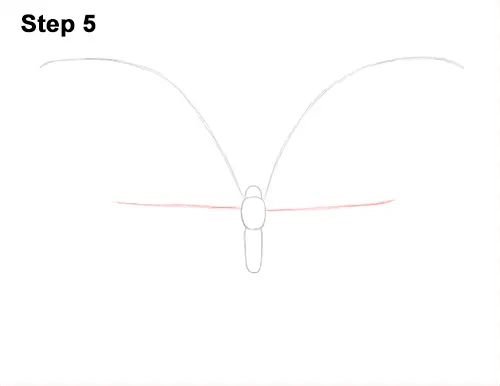
Step 5: Draw a horizontal line on either side of the thorax as guides for the lower part of the blue morpho butterfly's forewings. Pay attention to the length of these lines and make them as symmetrical as you can.
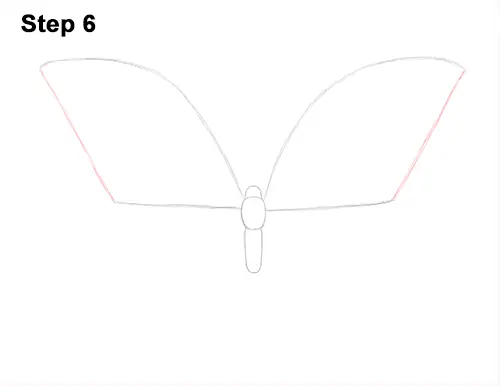
Step 6: Draw a diagonal line on either side that connects the previous lines to complete the guide for the blue morpho butterfly's forewings.
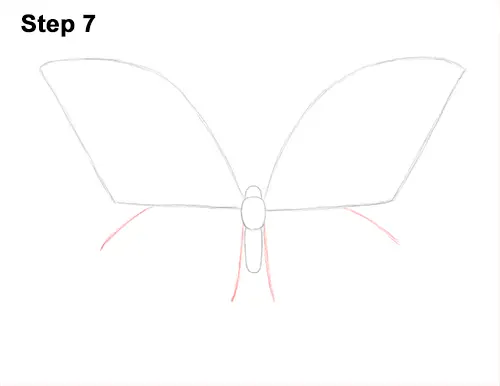
Step 7: Draw a short diagonal line on either side of the body, under the lower edge of the forewings, as a guide for the first part of the hindwings. Then draw a longer line with a more vertical orientation on either side of the body for the second part of the guide for the hindwing. These longer lines should be closer to the butterfly's body. Remember to make the side as symmetrical as possible.
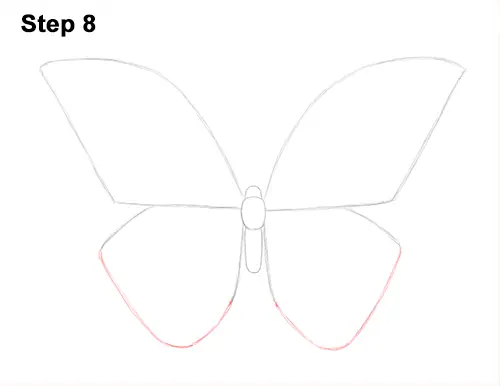
Step 8: Draw a long curved line on either side of the body that connects the previous lines as a guide for the lower edge of the hindwings. When you finish, check your blue morpho butterfly sketch for symmetry and fix anything that stands out. It doesn't have to be perfect. Just tweak any major inconsistencies.
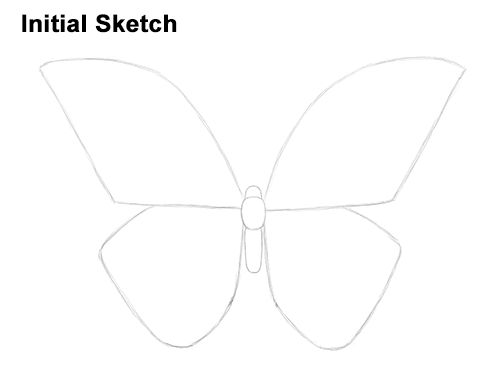
That's it for the initial sketch! From this point on, press harder with your pencil to get a more defined sketch.
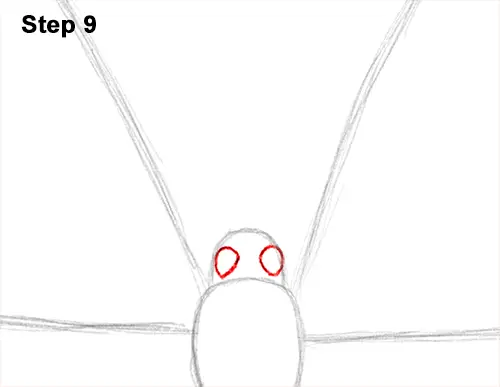
Step 9: Draw two small half-circles inside the head for the compound eyes. Butterflies have big eyes, so they should take up a lot of room inside the head.
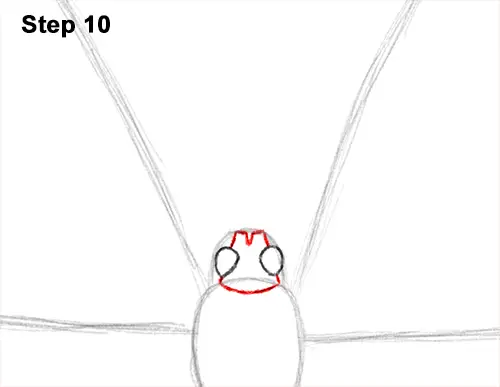
Step 10: Draw a curved line under the blue morpho's eyes for the bottom part of the head. Add an M-shaped line between the eyes at the top for the second part of the butterfly's head.
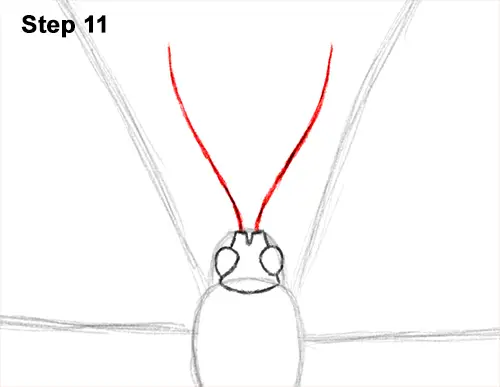
Step 11: Draw two long curved lines on top of the head for the blue morpho butterfly's antennae. Try to make these lines mirror images of each other.
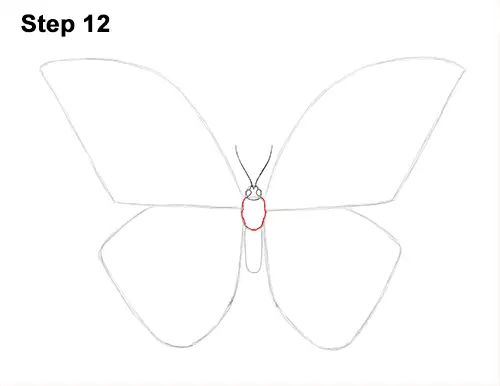
Step 12: Use wavy lines as you follow the basic path of the initial oval to create the shape of the blue morpho's thorax.
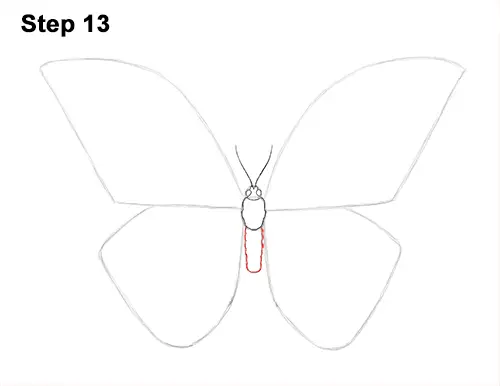
Step 13: Use the initial curved line as a guide to draw the blue morpho butterfly's abdomen. Follow the basic path but make the lines wavier.
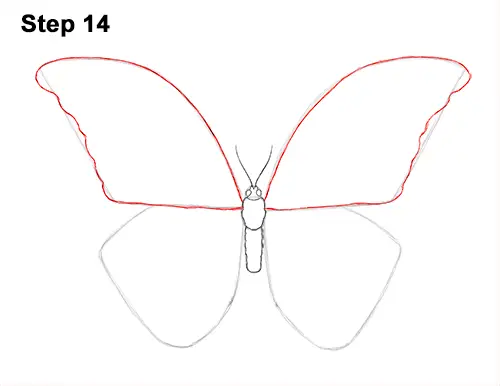
Step 14: Use the initial series of lines at the top as guides to draw the outer shape of the forewings. First darken the top curved edge and the lower edge of the guide lines. When you darken the sides of the forewings, use a wavy line as you follow the basic path of the guide. Try to make the wavy sides as similar as to each other as you can to give the butterfly's wing symmetry.
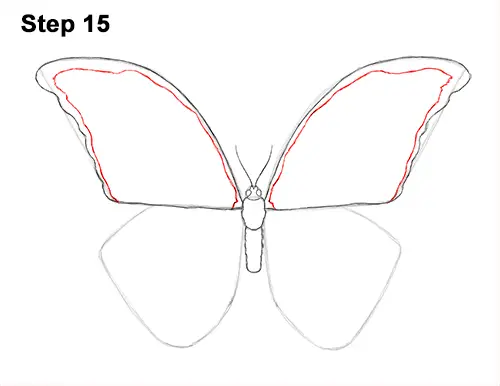
Step 15: Draw a wavy line inside each forewing near the edge for the detail on the wings' pattern. Follow the path of the forewings but don't make this line too similar. Make it wavier and don't add the bottom edge. Add the line to the blue morpho's other wing too and make them as similar to each other as you can.
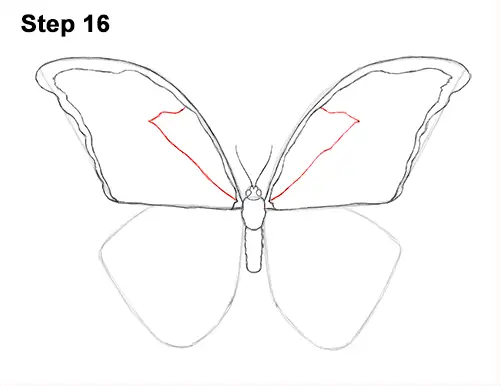
Step 16: Draw an angled line inside each of the blue morpho butterfly's forewing for the first part of the veins. These lines should start near the thorax and go up diagonally, then angle in toward the curved edge of the forewing.
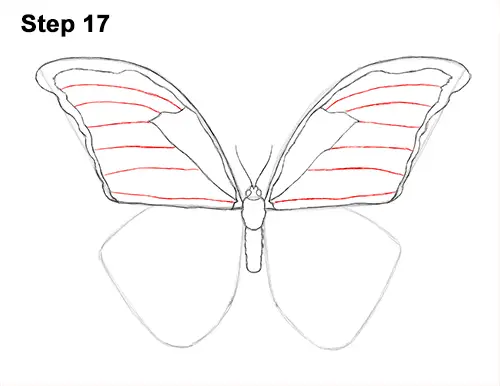
Step 17: Now draw a series of curved horizontal lines inside the forewing for the rest of the blue morpho's veins. The first lines should start at the corner of the previous lines. Then add two more lines above on each side. The three curved horizontal lines on each forewing should be spaced out pretty evenly. Now draw three more curved lines on each forewing under the first line. These lines should be spaced apart a bit more, and the bottom line should be very close to the lower edge of the butterfly's forewing.
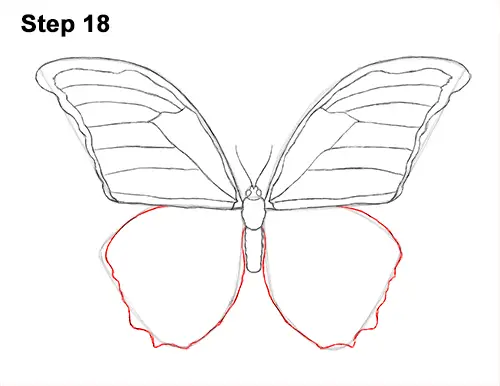
Step 18: Use the initial curved lines below the forewings as guides to create the shape of the blue morpho butterfly's hindwings. Darken the guides, but when you get to the lower outer edges, make the lines wavier. Make the inner edges of the hindwings curve in toward the abdomen more. Curve the outer lower edge of the hindwing on the right too and make it similar to the left side.
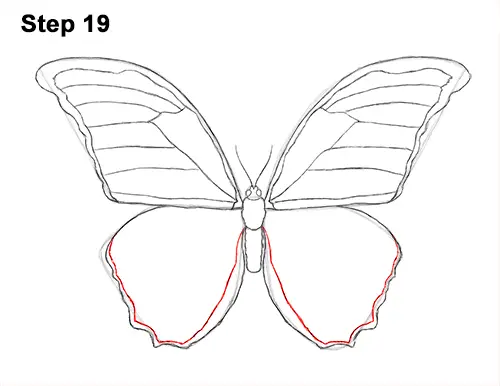
Step 19: Draw a wavy line near the bottom edge of each hindwing for the blue morpho's color separation. Follow the basic path of the hindwing as you draw the pattern. Keep the line close to the edge of the hindwing.
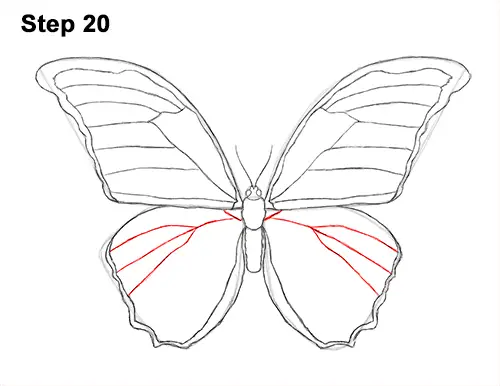
Step 20: Draw a small line inside each hindwing at the top near the thorax for the first part of the veins. Then draw a longer curved line. The longer curved lines should start at the top, near the butterfly's thorax, and then curve down toward the outer edges. Above each long line, draw a smaller line that starts near the middle of the long lines and ends on the outer edges. Draw another similarly shaped small line under each of the long curved lines. The end result should be similar to a three-pronged fork.
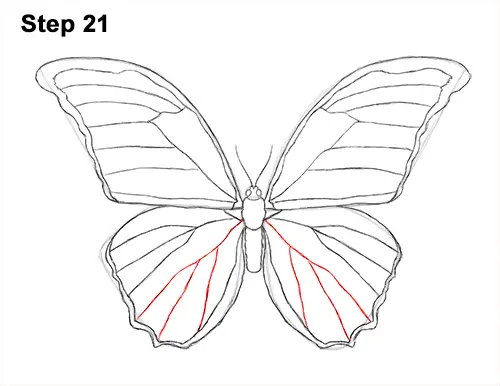
Step 21: Draw another long line inside each hindwing, on the lower half, for the second part of the veins. These lines should have a diagonal orientation, and they should start near the middle of the thorax like the lines above them. Below each of the long lines, draw two smaller, more vertical lines to complete the veins on the blue morpho butterfly's hindwings.
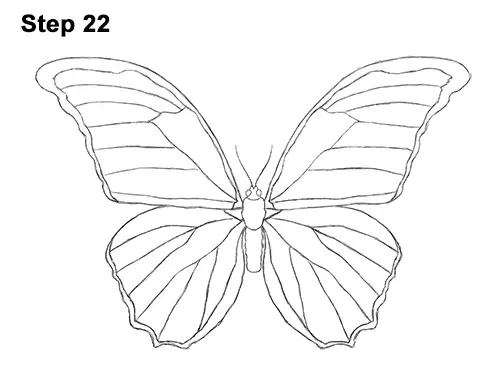
Step 22: For a cleaner look, erase as much as you can of the initial guide lines. Don't worry about erasing all of the guides. It's okay to leave some behind. Re-draw any final sketch lines that you may have accidentally erased. You can also LIGHTLY erase some of the final lines so that the colors don't get too muddled with the graphite in the next step.
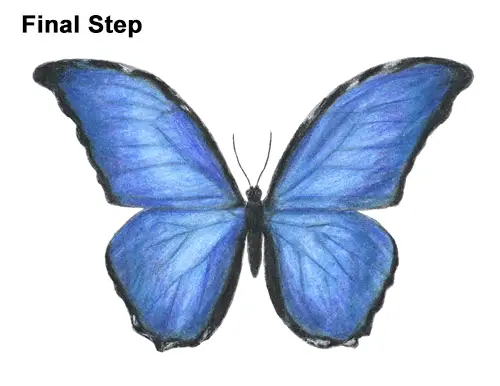
Final Step: Blue morpho butterflies are colorful, so instead of the usual shading, try coloring your drawing. Start by using black for the body. Use black for the outer edges of the wings too. Use a little less color in random areas to create a few white spots.
Start coloring lightly at first, then build up to the level of black that you want by pushing down harder. Now use dark blue for the outer edges of the wings and the veins. Use these colors to create a blue morpho butterfly. But you can also color your butterfly orange or pink or any other color you want! Add a bit of purple right on top of the dark blue. Add some more dark blue but push a bit harder to start blending the two colors.
Continue adding different shades of blue, like sky blue and light blue, right on top of each other. Push down harder as you color to blend the different shades together. Use a bit more dark blue to emphasize the veins. Coloring can be time- consuming, so be patient and take breaks. It's always a good idea to use reference as you draw. And don't forget to pause the video to draw at your own pace.
Thanks for watching! Subscribe to the How2DrawAnimals YouTube Channel for a new tutorial every Tuesday.
To learn how to draw popular cartoon characters, visit EasyDrawingTutorials.com.
RELATED TUTORIALS
 |
 |
 |