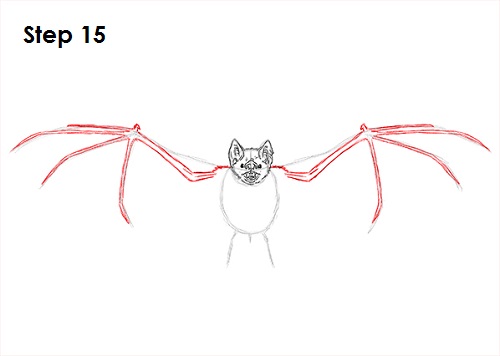
Step 15: Draw the bat's wings using the initial lines as guides. First draw a couple of fuzzy arcs on the side of the head for the shoulders. Then follow the basic path of the guide lines to create the arms and the long fingers. Draw a small shape at the top of the wing for the small thumb. Then draw a long, skinny shape slightly above the guide for the first digit. Use the other lines as guides to draw the remaining digits of the bat's hand. Follow the path of the line as you thicken up the fingers. There should be a total of five digits, including the tiny thumb. Complete the rest of the arm and make it thicker than the fingers. Draw the wing on the right using the same technique. Draw the small thumb at the top and the first digit above the guide line. Draw the rest of the digits by using the remaining lines as guides. Make the digits long and pointy. Be sure to have four long digits plus the small thumb on top. Finish the rest of the bat's arm and make it thicker than the digits.
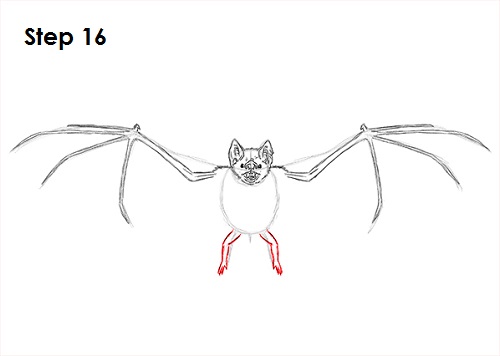
Step 16: Use the lines at the bottom as guides to draw the bat's legs. Follow the path of the guide as you make the line thicker. Draw the bat's small toes at the bottom. Draw the other leg using the same technique.
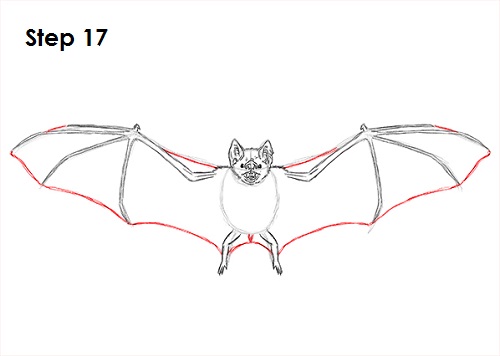
Step 17: Draw a few lines to connect the digits to each other and to the legs to create the bat's actual wings. Don't draw the lines too straight and rigid. Bend them a little for a more organic feel. The longer your original guide lines were, the bigger your bat's wings will be. Draw a tiny tail between the bat's legs and connect it to the legs with a couple of lines.
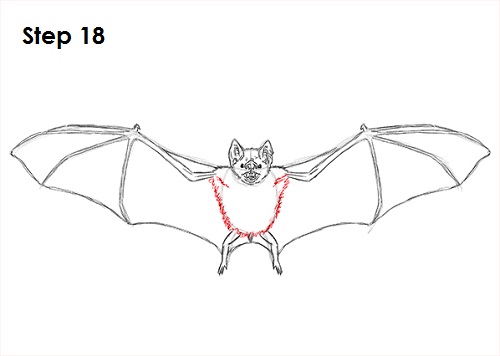
Step 18: Use the initial oval as a guide to draw the rest of the bat's body. Use quick, short strokes to represent fur.
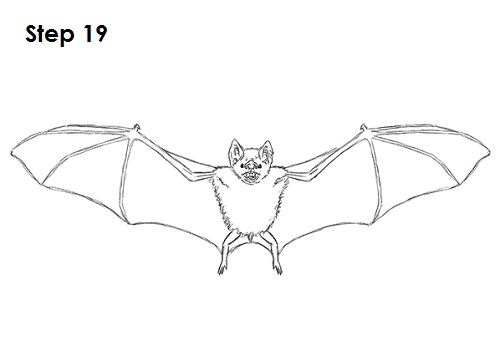
Step 19 (optional): For a cleaner look, erase as much as you can of the initial guide lines. Don't worry about erasing all of the guides. It's okay to leave some behind. Also re-draw any final sketch lines that you may have accidentally erased.
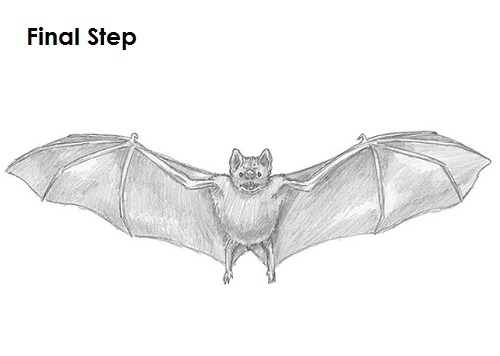
Final Step (optional): Add some shading to your bat drawing to give it more dimension and volume. Pick the direction of the light source when shading so that the shadows are consistent with it.
You can add more value throughout your bat drawing for extra detail. Vary the pressure on your pencil to get different degrees of tonal value. Try to add the value smoothly throughout the bat's wings for a leathery feel instead of a rough-textured look. It's always a good idea to use reference for accuracy when drawing. Remember to PAUSE the "How to Draw a Bat" video to draw at your own pace.
Thanks for visiting! Subscribe to the How2DrawAnimals YouTube Channel for a new tutorial every Tuesday.
To learn how to draw popular cartoon characters, visit EasyDrawingTutorials.com.
RELATED TUTORIALS
 |
 |
 |


