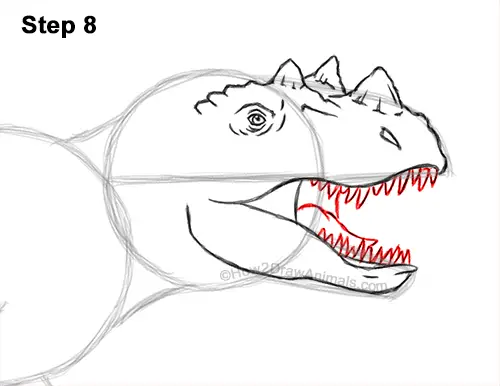
Step 8: Draw a series of small, triangular shapes along the edges of the mouth for the Ceratosaurus' teeth. Make the teeth different sizes. Draw a couple of curved lines in the middle for the visible section of the tongue.
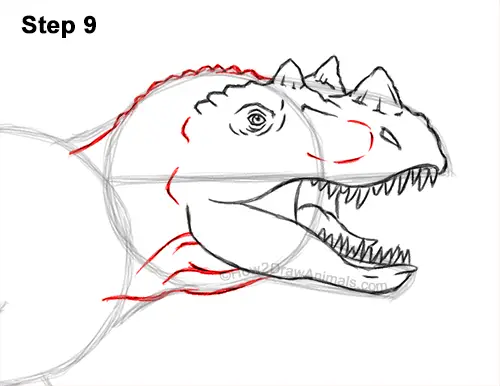
Step 9: Use the other shapes and lines as guides to draw the rest of the Ceratosaurus' head. Use small, angled lines at the top to create spikes. Add a few lines inside the head and on the neck to create the bony structure, the wrinkles and veins.
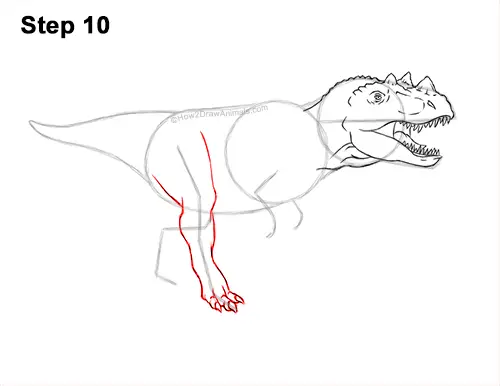
Step 10: Use he long angled line under the body as a guide to draw the Ceratosaurus' hind leg. First lightly sketch the shape of the leg around the guide line. Curve the shape to indicate the joints and muscle structure. Bend the bottom of the shape to the right for the foot. At the bottom, draw three small, thin shapes for the toes. On the tip of each toe, draw a small, triangular shape for the claws.
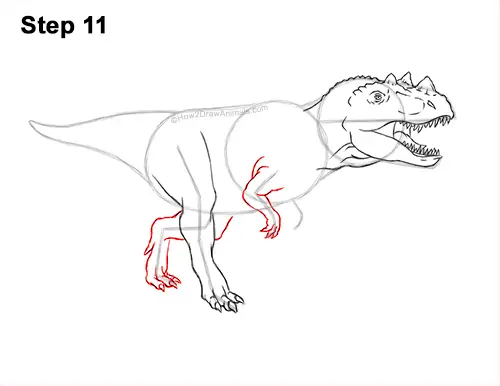
Step 11: Draw the Ceratosaurus' second hind leg behind the first hind leg. Follow the path of the guide as you draw the shape of the leg. Draw the toes at the bottom as three small, thin shapes. On the tips of the toes, draw small, triangular shapes for the claws. Don't overlap the first hind leg as you draw this leg. Use the angled line to the right as a guide to draw the arm the same way. Draw the arm around the guide. Add three small, thin shapes at the bottom for the fingers. Sketch lightly at first and only darken the lines when you get the shapes right.
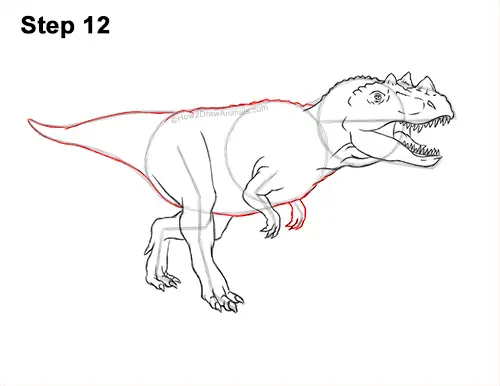
Step 12: Darken the outer edges of the guides to finalize the shape of the Ceratosaurus' body. Use short, angled lines as you darken the top edge to create small spikes. Don't overlap the legs that are on the side as you draw the underside of the body. Use the line that's under the body as a guide to draw the visible section of the other arm.
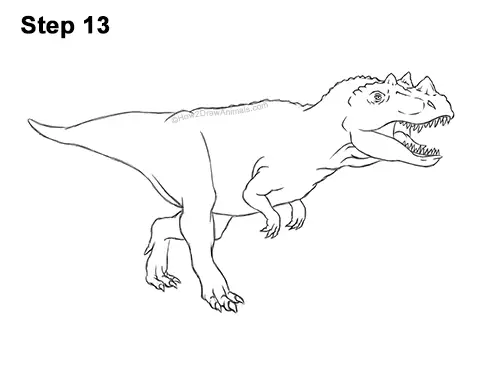
Step 13: For a cleaner look, erase as much as you can of the initial guide lines. Don't worry about erasing all of the guides. It's okay to leave some behind. Re-draw any final sketch lines you may have accidentally erased.
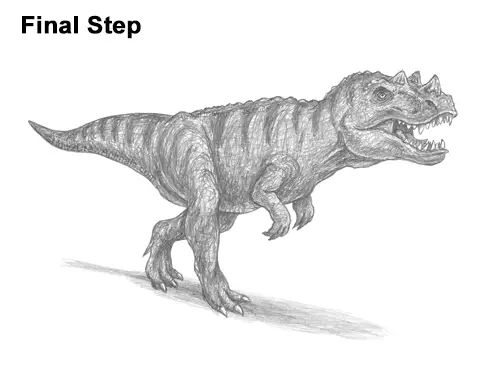
Final Step: Shade your drawing for extra detail. Nobody is exactly sure what Ceratosaurus looked like so you cna shade yours however you'd like. For this look, use a medium value all over the body. Don't shade too smoothly; use scribbly lines to create a rough texture. Add the scribbles so that they countour to the shape of the body. Use a dark value to create a striped pattern. Shade lightly at first and gradually build up to darker values. For light values, push down very lightly on your pencil and push down harder for darker values. Add a slightly darker value throughout the body to create shadows. Pick a light source as you shade so that the shadows are consistent across the body. Here the light source is coming from the top so most of the shadows will be on the underside of the shapes. Add a cast shadow at the bottom using a medium value. Shading can be time-consuming, so be patient and take breaks. For a more detailed guide on how to shade, check out this tutorial: How to shade.
Thanks for visiting! Subscribe to the How2DrawAnimals YouTube Channel for a new tutorial every week.
To learn how to draw popular cartoon characters, visit EasyDrawingTutorials.com.
To learn how to draw Manga, visit How2DrawManga.com.
RELATED TUTORIALS
 |
 |
 |


