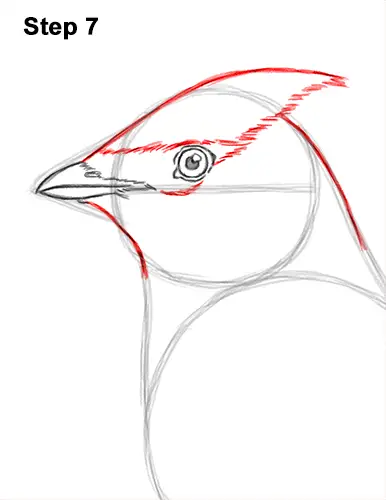
Step 7: Use the other shapes and lines as guides to draw the rest of the cedar waxwing's head. Draw a triangular shape on the top, right side of the head for the crest. Pay attention to the size of the crest in relation to the head. Use a series of short strokes on the right edge of the crest for a feathery texture. Inside the head draw the mask-like pattern using a series of short strokes for a feathery texture. Place the pattern around the eye and connect it to the crest on the right side.
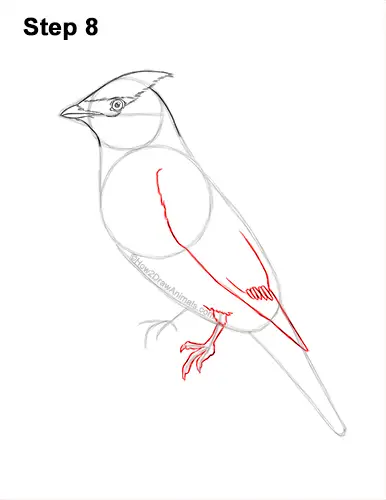
Step 8: Draw a long, curved line across the entire body for the waxwing's folded wing. Make the top part of the shape wide and then gradually make it thinner toward the bottom. The bottom tip of the wing should extend into the shape of the tail. Along the middle of the wing, draw a series of small, thin oval-like shapes for the tips of the feathers that look like drops of wax (which is where the name waxwing comes from). Use the lines that are under the body and on the right side as a guide to draw the bird's first leg. Add a few short strokes at the top for the feathery base of the leg. Draw the shape of the leg, foot and toes around the guide lines. Make the tips of the toes pointy and curved for the nails.
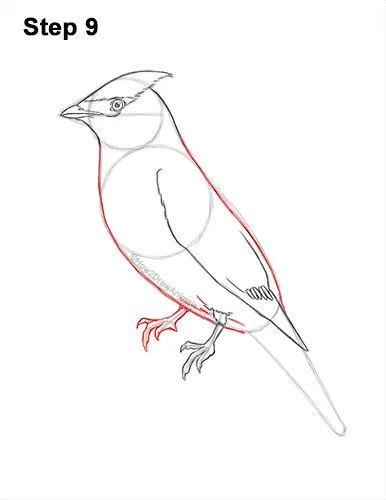
Step 9: Use the short lines on the left as guides to draw the cedar waxwing's other foot the same way. Draw the shape of the foot and toes around the guide lines. Keep the shape of the foot thin and the make the tips of the toes thin and pointy for the nails. Use the remaining shapes and lines as guides to draw the rest of the bird's body. Simply darken the outer edges of the initial guides to create the shape of the body.
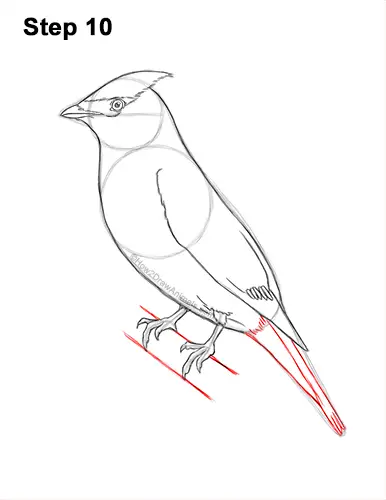
Step 10: Draw the shape of the tail within the long, thin guide on the right side. The tail is made up of long, sloping lines. Make the base of the tail wider than the tip and add a few short strokes at the top for a feather texture. Under the feet, draw a couple of sloping lines to give the cedar waxwing a branch to perch on.
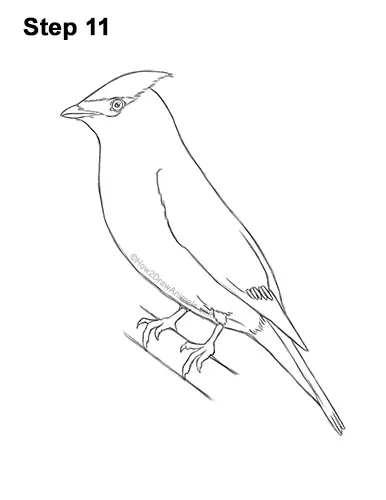
Step 11: Go over the final lines with a pen, marker or any other type of permanent ink. Take your time and be careful when you ink to avoid any accidents. Don't ink the initial guide lines, only the final drawing. After inking, get rid of every pencil mark with an eraser for a cleaner drawing of a cedar waxwing.
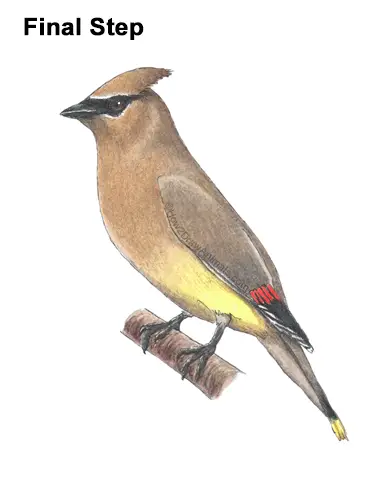
Final Step: Now color your waxwing drawing! Use different shades of brown to color the top part of the body. Use dark brown to create shadows, regular brown for mid-tones and light brown for highlights. Add the colors lightly at first and gradually blend them together as you color darker and push down harder on your pencils. Use yellow to color the underside of the body. Use a smooth transition between the brown and yellow to create the silk-like texture of the feathers. Color the beak, mask-like pattern, feet and tips of the wing black and gray. Leave a few sections blank on the head and wing for the white feathers. Color the small shapes across the middle of the wing red for the wax-like tips of the feathers. Use different shades of brown and a bit of green to color the branch. Coloring can be time-consuming, so be patient and take breaks. It's a good idea to use reference as you color for a more accurate depiction of a cedar waxwing bird.
Thanks for visiting! Subscribe to the How2DrawAnimals YouTube Channel for a new tutorial every week.
To learn how to draw popular cartoon characters, visit EasyDrawingTutorials.com.
To learn how to draw Manga, visit How2DrawManga.com.
RELATED TUTORIALS
 |
 |
 |


