







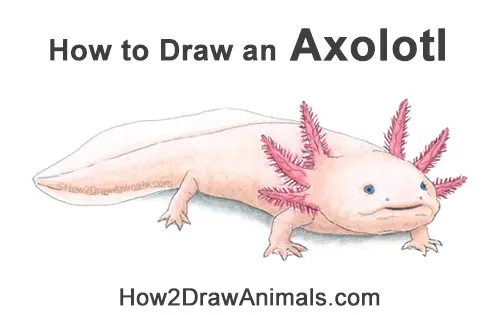
In this free art lesson, you'll learn how to draw an Axolotl step-by-step. All tutorials on How2DrawAnimals.com are designed for beginners and experienced artists alike. These online guides are easy to follow, teaching you basic sketching fundamentals while illustrating how to depict animals realistically. Each subject includes a video tutorial option along with step-by-step photos and written text.
Stay tuned for more free drawing lessons by:
This page contains Amazon affiliate links. If you choose to purchase through these links, I earn a small commission at no extra cost to you.

To draw this Axolotl, follow along with the video tutorial below and pause after each step to proceed at your own pace. You may find it easier to use the step-by-step drawings underneath the video. The new lines in each step are highlighted in red, so you'll know exactly what to sketch next. You can also open the video in a new tab and combine both methods.
Below you can watch a Narrated step-by-step video tutorial:
Materials You’ll Need
Before starting, gather these basic drawing supplies:
- Pencil (an HB lead pencil is best for light sketches)
- Eraser
- Black ink pen or marker
- Drawing paper
- Colored pencils or markers
For the first few steps, don't press down too hard with your pencil. Use light, smooth strokes to begin so that it's easy to erase if you make a mistake.
Start with Simple Lines and Shapes
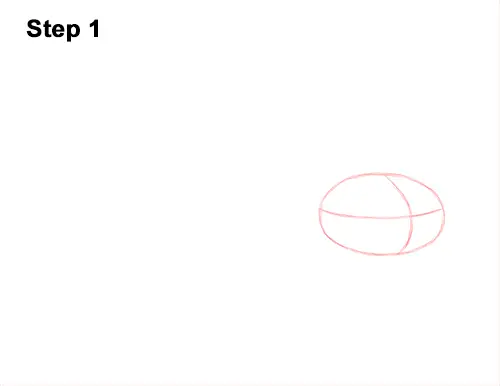
Step 1: Draw an oval as a guide for the axolotl's head. To draw the oval, first make four marks to determine the oval's height and width. Make sure that the marks for the oval's width are farther apart than the marks for the oval's length. Then connect the marks using curved lines. Sketch lightly at first so that it's easy to erase if you make a mistake. Inside the head, draw two intersecting lines as construction guides to help you determine the placement of the facial features later. Curve the lines to contour to the shape of the head and pay attention to their placements.
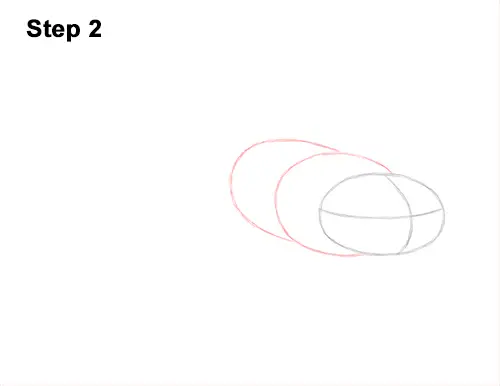
Step 2: To the left, draw two curved lines as guides for the front part of the axolotl's body. These lines should be similar to ovals behind the head. The body is receding back, so draw these shapes higher than the head.
Keep Building the Animal Slowly
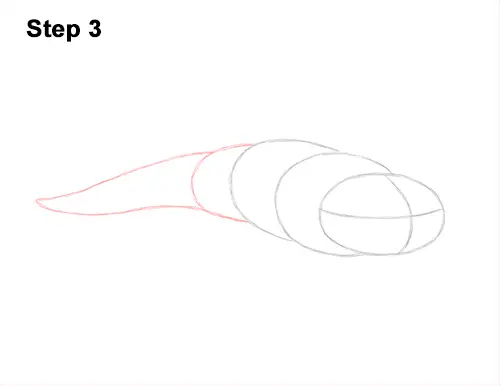
Step 3: Farther to the left, draw a shorter, curved line as a guide for the back portion of the axolotl's body. This line should be similar to an arc on its side. To the left of that, draw two long lines that curve to the left as a guide for the tail. The tail should be long in relation to the body.
Finish Up the "Skeleton"
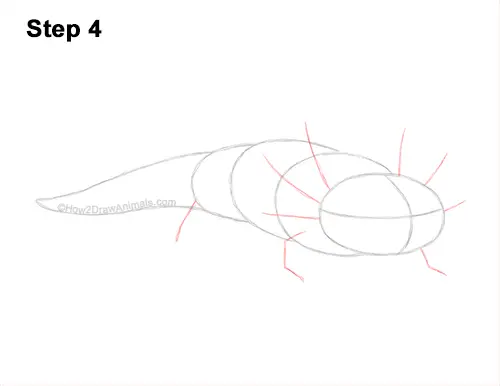
Step 4: Draw three lines on either side of the axolotl's head as guides for the external gills. Pay attention to the positions and lengths of these lines on the head. Under the body, draw three short lines as guides for the legs. Bend the lines on the right to indicate the joints on the legs. Axolotls have short legs, so don't draw these lines too long.
That's it for the guides! From this point on, press down harder with your pencil for a more defined drawing of an axolotl.
Now Add Details
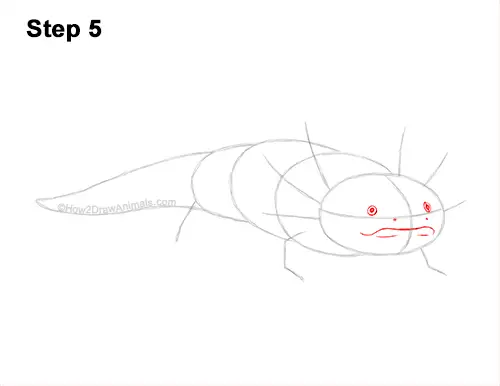
Step 5: Inside the head, draw two small circles for the axolotl's eyes. Place the eyes on top of the horizontal guide and on either side of the vertical guide. Add a smaller circle inside each eye and shade them in for the pupils. Make the eye on the right slightly smaller and flatter. Below the eyes, draw a wavy, horizontal line for the mouth. Pay attention to how long the line is and how it curves. Sketch all these shapes lightly at first and only darken the lines when you get them right. Above the mouth, draw two tiny circles for the nostrils. Add a few lines under the mouth for creases on the skin.
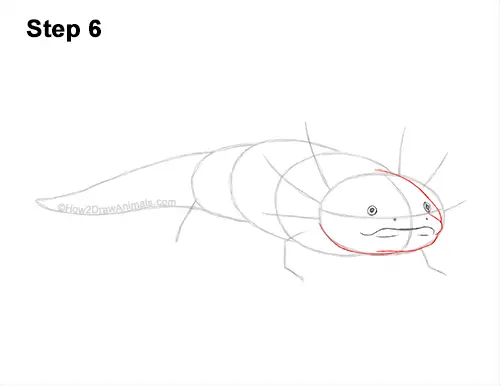
Step 6: Use the first oval as a guide to draw the axolotl's head. Follow the basic path of the oval as you draw the head but make the top, right side thinner. Curve the lines to the right of the mouth. Don't connect the lines on the top, left side.
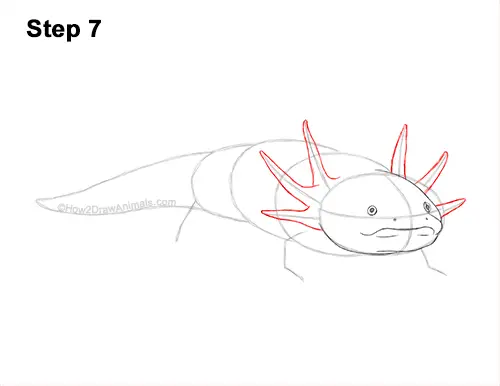
Step 7: Use the short lines on the sides of the head as guides to draw the axolotl's external gill stalks. Draw the shapes of the gills around the guide lines. Make the bottoms of the gills thick and the tops thin and pointy. The bottom gills should be the smallest. Sketch lightly at first and only darken the lines when you get the shapes right.
Stay Patient and Keep Drawing - You're Almost There!
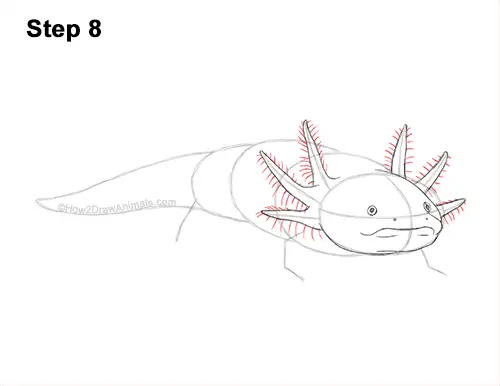
Step 8: Draw a series of short lines along the edges of the axolotl's gill stalks for the small filaments. Make the lines short at the top and then gradually make them longer toward the bottom.
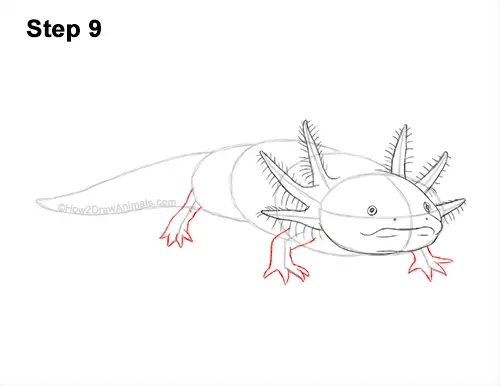
Step 9: Use the lines under the body as guides to draw the axolotl's legs. Lightly sketch the shapes of the legs around the guide lines. Curve the shapes of the legs along the paths of the guides. On the bottom of each leg, draw a few small, V-shaped lines for the toes. Spread out the shapes of the toes. The legs and feet should be small in relation to the body.
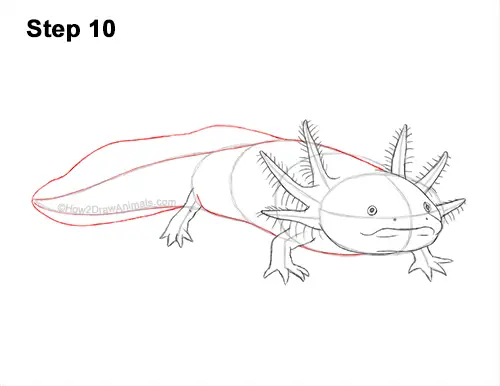
Step 10: Darken the outer edges of the initial guides to create the shape of the body. Don't overlap the gills or legs as you darken the lines. On the left side, draw a long curved line that surrounds the tail for the thin section of skin. Make these lines wavy. The top section should be wider than the bottom.
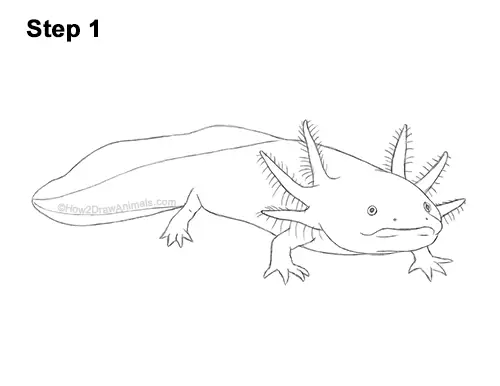
Step 11: For a cleaner look, erase as much as you can of the initial guide lines. Don't worry about erasing all of the guides. It's okay to leave some behind. Re-draw any final sketch lines you may have accidentally erased.
Now It's Time to Shade
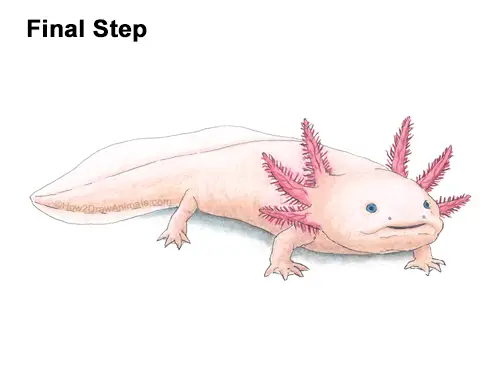
Final Step: Now color your axolotl drawing! Axolotls have different colors, so you can color your drawing however you'd like. For this look use different shades of pink and peach for the body. Don't color too dark; keep the colors light. Blend the colors together by pushing down slightly harder on your colored pencils. Use darker shades of pink along the bottom sections for shadows. Inside the gill stalks, draw a few angled lines using dark red for veins. Add more filaments to the gills using dark red too. Color the gill stalks a dark shade of pink and peach. For a white axolotl just leave the drawing blank and only add color to the gill stalks and to create shadows. At the bottom, add a shadow using gray and a bit of blue. Coloring can be time-consuming, so be patient and take breaks. It's a good idea to use reference as you color for a more accurate depiction of an axolotl.
Buy My Step-by-Step Art Books on Amazon!
If you enjoyed drawing with me and want to expand your artistic skills, please consider checking out my step-by-step drawing books on Amazon! My books break down a wide variety of animals into simple geometric shapes, making it easy and fun for artists of any skill level to follow along. Every purchase directly helps support this site so I can keep creating high-quality, free tutorials for the art community.
Click Here to Order Your Copy Today!
Thanks for visiting! Subscribe to the How2DrawAnimals YouTube Channel for new tutorials every week.
And to learn how to draw cartoons, visit EasyDrawingTutorials.com.
To learn how to draw Manga, visit How2DrawManga.com.
RELATED TUTORIALS
 |
 |
 |