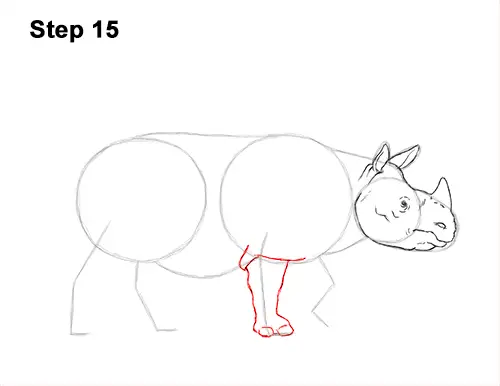
Step 15: Use the second line from the right as a guide to draw the rhino's first front leg. Follow the guide and lightly sketch the shape of the leg around it. When you get the shape of the leg right, darken the lines. At the top, where the leg meets the body, draw a couple of curved lines for the thick, loose skin hanging over the leg. The shape of the leg should be wide at the top and thin at the bottom. The rhinoceros' foot should also be wide. At the bottom of the foot, draw a couple of square-like shapes for the big, thick nails.
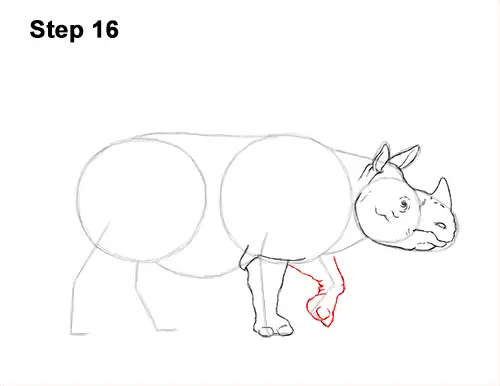
Step 16: Use the angled line on the right as a guide to draw the other front leg the same way. Lightly sketch the shape of the lifted leg around the angled guide line. When you get the shape right, darken the lines. Use a series of lines along the left edge for wrinkles. The shape of the rhinoceros' leg should be thick at the top, thin in the middle where it bends and thick again for the foot. Add a couple of curved lines on the tip of the foot for the rhino's nails.
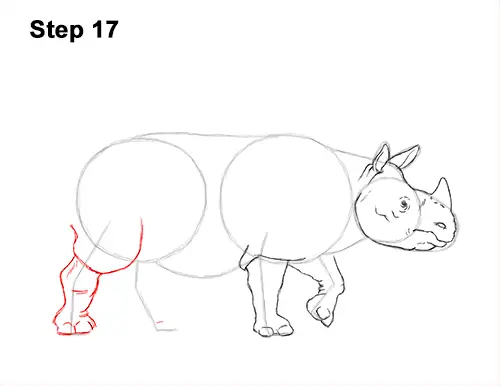
Step 17: Use the angled line on the far left side as a guide to draw the first hind leg. Follow the path of the guide and lightly sketch the leg around it. The top part of the leg should consist of a wide, curved line for the loose skin on top overlapping the shape of the leg. When you get the shape of the rhino's leg right, darken the lines. The shape of the leg should bend twice on the left side to indicate the joints. The foot at the bottom should be blocky and wide. Add a couple of curved lines at the tip for the nails.
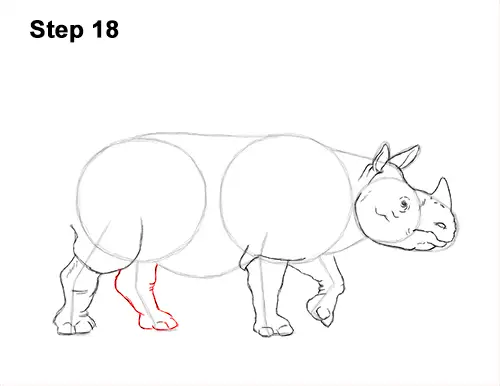
Step 18: Use the last line under the rhino's body as a guide to draw the other hind leg the same way. Draw the shape of the leg around the guide. Curve the shape at the joints and make the foot wide. Use short, curved lines to indicate the wrinkles on the joints and add curved lines on the foot for the nails.
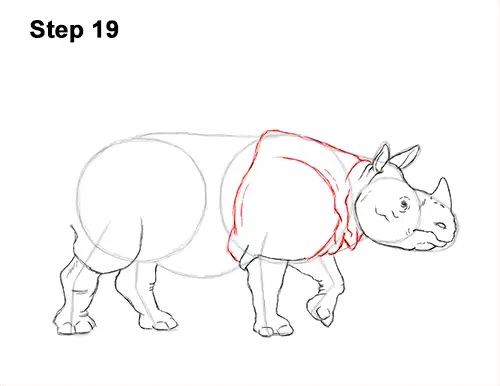
Step 19: Use the first big circle as a guide to draw the front part of the rhino's body. Draw a few curved lines behind the ears for the folded skin on the neck. Then darken the top part of the initial circle. Near the left edge of the initial circle, bend the line down for the big section of folded skin there. This line should curve down and meet the front leg at the bottom. Add and extra line inside to make the shape thicker.
Draw a series of curved lines along the bottom edge for the folds on the neck's skin. Rhinoceroses have thick hides that act like armor. More wavy lines indicate more folds on the skin. Add a long fold on the skin that stretches from the neck to the top, left side. As with the legs, sketch lightly at first and only darken the lines when you get the shapes right.


