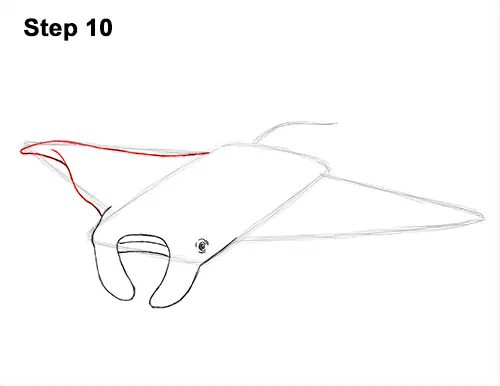
Step 10: Use the triangle-like shape on the left as a guide to draw the first pectoral fin. Follow the path of the guide line at the top to create the back edge of the manta ray's pectoral fin. Make the line wavier so that the left side is raised up and the right side dips down. Sketch lightly at first and only darken the wavy line when you get its shape right. Now follow the basic path of the initial sloping line to create the front edge of the pectoral fin. Follow the path of the guide but at the top, curve the line to the inside of the initial triangle shape. Draw a smaller curved line at the bottom, near the tip to emphasize the folding of the pectoral fin.
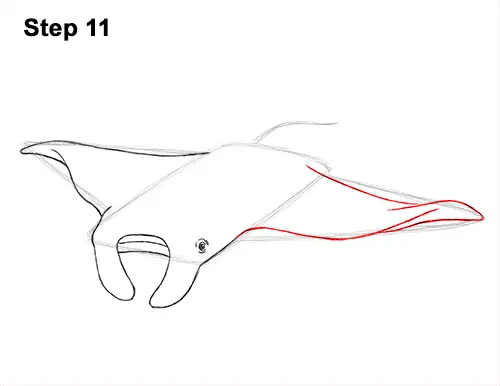
Step 11: Use the initial triangle shape on the right as a guide to draw the second pectoral fin. Follow the path of the guides but make the lines wavier to simulate movement. The front edge of the manta ray's pectoral fin should dip in the middle , and the sides should curve up. For the back edge of the fin, the middle section should also dip low. Follow the basic path of the initial line to guide you.
The oceanic manta ray's fins can be tricky to draw. Sketch lightly at first so that it's easy to erase if you make a mistake. When you get the wavy shape of the pectoral fin right, darken the lines. Notice how the lines curve and overlap each other at the tip to create the fin folding over. The way the lines curve at the tip makes a bit of the underside of the fin visible.
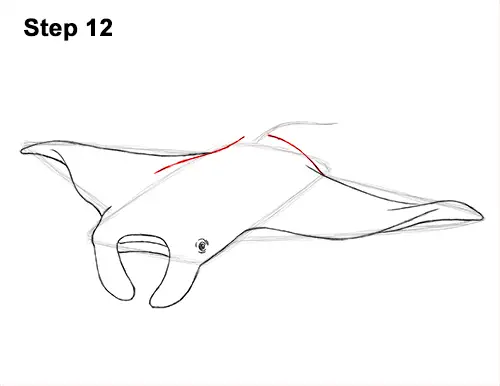
Step 12: Use the top part of the initial rectangular shape as a guide to draw the back portion of the body. First draw a sloping line on the top, left side for the part of the body that overlaps the pectoral fin on the left. Then draw a curved line from the pectoral fin on the right to the base of the manta ray's tail.
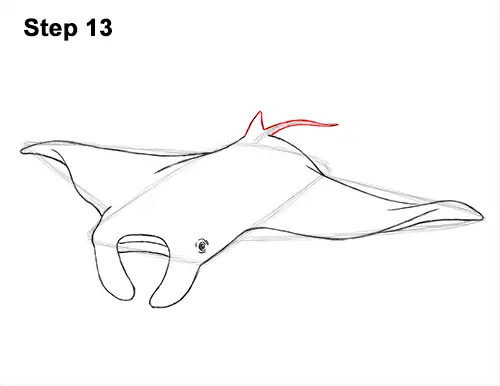
Step 13: Use the initial wavy line at the top as a guide to draw the manta ray's tail. Draw the shape of the tail around the guide. Make the base thick and the tip pointy. Before the tail meets the body, draw a small, triangular shape for the dorsal fin.
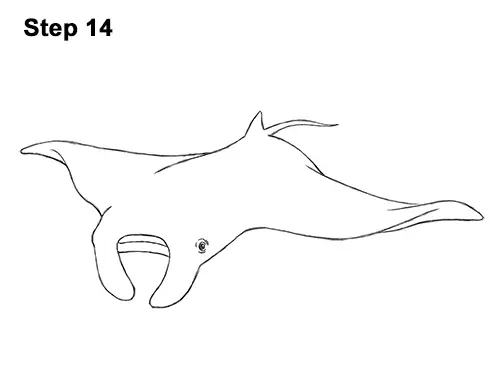
Step 14: For a cleaner look, erase as much as you can of the initial guide lines. Don't worry about erasing all of the guides. It's okay to leave some behind. Re-draw any final sketch lines you may have accidentally erased.
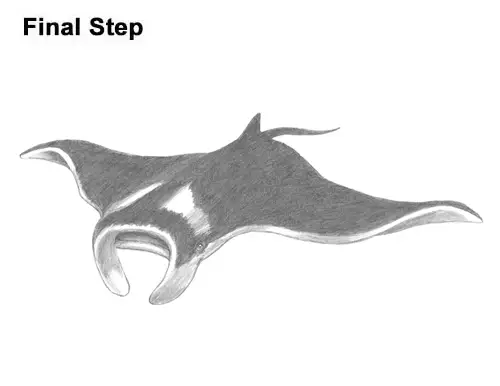
Final Step: Add some shading to your oceanic manta ray drawing to emphasize the appearance of a giant oceanic manta ray. Draw a line along the edge of the pectoral fins for the separation of black at the top and white at the bottom. At the top of the head, draw a shape similar to a bold letter T that wraps around the head down to the eyes.
Shade the top part of the manta ray's body using a dark value but leave the T- shaped section on the head blank. Apply more pressure to your pencil to get a dark value. You can also use a black color pencil. Don't push down too hard on your pencil or the graphite may become shiny, and you may tear your paper. As you shade, use strokes that go in the same direction, otherwise you may end up with a criss-cross pattern on your manta ray. Use the same consistent pressure throughout the whole drawing or some areas may look unintentionally lighter. Be extra careful as you shade the head so that you don't accidentally shade the white markings there. For a more detailed guide on how to shade, check out this tutorial: How to shade.
This may take longer, but to be safe, start shading lightly at first and gradually build to a darker value. Shade evenly across the whole body for a smooth value and avoid a rough, gritty texture. It's a good idea to use a blank, scrap piece of paper under your hand so that your skin doesn't accidentally smudge the graphite. The area around the manta ray's mouth is white, and the cephalic lobes are white too, so don't add value there.
Shading your manta ray drawing can be time-consuming, so be patient and take breaks. You can add the value to different sections of the body at a time to break up the shading process. Continue adding the value until the entire body is shaded.
Use a medium to light value on the lower part of the body to create shadows. Add some value inside the manta ray's open mouth to give it more depth. Use a light value on the cephalic lobes to emphasize them curving inward. These shadows help give the figure more dimension and volume. Vary the pressure on your pencil to get different degrees of tonal value. These shadows help give the figure more dimension and volume. Don't make the white sections too dark with shadows. It's always a good idea to use reference for a more accurate drawing. Don't forget to pause the video after each step to draw at your own pace.
Thanks for visiting! Subscribe to the How2DrawAnimals YouTube Channel for a new tutorial every week.
To learn how to draw popular cartoon characters, visit EasyDrawingTutorials.com.
RELATED TUTORIALS
 |
 |
 |


