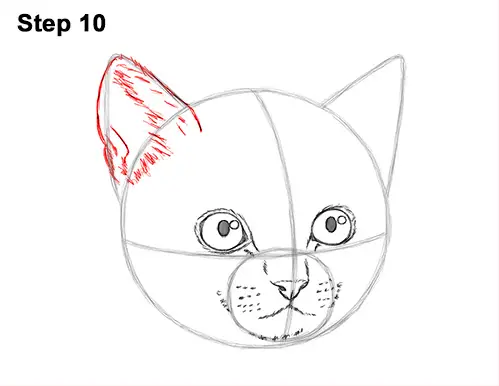
Step 10: Use the triangle-like shape on the top, left side of the head as a guide to draw the kitten's first ear. Darken the initial guide but make the lines curvier and the top more round. The bottom of the ear should stretch inside the head. Add a few lines on the left for structure. Add a series of strokes along the bottom and right side of the ear for fur. The fur inside the ears is long, so make these strokes long.
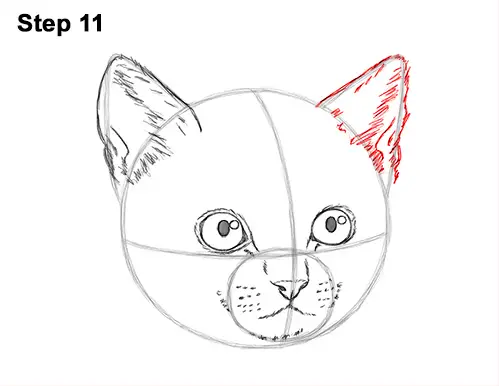
Step 11: Use the triangle on the top, right side of the head as a guide to draw the other ear the same way. Darken the path of the guide but make the shape curvier and more round. Draw a series of long strokes within the shape for a fur- like texture. Add a few curved lines on the right side of the kitten's ear for structure.
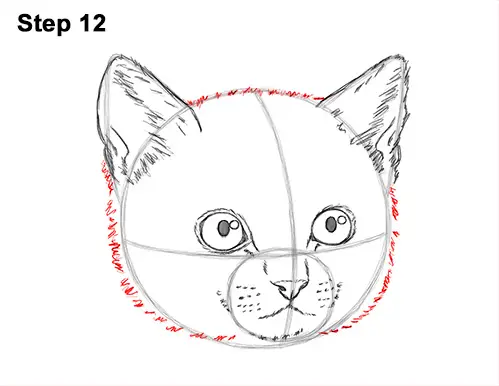
Step 12: Use the main circle as a guide to draw the rest of the kitten's head. Draw a series of short strokes along the top edge of the circle to create the furry head. Draw short strokes along the sides of the initial circle to create the sides of the head. Draw the strokes farther out from the circle to make the shape of the head wider. The longer you make these strokes, the shaggier the fur will be. Draw the right side of the face the same way. The bottom of the head should curve up toward the chin.
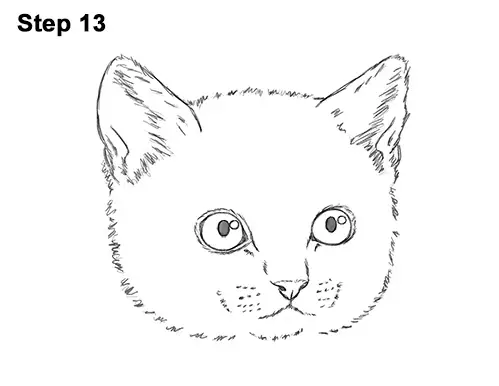
Step 13: For a cleaner look, erase as much as you can of the initial guide lines. Don't worry about erasing all of the guides. It's okay to leave some behind. Re-draw any final sketch lines you may have accidentally erased.
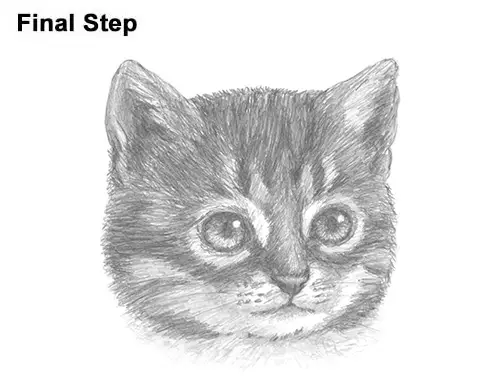
Final Step: Add some shading to your kitten drawing for extra detail. Leave the tiny glare circles blank. As you shade the eyes, use strokes that radiate outward from the pupil to convey the irises. For the irises, use a value that's darker than the pupils at the top and a light value at the bottom. Add a medium value to a thin section surrounding the kitten's eyes. Use a dark value at the bottom of the nose and gradually make it lighter toward the top. Use a dark value inside the ears. Use long strokes to represent the fur in front of the shadow.
You can stop here for a white kitten or continue adding value for a tabby kitten. A tabby pattern consists of stripes of different sizes and values. Use four values for a tabby pattern: light, medium, dark, and white (or blank/no value). Use a medium value for the bridge of the nose. Most of the head will also use a medium value. Don't add the value too smoothly. Use many individual strokes to cover the entire head.
Separate each individual stroke a bit so that the white of the paper comes through and creates a more fur-like texture. This process is slow and will take a very long time. Be patient and take breaks. The strokes on the kitten's head should be a medium value except for a darker M-shaped set of stripes in the middle. Notice that there's also a blank area around the eyes for the white fur.
The strokes on the head should radiate outward from the middle. That means the strokes will have a vertical orientation at the top and gradually turn horizontal on the sides. The darker value on the head goes down to the eyes, and everything below that is lighter. Throughout the process of adding value, add it lightly at first, and then build up to the level of darkness you like. Vary the pressure on your pencil to get different degrees of tonal value. The value around the kitten's muzzle and cheeks should be very light.
Continue to add the value all over the head until you're happy with the result. It's always a good idea to use reference for a more accurate drawing. If you have a pet kitten or cat, try to duplicate its fur pattern on your drawing. Add a few long strokes to the muzzle for whiskers. Don't forget to pause the video to draw at your own pace.
Thanks for visiting! Subscribe to the How2DrawAnimals YouTube Channel for a new tutorial every Saturday.
To learn how to draw popular cartoon characters, visit EasyDrawingTutorials.com.
RELATED TUTORIALS
 |
 |
 |


