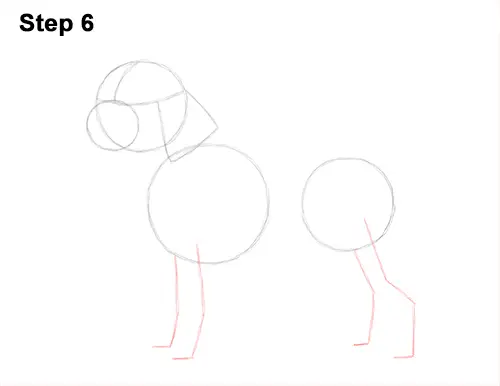
Step 6: Draw four lines under the beagle's body (two below each circle) as guides for the legs. The lines on the left should be vertical. They should bend slightly in the middle to indicate the joint and again at the bottom for the foot. The first hind leg should bend to the right near the middle before heading straight down again. Bend it at the bottom too for the foot. The last guide line should look like the previous line but without the top section.
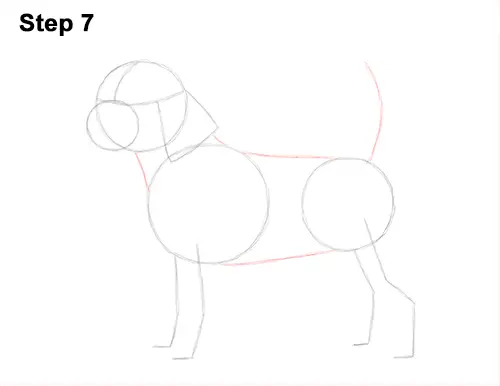
Step 7: Draw two lines that connect the head to the body to form the guide for the dog's neck. Now draw two longer lines that connect the first two circles to complete the guide for the body. Draw a curved line on the top right side of the body as a guide for the beagle's tail.
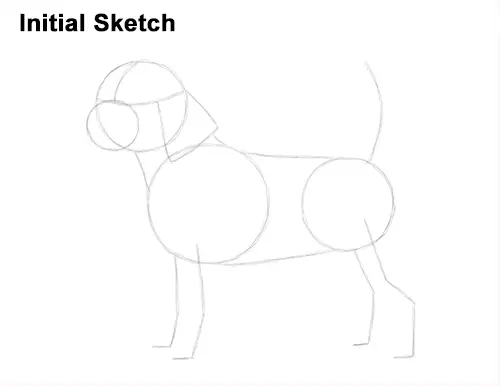
That's it for the initial sketch! From this point on, press harder with your pencil to get a more defined sketch.
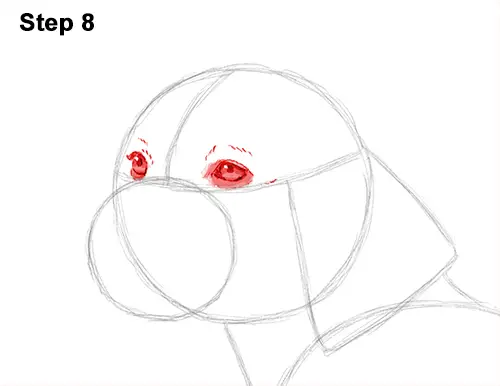
Step 8: Lightly sketch the beagle's eyes inside the head as two small circles. Use the construction lines as guides for the placement of the eyes. When you get the placement of the eyes right, darken the lines. For the first eye, the right side should be flat, while the left side should be pointy. Darken the eye on the right too using slightly thicker lines.
Make the sides of the eye a bit pointier to represent the corners of the eye. In the middle of each eye, draw a big dot for the pupils. Shade the eyes except for a tiny circle off to the side that represents glare. As you shade, use a value that's lighter than the pupils. Add a couple of lines around the dog's eyes for extra detail. Add some lines very close to the top of the eyes as well for the eyelids.
Draw a series of quick, short strokes higher up above the eye to represent fur. The area around a beagle's eyes is usually very dark, so shade that section too. This area shouldn't be too dark either. It should be a tiny bit darker than the eyes. Vary the pressure on your pencil to get different degrees of tonal value.
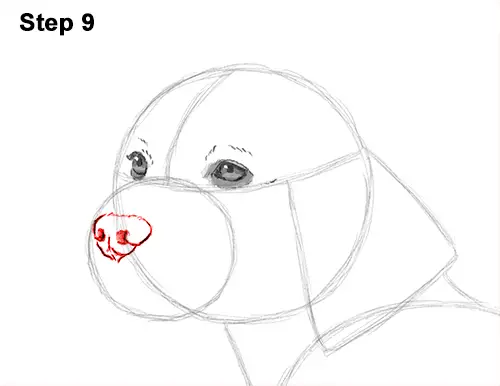
Step 9: Draw the beagle's nose inside the muzzle, next to the left edge, by first lightly sketching a small oval. When you get the position and size right, darken the lines. Use quick, short strokes at the top for the fur. Curl the sides of the nose inward to create the nostrils. Use thick lines for the dog's nostril openings. Add a short, vertical line across the nose, close to the bottom. The bottom of the nose should be pointy and it should extend outside of the initial oval guide.


