Page 4 of 4
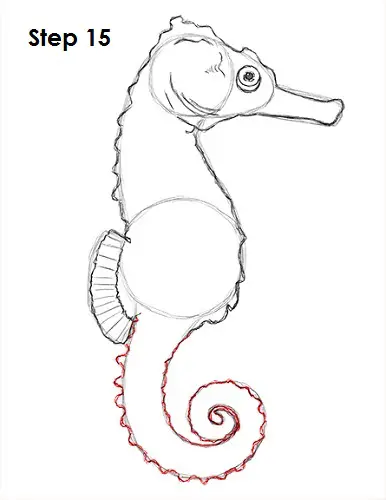
Step 15: Use the spiral shape under the body as a guide to draw the seahorse's tail. Simply go over the guide lines using a darker stroke. Add a few bumps to the lines as you darken them for extra texture.
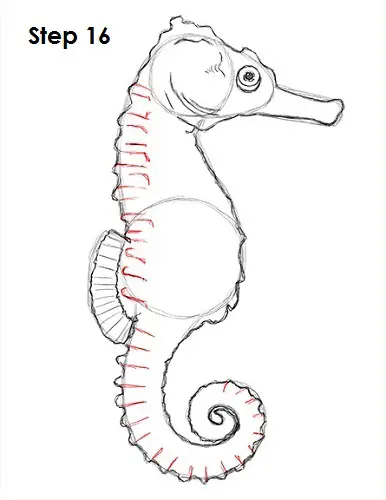
Step 16: Add a series of lines on the left side of the seahorse's body for skin texture. Seahorses are fish, but they don't have scales. They have skin stretched over bony plates, which are arranged in rings throughout their bodies. Draw these small lines across the body and tail to represent these bony rings.
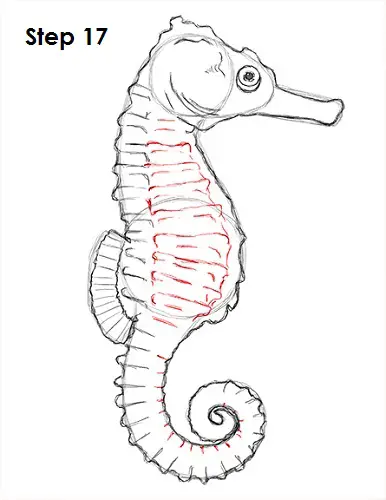
Step 17 (optional): Draw more lines throughout the body to complete the series of bony rings. Each species of seahorse has a distinct number of rings, so you can add fewer lines if you'd like. Or just skip the lines altogether!
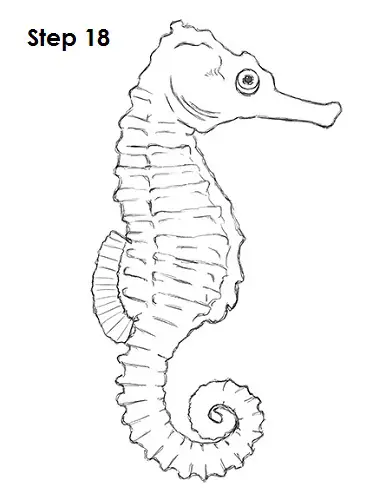
Step 18 (optional): For a cleaner look, erase as much of the initial guide lines. Don't worry about erasing all of the guides. It's okay to leave some behind. Re-draw any final sketch lines that you may have accidentally erased.
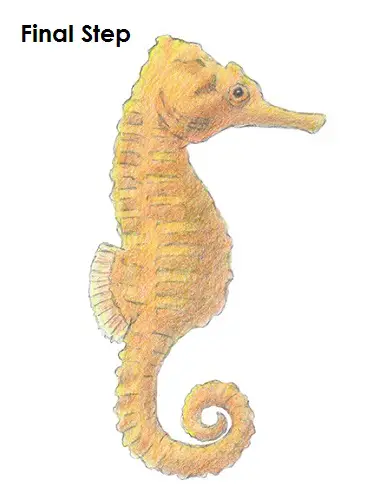
Final Step (optional): Some seahorses are colorful, so instead of the usual shading, try coloring your drawing. Using gray, add some shading to give the drawing more dimension and volume. Pick the direction of the light source to draw the shadows consistently. Shadows are generally at the cool end of the color spectrum, so add some blue or purple to the shadows.
Now start adding whatever color you want your seahorse to be. It's usually best to gradually add multiple colors rather than one solid coat of a single color. This seahorse will be yellow-orange, so you can build its color by adding hues of yellow, orange and even red! This helps create a rounder, more three-dimensional look rather than a flat, graphic texture you get from a single-color coat. Use red and orange in the sections with the shading and use yellow for the highlights of the brighter areas. Continue adding color gradually, alternating between different shades of yellow, orange and red. Vary the pressure on each pencil to get different shades of a color. Start coloring lightly, then darker by applying more pressure.
The coloring can be a bit time-consuming, so be patient and take breaks. It's also a good idea to use reference for a more accurate drawing. Or you can just color your seahorse using your favorite colors! You can be creative and make yours blue with stripes or green with polka dots. Have fun with it! Remember to pause the "How to Draw a Seahorse" video after each step to draw at your own pace.
Thanks for watching! Subscribe to the
How2DrawAnimals YouTube Channel for a new tutorial every Tuesday.
To learn how to draw popular cartoon characters, visit
EasyDrawingTutorials.com.


