







Please PAUSE the "How to Draw a Chinese Dragon" video after each step to draw at your own pace.
Stay tuned for more free drawing lessons by:
- Liking us on Facebook
- Subscribing on YouTube
- Following us on Instagram
This page contains Amazon affiliate links. If you choose to purchase through these links, I earn a small commission at no extra cost to you.
All of the tutorials on How2DrawAnimals.com are excellent for beginners and experienced artists alike. The online lessons are easy to follow, teaching you foundational drawing basics while showing you how to sketch animals step by step. Each subject includes a video drawing tutorial option along with step-by-step photos and written text to follow. While you're here, try another tutorial!
RELATED TUTORIALS
 |
 |
 |
To draw this dragon, follow along with the video tutorial below and pause after each step to work at your own pace. You may find it easier to use the step-by-step drawings underneath the video. The new lines in each step are highlighted in red, so you'll know exactly what to draw next. You may want to open the video in a new tab and utilize both methods. Take your time and sketch at your own pace.
Materials You’ll Need
Before starting, gather these basic drawing supplies:
- Pencil (an HB lead pencil is best for light sketches)
- Eraser
- Black ink pen or marker
- Drawing paper
- Colored pencils or markers
Start with Simple Lines and Shapes
For the first few steps, don't press down too hard with your pencil. Use light, smooth strokes to begin.

Step 1: Draw a circle on the top, left side as a guide for the head. First draw four small marks to indicate the height and width of the circle, then connect them using curved lines. Sketch lightly at first so that it's easy to erase if you make a mistake. The circle doesn't have to be perfect; it's just a guide. If you want a perfect circle, trace the outer rim of a coin, a button or any other object with a circular edge.
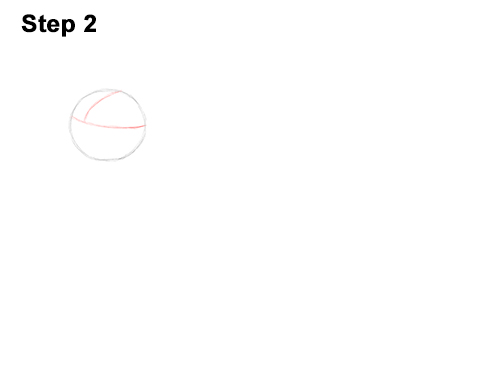
Step 2: Draw a curved horizontal line across the head. This construction line will help you place the facial features later. Add a curved vertical line on the top left side of the head for another construction line.

Step 3: Draw a curved line similar to the letter C on the left side of the head as a guide for the top jaw. Extend the lower end of the C-shaped guide so that it touches the horizontal construction line inside the head. Draw another curved line on the lower left side of the head as a guide for the lower jaw.
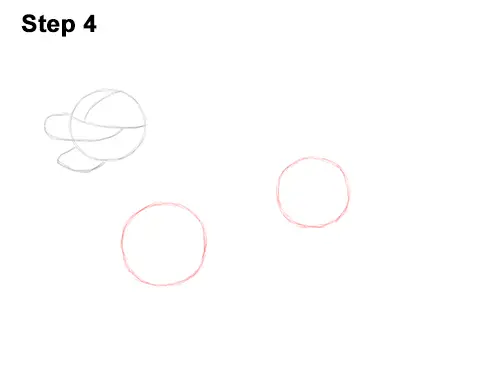
Step 4: Draw another circle below the head and to the right as a guide for the front part of the body. This circle should be about the same size as the head. The farther away this circle is, the longer the neck will be. Add another circle on the top, right side as a guide for the lower half of the body. These shapes determine the curvature of the form. Chinese dragons are mythical creatures, so you can spread these circles farther apart to make yours longer if you'd like.
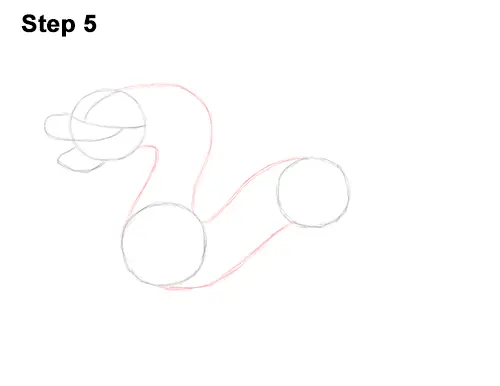
Step 5: Draw a series of lines that connect the major shapes to form the rest of the body. First draw two curved lines that start on the right side of the head and end on top of the circle below for the neck. Then draw two more lines that connect the circles in the middle to form the shape of the torso. Curve these connecting lines to give a wavy, serpent-like appearance.
Finish Up the "Skeleton"
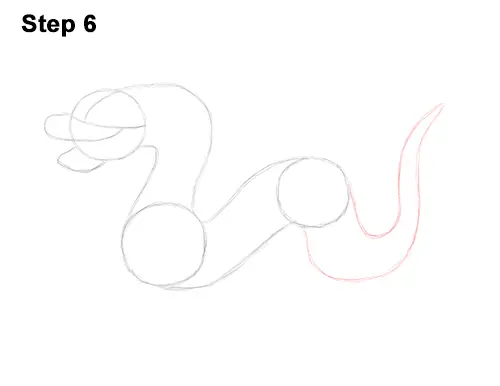
Step 6: Draw a couple of curved lines that come to a point on the right side as a guide for the tail. The first line should be similar to the letter U but curved slightly to the right at the end. Because these are mythical creatures, feel free to make any changes along the way, like making the tail longer. The second line should start under the circle. It should be wider and should meet the first line at the top to form a point. The final shape of the torso should be long, slender and wavy like a snake.
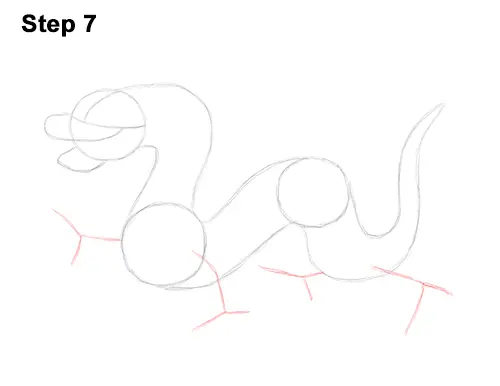
Step 7: Draw a series of lines under the body as guides for the legs. The first line should start on the right side of the body circle. The second line should start on the left side of the body circle. The lines should split at the end as guides for the feet. The guide line for the first hind leg should be placed on the curving part of the torso at the bottom. These creatures are usually depicted with short legs, so don't draw these guides too long. The guide line for the other hind leg should be placed on the left side of the curved section of the torso.
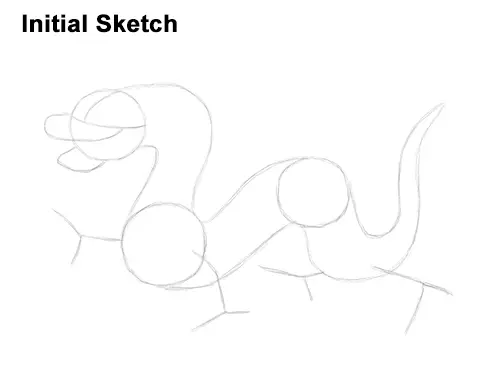
That's it for the initial sketch! From this point on, press harder with your pencil to get a more defined drawing.
Now Add Details
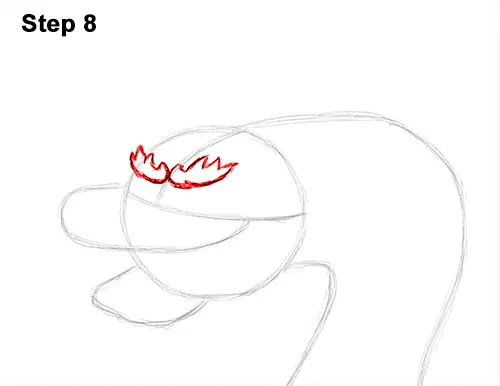
Step 8: Draw the eyebrows above the horizontal construction line and on either side of the vertical construction line. First draw two curved lines as the base. Leave a gap between these lines and the horizontal construction line for the eyes. Above each curved line, draw a series of spikes to make the features bushy. Don't add too many spikes; about four will do. Draw them on the left eyebrow as well, making them thinner due to perspective.
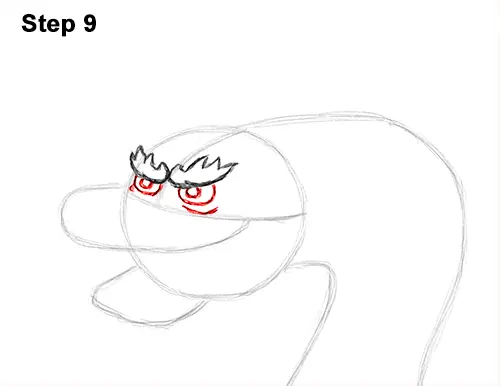
Step 9: Draw two curved lines similar to half-circles under the eyebrows for the eyes. The eye on the left should be a bit smaller than the one on the right because of the perspective. Inside each eye, at the top close to the brows, draw a tiny circle for the pupils. Add a small line under each eye for extra detail.
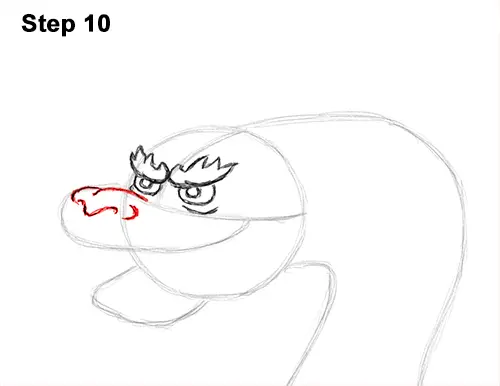
Step 10: Follow the path of the curved guide on the left as you draw the top part of the muzzle and nose. The top of the muzzle consists of two curved lines. The nose is a line similar to the letter V. The V-shaped nostrils should be at the tip on the left. Add a small curved line to the right for structure.
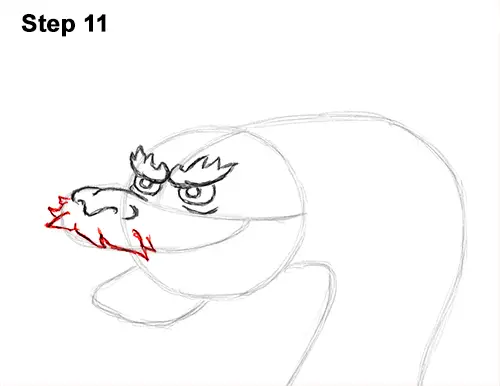
Step 11: Follow the path of the curved guide to draw the mustache at the end of the muzzle. Make it thick and bushy by drawing a series of curved spikes along the edge of the guide.
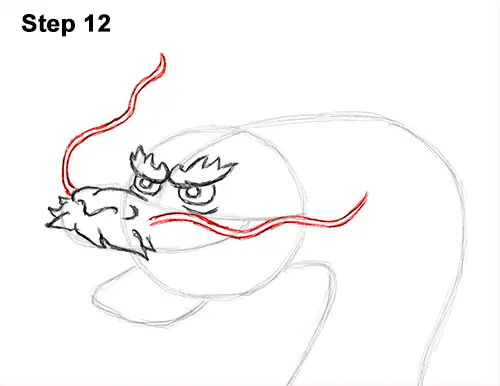
Step 12: Draw the whiskers by using two wavy lines at the end of the muzzle. Lightly sketch the shape first, then darken the lines when it looks right. The other whiskers should start at the front of the muzzle and extend to right under the eye. You can make yours longer if you'd like.
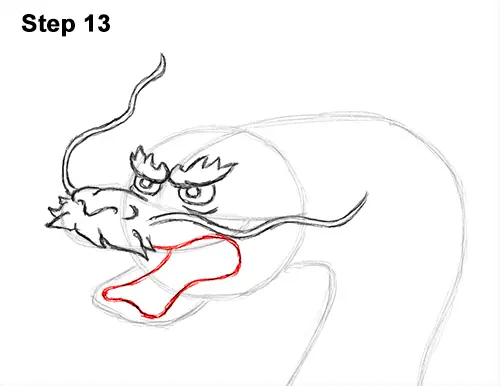
Step 13: Draw the open mouth by using the curved line at the bottom as a guide. Place the shape a bit more inward than the guide. Make the bottom left side of the opening wavy to accommodate the teeth in the next step.
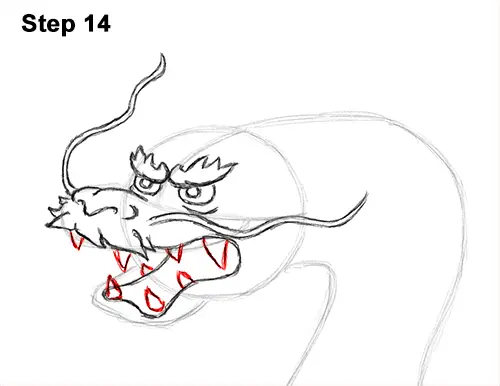
Step 14: Draw pointy teeth along the path of the mouth, similar to the letter V. Make them different sizes. You can draw more teeth if you'd like, but keep them a bit smaller so the mouth doesn't look too crowded.
Keep Adding Details Slowly
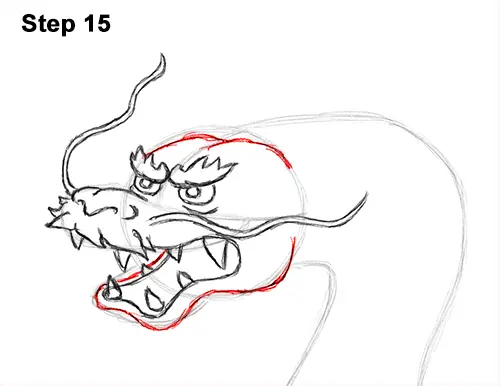
Step 15: Draw the rest of the head using the initial lines and shapes as guides. Darken the guide under the open mouth to create the shape of the chin and jaw. Draw two curved lines along the top edge of the initial circle to create the top of the head.
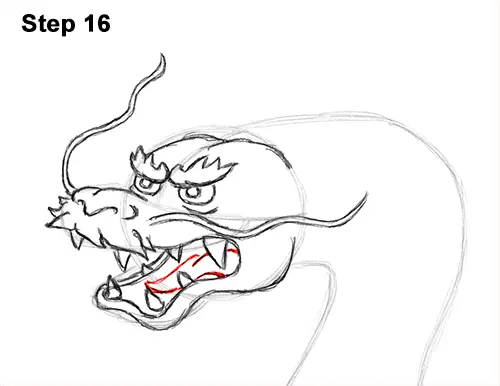
Step 16: Draw the tongue inside the mouth using two curved lines that come to a point on the left.
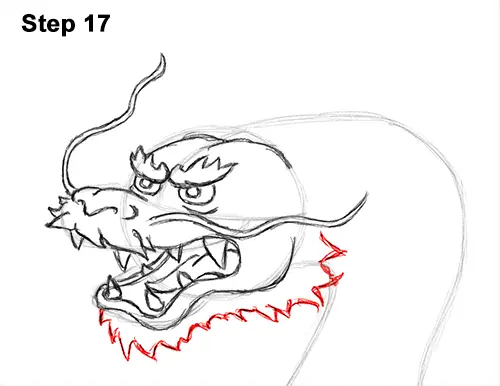
Step 17: Draw the beard along the path of the chin and jaw. The beard is made up of small angled lines similar to triangles or the letter V. It should extend all the way to the right side and overlap part of the neck.
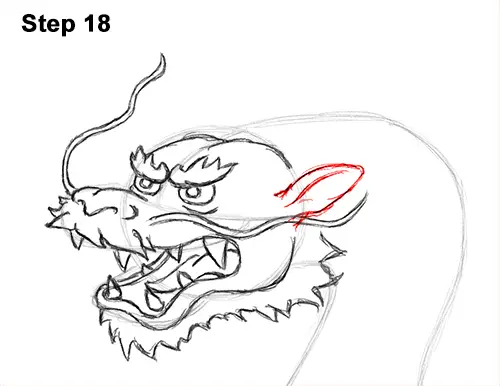
Step 18: Draw a curved line on the right side of the main circle for an ear that's similar to a cow's ear. Sketch lightly at first and only darken the lines when you get the shape right. Add some internal lines for structure.
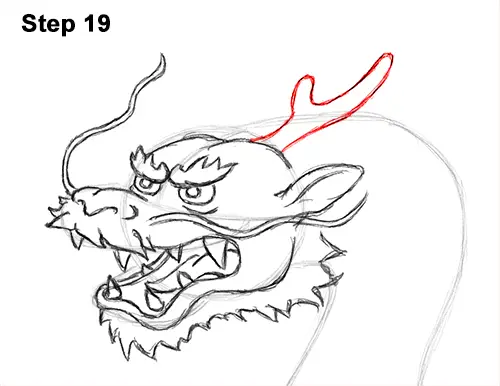
Step 19: Lightly sketch the antler on top of the head using a series of curved lines. The shape should be similar to a thick letter Y that's slightly tilted. Darken the lines when you get the shape right, making the tips pointy if you'd like.
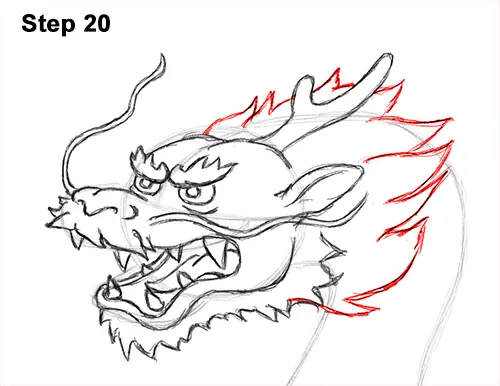
Step 20: Use a series of wavy and spiky lines on the right side of the head to create the flowing mane. Follow the basic path of the neck as you draw. The mane should cover a lot of the neck without overlapping the antler. Use curved lines and spikes of different sizes pointing to the right to give it more volume.
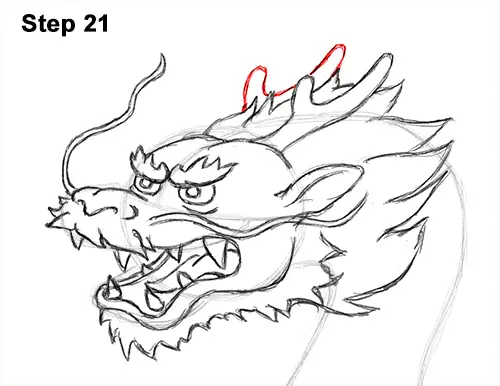
Step 21: Use a series of curved lines to draw the antler on the other side peeking out from behind the flowing mane.
Stay Patient and Keep Drawing
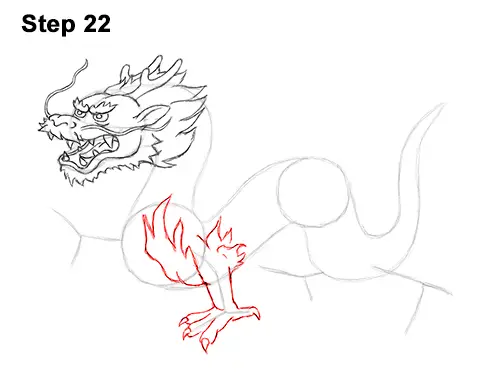
Step 22: Draw the first front leg by using the lines under the body as guides. First draw a line on either side of the guide for the middle section. Continue following the path to draw the first toe, adding a talon at the tip using curved lines. Draw another toe on either side of the first one. The toes should be thin and the claws long like an eagle's. Follow the guide line pointing to the right to draw the final toe and claw. On the top left side of the leg, draw long, flowing fur using a series of wavy lines that form points resembling flames. Add some smaller flame-like fur on the right side of the leg.
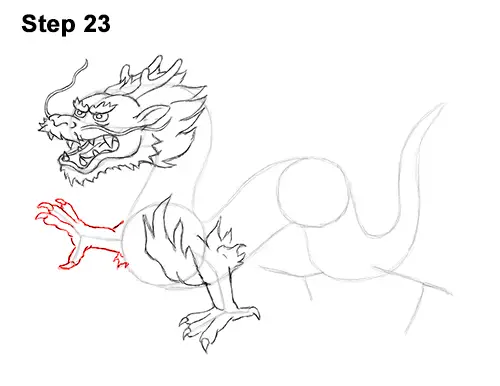
Step 24: Draw the other front leg using the lines to the left of the body as guides. Follow the path to sketch the thin toe at the bottom and add a claw on the tip. Follow the line at the top to draw the other three toes and claws, allowing them to overlap slightly due to perspective. Most of this leg's fur isn't visible because it's on the other side of the body, so only draw a bit of it at the bottom edge.
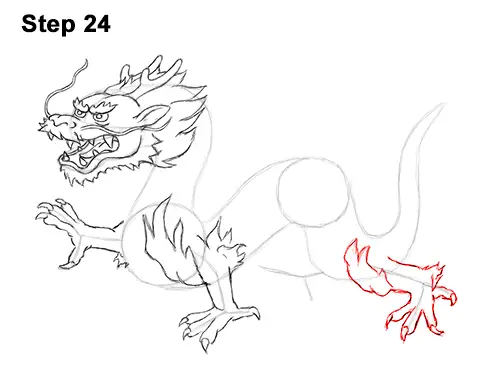
Step 24: Use the lines on the far right side as guides to draw the first hind leg. Follow the path of the guides to draw the thin toes, adding a small curved claw at the tip of each. Draw the thumb-like toe pointing to the right by following the angled section of the guide. As you draw the top part of the leg, use curved lines for the patch of fur at the joint. Add flame-like fur on the left side of the leg using wavy lines, keeping it smaller than the fur on the front leg.
You're Almost There!
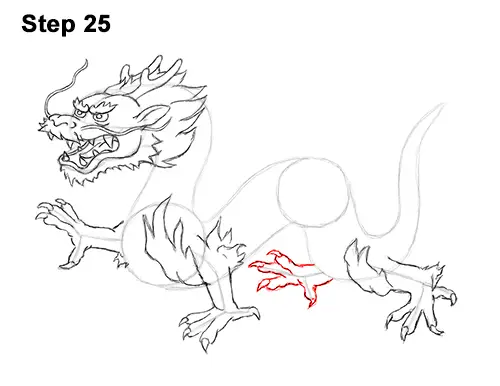
Step 25: Use the angled lines under the body as guides to draw the other hind leg using the same technique. Follow the basic path to draw the toes and claws, spreading them apart so they are all visible. Most of the leg should be hidden behind the body, so only draw the foot peeking out on the left.
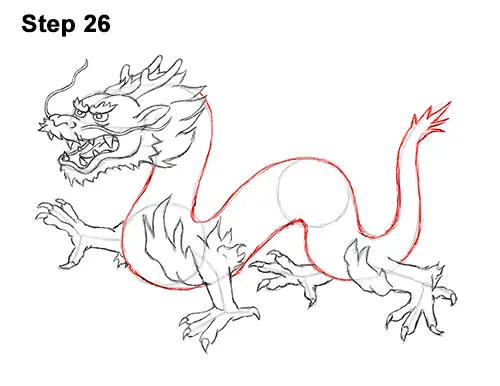
Step 26: Draw the rest of the body by using the remaining lines and shapes as guides. Simply darken the outer edges of the initial guides to establish the form. Avoid overlapping the lines for the legs on this side. When you darken the tip of the tail, draw a few spikes around it using short, curved lines.
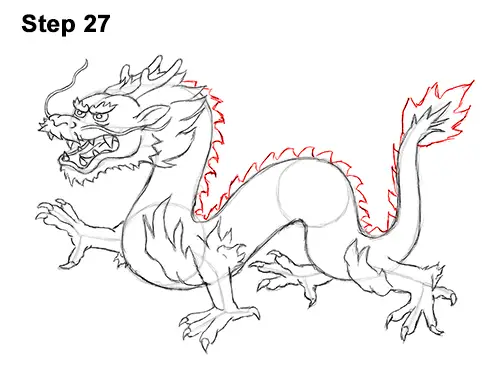
Step 27: Draw a series of spikes across the length of the body using small triangle-like shapes. Make the left side of each individual spike slightly longer and curvier than the right so that they point toward the tail. The spikes on the narrow sections of the body should be slightly smaller than those on the upper curved sections. At the end of the tail, use wavy lines to make the tip resemble a flame.
Now It's Time to Shade
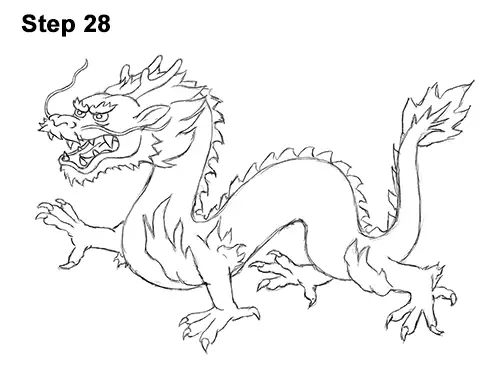
Step 28 (optional): This mythical subject lends itself well to a graphic style, so instead of standard pencil shading, try inking your drawing. Carefully go over the final sketch lines with a pen, marker, or permanent ink. Inking can be tricky, so take your time to avoid mistakes. After inking, clear away all leftover pencil marks with an eraser for a clean finish.
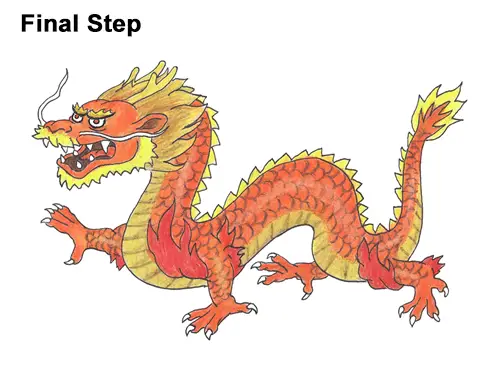
Final Step (optional): Color your artwork any way you'd like! For a look like this one, first color the mane, mustache, beard, antlers, spikes, tail tip, and underside yellow. Use a bit of dark brown on the mane, the belly, and inside the mouth.
For the main body, apply multiple layers of red on top of an orange base coat. Right over the orange, add a coat of red-orange. Apply these early coats lightly, then add a layer of pure red, pressing a little harder with each new coat so the colors blend smoothly. Use red for the fur on the legs as well. Finish with a layer of dark red, continuing to blend until you achieve a smooth gradient.
Using brown, draw a series of lines along the underside to define the long scale segments. Next, draw U-shaped lines all over the body for the scales. You can skip this if you prefer a sleek look. The scales should gently overlap. This process can be time-consuming, so remain patient and take breaks. Lightly erase small sections of color on the sides to create a shiny highlight, adding back a bit of brown if any scales get lost. Remember to pause the video to work at your own pace.
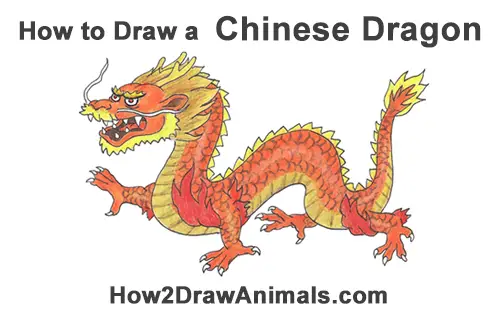
Buy My Step-by-Step Art Books on Amazon!
If you enjoyed drawing with me and want to expand your artistic skills, please consider checking out my step-by-step drawing books on Amazon! My books break down a wide variety of animals into simple geometric shapes, making it easy and fun for artists of any skill level to follow along. Every purchase directly helps support this site so I can keep creating high-quality, free tutorials for the art community.
Click Here to Order Your Copy Today!
Thanks for watching! Subscribe to the How2DrawAnimals YouTube Channel for the latest tutorials.
To learn how to draw popular cartoon characters, visit EasyDrawingTutorials.com.
RELATED TUTORIALS
|
|
|