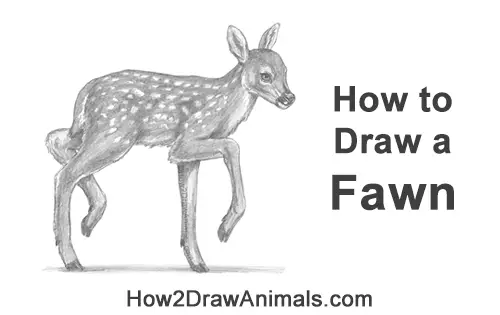
In this free art lesson, you'll learn how to draw a baby deer or fawn step-by-step.
Stay tuned for more free drawing lessons by:
Liking us on Facebook>>
Subscribing on YouTube.com>>
Following us on Instagram>>
All of the tutorials on How2DrawAnimals.com are good drawing tutorials for beginners and experienced artists alike. The online tutorials are easy to follow; they teach you the how to draw basics while showing you how to draw animals step by step. Each animal has a video drawing tutorial option, as well as step-by-step photos and written text to follow.
RELATED TUTORIALS
 |
 |
 |
To draw this fawn step by step, follow along with the video tutorial below and pause the video after each step to draw at your own pace. You may find it easier to follow the step-by-step drawings below the video. The new lines in each step are shown in red, so you'll know exactly what to draw next. You may want to open the video in a new tab and use both drawing methods. Take your time and draw at your own pace.
Below you can watch a Narrated step-by-step video tutorial:
For the first few steps, don't press down too hard with your pencil. Use light, smooth strokes to begin so that it's easy to erase if you make a mistake.
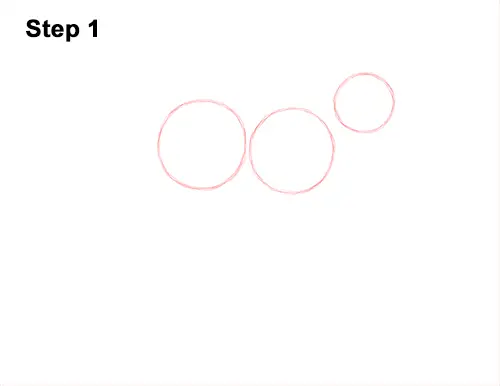
Step 1: Start by drawing three circles as guides for the fawn's head and body. The circle on the right side will be the head and the two circles in the middle will be the body. To draw each circle, first make four marks to determine the height and width. Then connect the marks using curved lines. If you're struggling to draw the circles, just trace the outer rims of circular objects like coins or bottle caps. For a more detailed guide on the different ways to draw a circle check out this tutorial: Four simple ways to draw a circle. Pay attention the sizes and spacing of the circles.
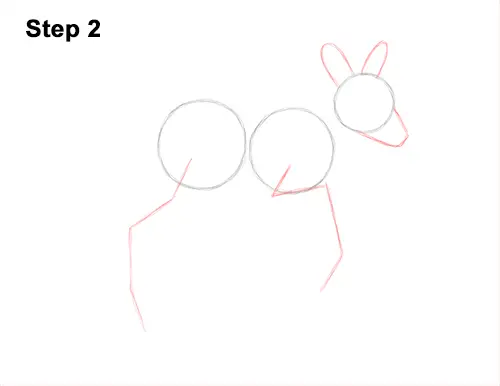
Step 2: On top of the circle, draw two small arcs as guides for the baby deer's ears. On the bottom, right side of the head, draw a slightly bigger, more angular arc as a guide for the muzzle. Under the body circles, draw long, angled lines as guides for the legs. Pay attention to the lengths of the lines and how they bend in relation to the circles.
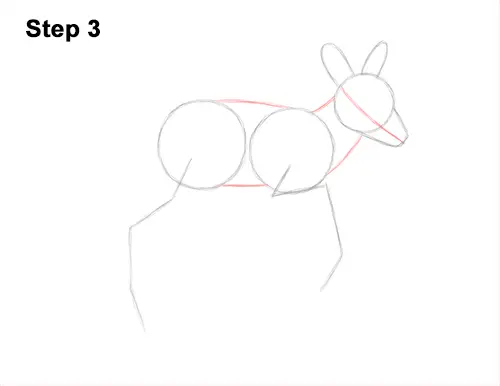
Step 3: Inside the head, draw a sloping line as a guide to help you place the fawn's facial features later on. Connect the head to the body using short lines to create the guides for the neck. Connect the circles in the middle using longer, curved lines to finish the guide for the torso.
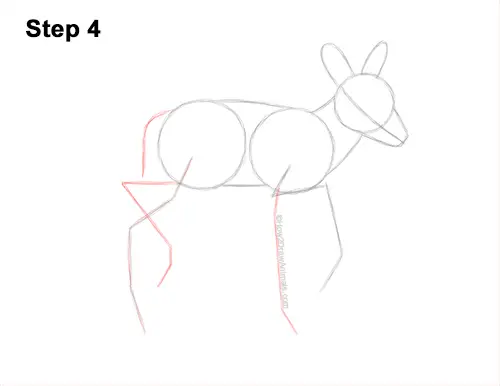
Step 4: Draw another set of lines under the body circles as guides for the deer's legs that are on the other side of the body. Bend the lines to indicate the joints. On the top, left side of the body, draw a short, curved line as a guide for the tail.
That's it for the guidelines! From this point on, press down harder with your pencil for a more defined drawing of a fawn or baby deer.
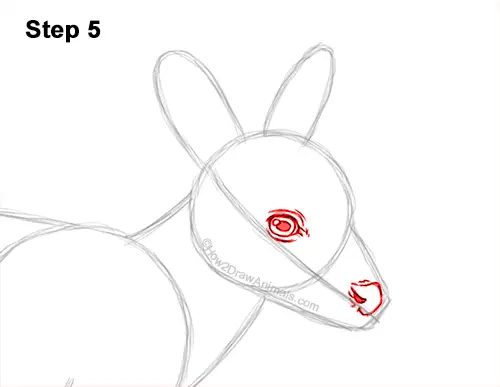
Step 5: Inside the head, draw a small circle for the fawn's eye. Place the eye above the sloping guide line and close to the center of the head circle. Draw curved lines to create the outer shape of the eye. Inside the eye, draw a tiny circle for a highlight and an oval and shade it in for the pupil. Near the tip of the muzzle, draw a curved shape for the nose. Draw the nose above the guide line. On the left side, draw a curved line and shade in the shape for the nostril.
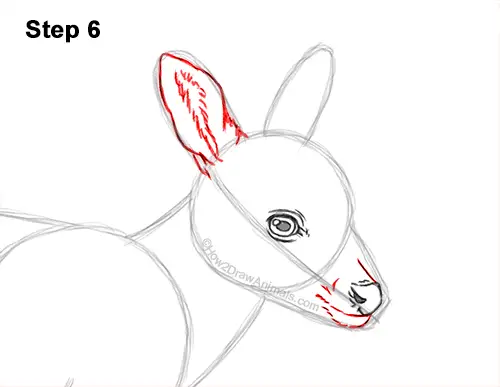
Step 6: Under the nose, draw a line that curves to the left as a guide for the baby deer's mouth. Don't make the line too long. Under the mouth, draw a curved line for the chin. Use a series of short strokes to create a furry texture. Darken the arc on the top, left side for the ear. Make the sides of the ear wavier as you darken the shape. Add a few short strokes inside the shape for the ear's opening and for fur.
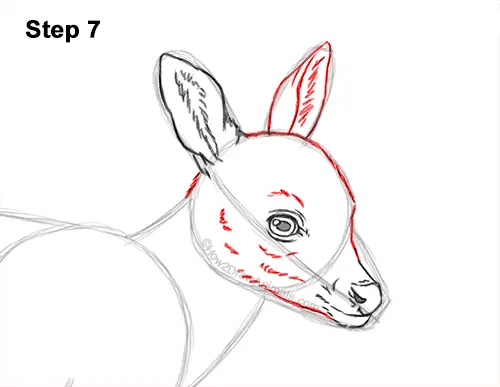
Step 7: Darken the outer edges of the guides to create the rest of the fawn's head. Make the muzzle slightly thinner than the initial arc. Darken the arc on the top, right side but make it thinner to create the other ear. Use short strokes along the inside to create a furry texture.
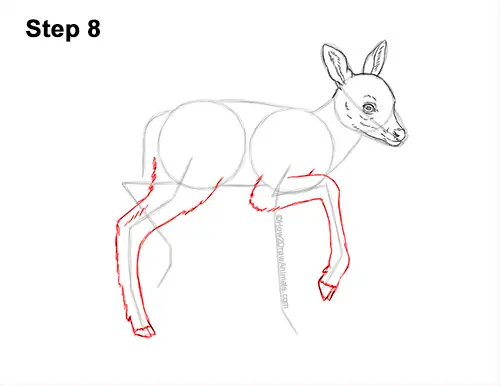
Step 8: Use the long, angled line that's under the body on the rights side as a guide to draw the baby deer's front leg. Draw the shape of the leg around the guide line. The top of the leg should be a bit wider than the bottom but the overall leg should be thin. On the tip of the foot, draw a few short lines for the hoof. Sketch lightly at first and only darken the lines when you get the shape right. Use the angled line on the left as a guide to draw the hind leg the same way. Draw the leg around the guide line and keep the shape thin. Add the hoof at the bottom using short lines.
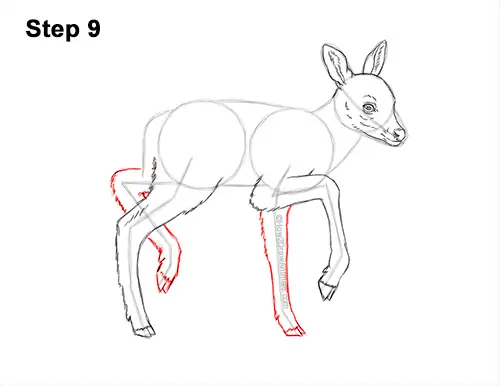
Step 9: Use the other angled lines under the body as guides to draw the fawn's other set of legs. Draw the shapes of the legs around the guide lines. The tops of these legs will be hidden behind the first set of legs, so only draw the visible sections. Add a few short, angled lines along the tips of the feet for the hooves.
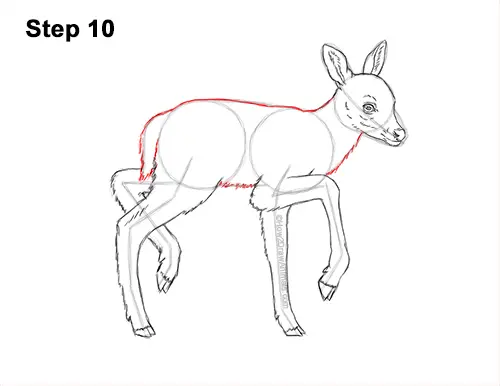
Step 10: Darken the outer edges of the remaining guide lines to create the shape of the baby deer's body. Use short strokes along the underside of the body for a furry texture. Darken the line on the left and add short strokes underneath for the tail.
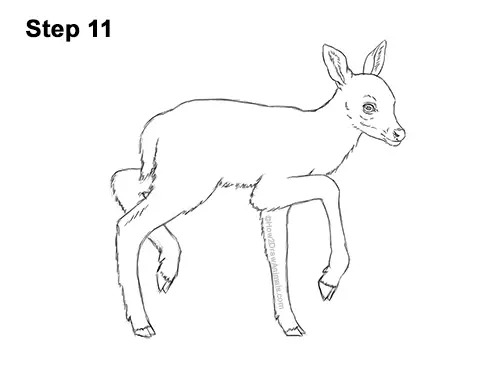
Step 11: For a cleaner look, erase as much as you can of the initial guide lines. Don't worry about erasing all of the guides. It's okay to leave some behind. Re-draw any final sketch lines you may have accidentally erased.
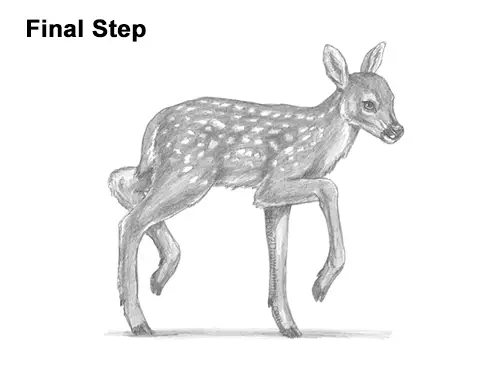
Final Step: Draw a few small shapes across the body for the spotted pattern on the fawn's coat. Shade the rest of the coat using a medium value except for the neck and underside of the body which should be a light value because of the white fur. Use a dark value for the nose and the hooves. Add a slightly darker value throughout the body to create shadows. Pick a light source as you shade so that the shadows are consistent across the body. Here the light source is coming from the top so most of the shadows will be on the underside of the shapes. Shade lightly at first and gradually build up to darker values. For light values, push down very lightly on your pencil and push down harder for darker values. Add a cast shadow at the bottom using a medium value. It's a good idea to use reference as you shade for a more accurate depiction of a fawn. Shading can be time-consuming, so be patient and take breaks. For a more detailed guide on how to shade, check out this tutorial: How to shade.
Thanks for visiting! Subscribe to the How2DrawAnimals YouTube Channel for a new tutorial every week.
To learn how to draw popular cartoon characters, visit EasyDrawingTutorials.com.
To learn how to draw Manga, visit How2DrawManga.com.
RELATED TUTORIALS
 |
 |
 |
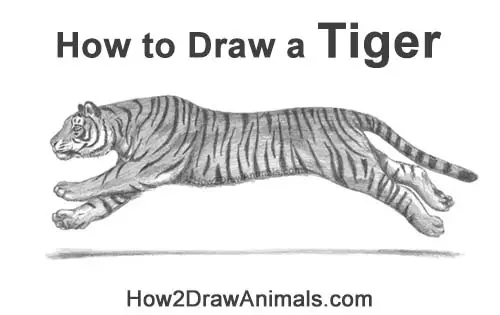
In this free art lesson, you'll learn how to draw a Tiger running step-by-step.
Stay tuned for more free drawing lessons by:
Liking us on Facebook>>
Subscribing on YouTube.com>>
Following us on Instagram>>
All of the tutorials on How2DrawAnimals.com are good drawing tutorials for beginners and experienced artists alike. The online tutorials are easy to follow; they teach you the how to draw basics while showing you how to draw animals step by step. Each animal has a video drawing tutorial option, as well as step-by-step photos and written text to follow.
RELATED TUTORIALS
 |
 |
 |
To draw this running Tiger step by step, follow along with the video tutorial below and pause the video after each step to draw at your own pace. You may find it easier to follow the step-by-step drawings below the video. The new lines in each step are shown in red, so you'll know exactly what to draw next. You may want to open the video in a new tab and use both drawing methods. Take your time and draw at your own pace.
Below you can watch a Narrated step-by-step video tutorial:
For the first few steps, don't press down too hard with your pencil. Use light, smooth strokes to begin so that it's easy to erase if you make a mistake.
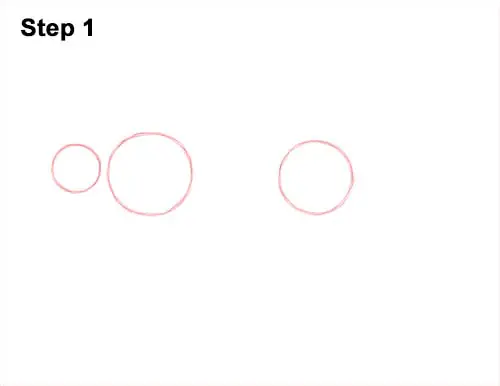
Step 1: Start by drawing three circles as guides for the tiger's head and body. The circle on the left side will be the head and the two circles in the middle will be the body. To draw each circle, first make four marks to determine the height and width. Then connect the marks using curved lines. If you're struggling to draw the circles, just trace the outer rims of circular objects like coins or bottle caps. For a more detailed guide on the different ways to draw a circle check out this tutorial: Four simple ways to draw a circle. Pay attention the sizes and spacing of the circles.
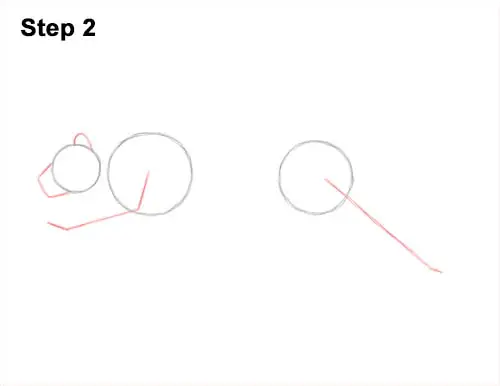
Step 2: On top of the circle on the left (the head circle), draw a small arc as a guide for the tiger's ear. On the left side of the head circle, draw a small, angled line as a guide for the muzzle. Under the body circles, draw two lines as guides for the legs. Bend the line on the left to indicate the joints on the front leg. The line on the right for the hind leg should be diagonal. Pay attention to the sizes of these lines in relation to the circles.
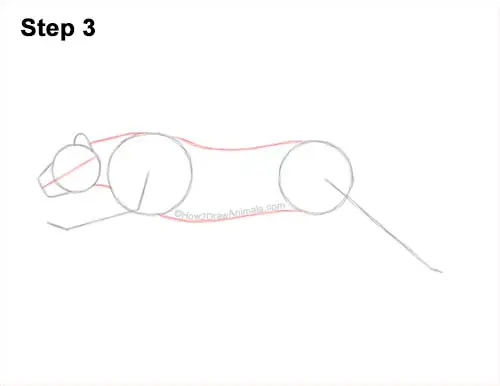
Step 3: Inside the head circle, draw a sloping line as a guide to help you place the tiger's facial features later on. Connect the head to the body using short lines to create the guides for the neck. Connect the circles in the middle using longer, curved lines to finish the guide for the torso.
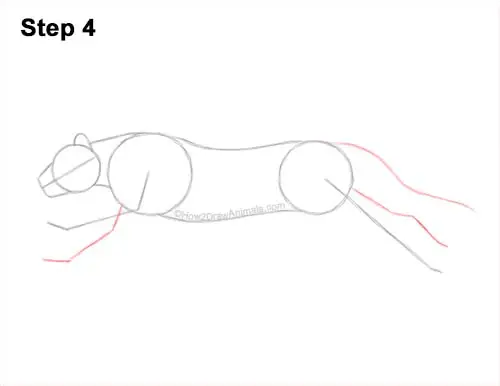
Step 4: Draw another set of lines under the body circles as guides for the tiger's legs that are on the other side of the body. Bend the lines to indicate the joints. On the top, right side of the body, draw a long, wavy line as a guide for the tail.
That's it for the guidelines! From this point on, press down harder with your pencil for a more defined drawing of a running tiger.
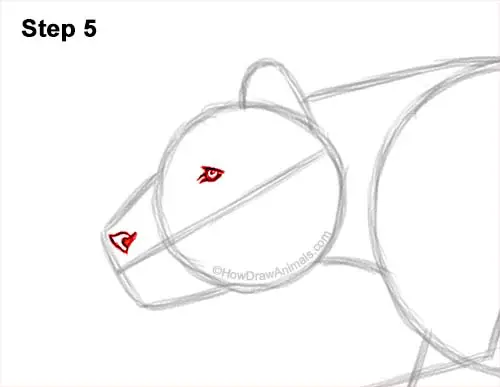
Step 5: Inside the head, draw a small circle for the tiger's eye. Place the eye above the sloping guide line and close to the top edge of the muzzle. Draw sloping lines to create the outer shape of the eye. Inside the eye, draw a tiny dot for the pupil. Near the tip of the muzzle, draw a triangular shape for the nose. Draw the nose above the guide line. On the right side, draw a curved line and shade in the shape for the nostril.
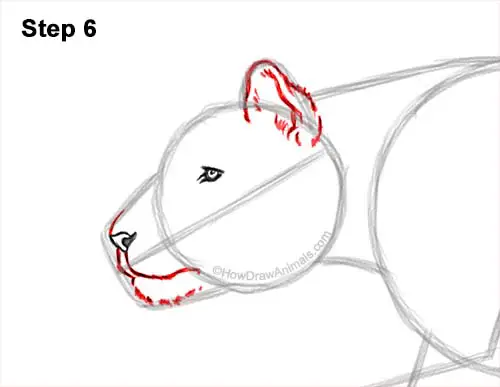
Step 6: Under the nose, draw a line that curves to the right as a guide for the tiger's mouth. The line should end at the head circle. Under the mouth, draw a curved line that's made up of short strokes to create the furry chin. Darken the arc at the top for the ear. Make the sides of the ear wavier as you darken the shape. Add a few lines inside the shape for the ear's opening and for fur.
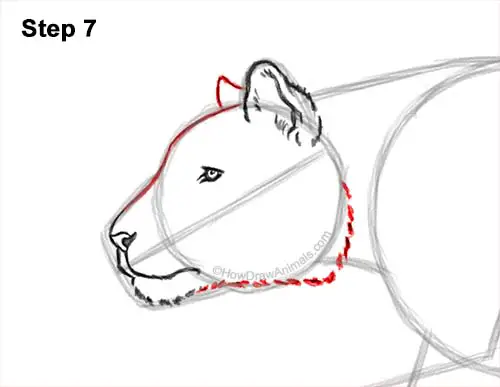
Step 7: Darken the outer edges of the guides to create the rest of the tiger's head. At the top, draw a small curved line for the other ear. Use short strokes along the bottom o create a furry texture. Extend the shape of the head farther to the right than the initial head circle.
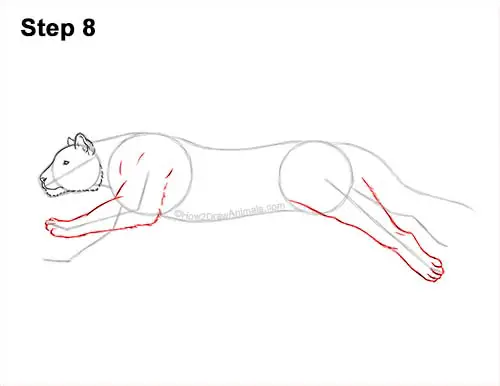
Step 8: Use the long, angled line that's under the head as a guide to draw the tiger's front leg. Draw the shape of the leg around the guide line. The top of the leg should be wide and then it should gradually get narrower toward the foot. Curve the lines to indicate the muscle structure. On the tip of the foot, draw a few curved lines for the toes. Sketch lightly at first and only darken the lines when you get the shape right. Use the diagonal line on the left as a guide to draw the hind leg the same way. Draw the leg around the guide line and add the toes at the bottom.
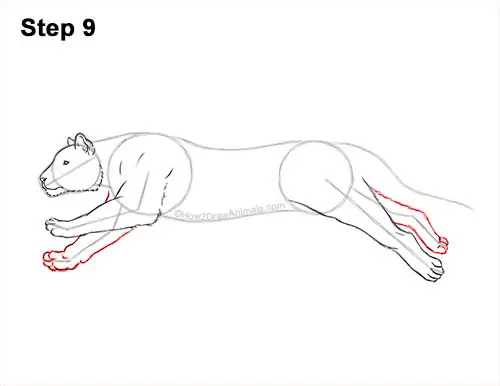
Step 9: Use the other angled lines under the body as guides to draw the tiger's other set of legs. Draw the shapes of the legs around the guide lines. The tops of these legs will be hidden behind the first set of legs, so only draw the visible sections. Add a few curved lines along the edges of the feet for the toes.
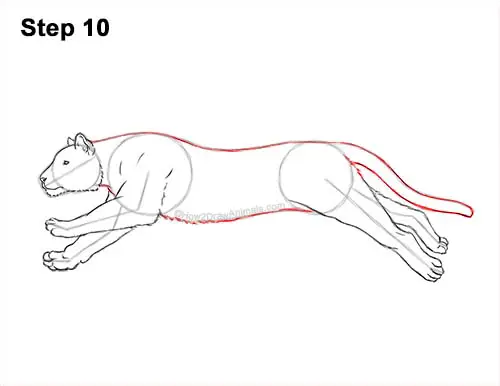
Step 10: Darken the outer edges of the remaining guide lines to create the shape of the tiger's body. Use short strokes along the underside of the body for a furry texture. Darken the line on the right for the tail. Make the tail wider by drawing another wavy lines below the original tail guide.
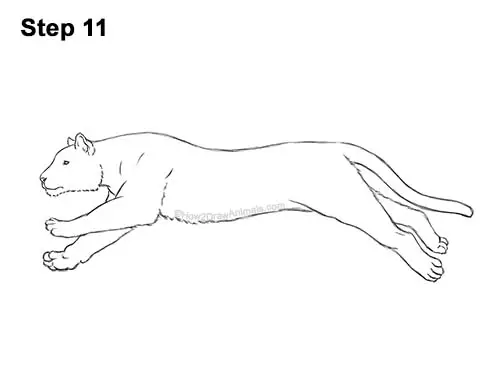
Step 11: For a cleaner look, erase as much as you can of the initial guide lines. Don't worry about erasing all of the guides. It's okay to leave some behind. Re-draw any final sketch lines you may have accidentally erased.
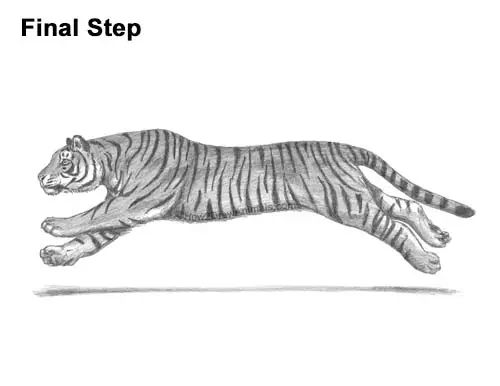
Final Step: Add the distinctive striped pattern all over the body using a dark value. Draw each stripe as a thin, pointy shape and shade it in. Use short stripes on the head and longer stripes along the body. Curve the stripes to conform to the shape of the head. Tigers can have a variety of stripes, so you can draw yours differently if you'd like. After you add the stripes, shade the rest of the body using a light value. Don't shade the area around the eye or under the head and body for the white fur. Add a medium value throughout the body to create shadows. Pick a light source as you shade so that the shadows are consistent across the body. Here the light source is coming from the top so most of the shadows will be on the underside of the shapes. Shade lightly at first and gradually build up to darker values. For light values, push down very lightly on your pencil and push down harder for darker values. Add a cast shadow at the bottom using a medium value. It's a good idea to use reference as you shade for a more accurate depiction of a tiger. Shading can be time-consuming, so be patient and take breaks. For a more detailed guide on how to shade, check out this tutorial: How to shade.
Thanks for visiting! Subscribe to the How2DrawAnimals YouTube Channel for a new tutorial every week.
To learn how to draw popular cartoon characters, visit EasyDrawingTutorials.com.
To learn how to draw Manga, visit How2DrawManga.com.
RELATED TUTORIALS
 |
 |
 |
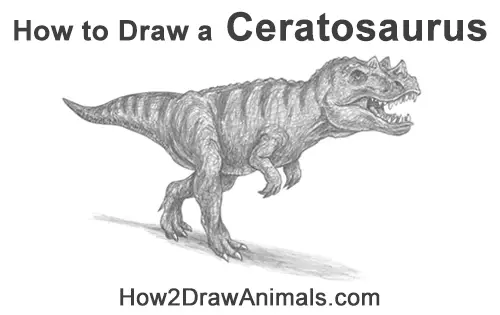
In this free art lesson, you'll learn how to draw a Ceratosaurus Dinosaur step-by-step.
Stay tuned for more free drawing lessons by:
Liking us on Facebook>>
Subscribing on YouTube.com>>
Following us on Instagram>>
All of the tutorials on How2DrawAnimals.com are good drawing tutorials for beginners and experienced artists alike. The online tutorials are easy to follow; they teach you the how to draw basics while showing you how to draw animals step by step. Each animal has a video drawing tutorial option, as well as step-by-step photos and written text to follow.
RELATED TUTORIALS
 |
 |
 |
To draw this Ceratosaurus step by step, follow along with the video tutorial below and pause the video after each step to draw at your own pace. You may find it easier to follow the step-by-step drawings below the video. The new lines in each step are shown in red, so you'll know exactly what to draw next. You may want to open the video in a new tab and use both drawing methods. Take your time and draw at your own pace.
Below you can watch a Narrated step-by-step video tutorial:
For the first few steps, don't press down too hard with your pencil. Use light, smooth strokes to begin so that it's easy to erase if you make a mistake.
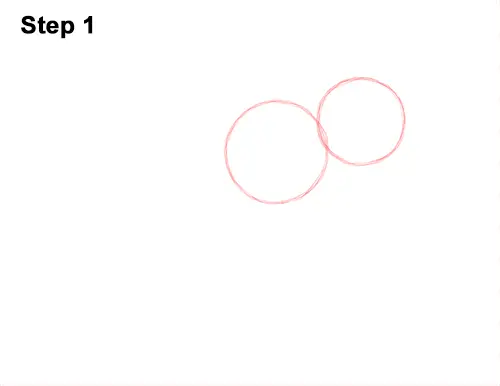
Step 1: Start by drawing two circles as guides for the Ceratosaurus' head and top part of the body. The circle on the top, right will be the head. To draw each circle, first make four marks to determine the height and width. Then connect the marks using curved lines. If you're struggling to draw the circles, just trace the outer rims of circular objects like coins or bottle caps. For a more detailed guide on the different ways to draw a circle check out this tutorial: Four simple ways to draw a circle. Pay attention the sizes and spacing of the circles.
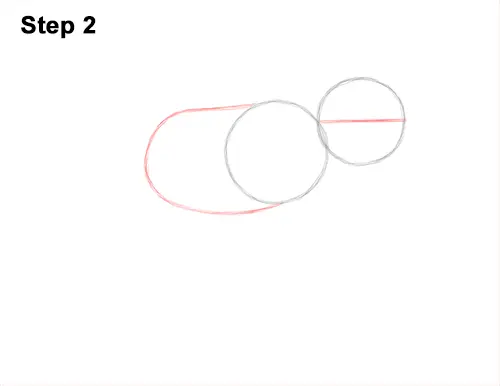
Step 2: Draw a horizontal line inside the head as a guide to help you position the Ceratosaurus' facial features later. On the left side of the big circle, draw a long, curved line as a guide for the back portion of the body. This guide should be similar to an arc on its side. Pay attention to the size of this arc in relation to the first circle.
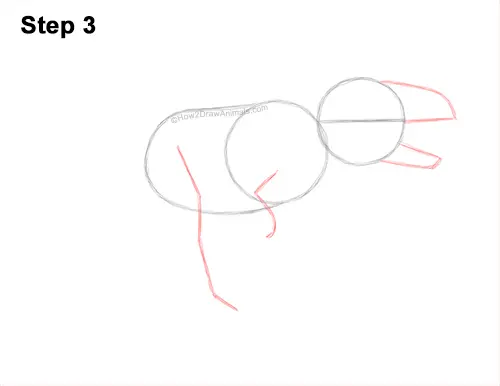
Step 3: On the right side of the head circle, draw two curved lines as guides for the Ceratosaurus' jaws. These guides should be similar to arcs on their sides. Make the inner edges of the arcs flat for the mouth. Under the body, on the left, draw a long angled line as a guide for the hind leg. To the right, draw a smaller angled line as a guide for the arm. Pay attention how the lines bend to indicate the joints.
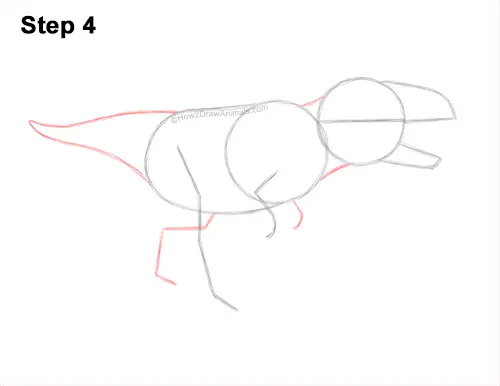
Step 4: Connect the head to the body using short lines to create the Ceratosaurus' thick neck. On the left side of the body, draw a long, curved shape as a guide for the tail. Make the tail wide at the base and thin and pointy at the tip. Under the body, draw a long, angled line as a guide for the second hind leg. To the right, draw a short, curved line as a guide for the second arm.
That's it for the guidelines! From this point on, press down harder with your pencil for a more defined drawing of a baby horse or foal.
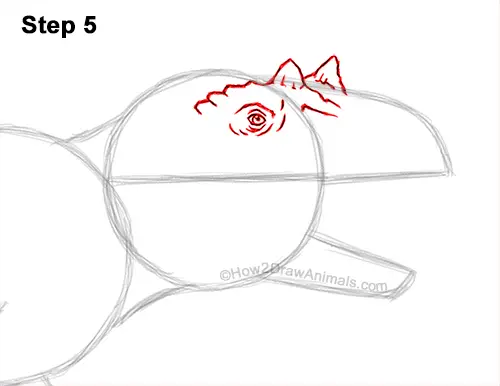
Step 5: Inside the head, on the top, right side, draw a small circle for the Ceratosaurus' eye. Make the sides of the shape pointy for the corners of the eye. Inside the eye draw a tiny circle for a highlight and a small dot for the pupil. Add a few of curved lines around the eye to indicate the eyelid and wrinkles. Above the eyes, draw a series of angled lines for the thick brow and the two horns. Don't make the horns too big.
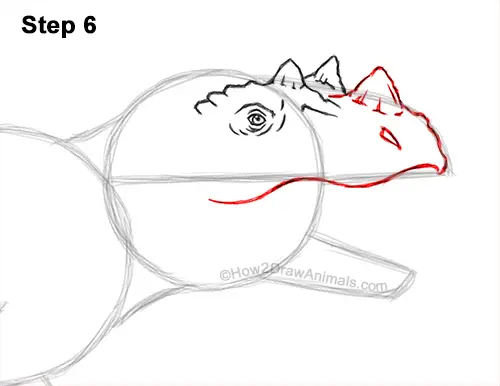
Step 6: Draw a triangular shape on top of the top jaw for the Ceratosaurus' main horn. Make the edges angled and rough. Darken the basic path of the arc to create the jaw. Make the bottom edge wavy. Extend the line farther to the left so that it's inside the head. Inside the jaw, near the tip, draw a slit-like shape for the nostril.
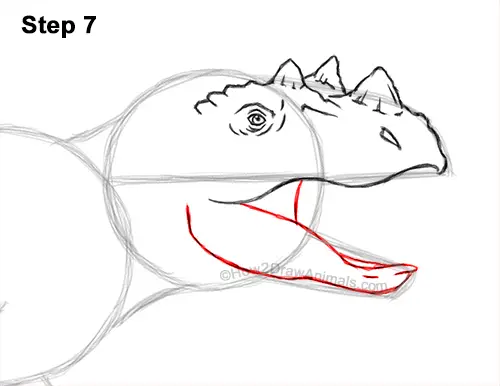
Step 7: Use the small arc on the bottom as a guide to draw the Ceratosaurus' lower jaw. Make the top edge wavy for the mouth. Extend the bottom line farther inside the head and curve it upward. Add a curved, vertical line between the jaws for a piece of skin.
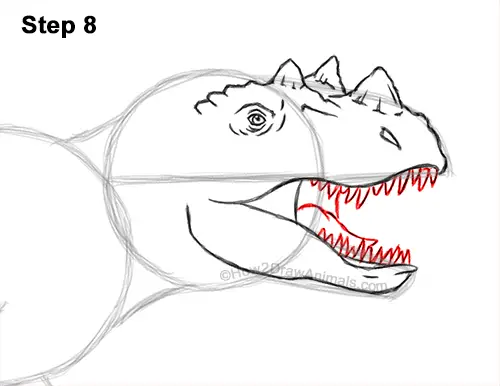
Step 8: Draw a series of small, triangular shapes along the edges of the mouth for the Ceratosaurus' teeth. Make the teeth different sizes. Draw a couple of curved lines in the middle for the visible section of the tongue.
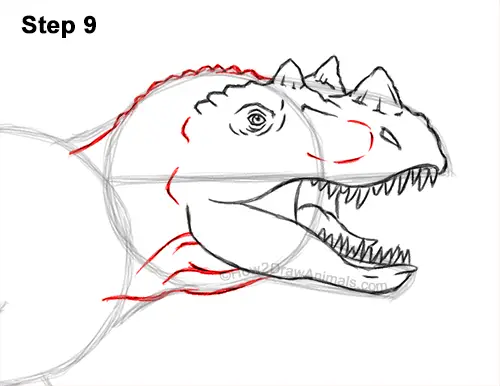
Step 9: Use the other shapes and lines as guides to draw the rest of the Ceratosaurus' head. Use small, angled lines at the top to create spikes. Add a few lines inside the head and on the neck to create the bony structure, the wrinkles and veins.
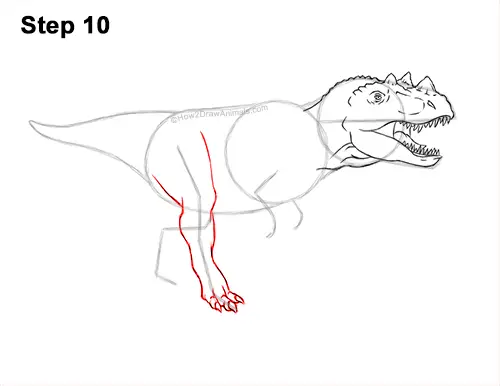
Step 10: Use he long angled line under the body as a guide to draw the Ceratosaurus' hind leg. First lightly sketch the shape of the leg around the guide line. Curve the shape to indicate the joints and muscle structure. Bend the bottom of the shape to the right for the foot. At the bottom, draw three small, thin shapes for the toes. On the tip of each toe, draw a small, triangular shape for the claws.
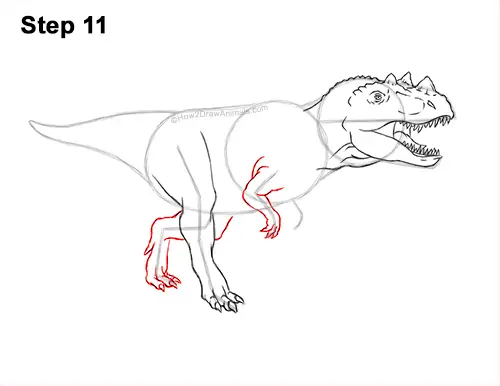
Step 11: Draw the Ceratosaurus' second hind leg behind the first hind leg. Follow the path of the guide as you draw the shape of the leg. Draw the toes at the bottom as three small, thin shapes. On the tips of the toes, draw small, triangular shapes for the claws. Don't overlap the first hind leg as you draw this leg. Use the angled line to the right as a guide to draw the arm the same way. Draw the arm around the guide. Add three small, thin shapes at the bottom for the fingers. Sketch lightly at first and only darken the lines when you get the shapes right.
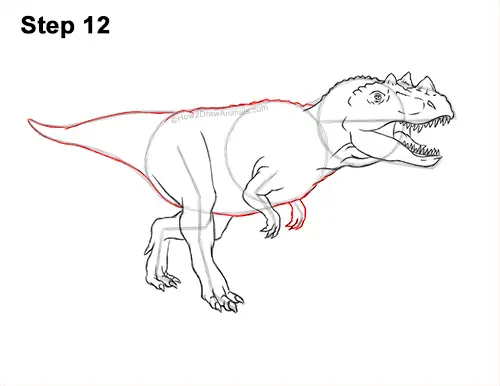
Step 12: Darken the outer edges of the guides to finalize the shape of the Ceratosaurus' body. Use short, angled lines as you darken the top edge to create small spikes. Don't overlap the legs that are on the side as you draw the underside of the body. Use the line that's under the body as a guide to draw the visible section of the other arm.
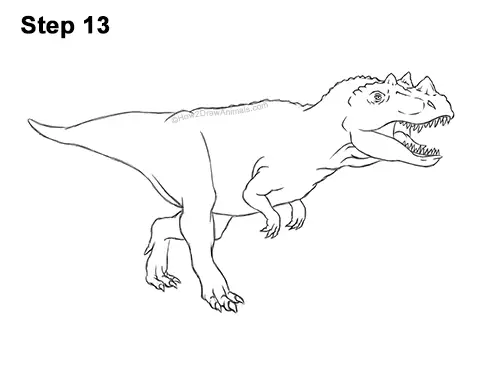
Step 13: For a cleaner look, erase as much as you can of the initial guide lines. Don't worry about erasing all of the guides. It's okay to leave some behind. Re-draw any final sketch lines you may have accidentally erased.
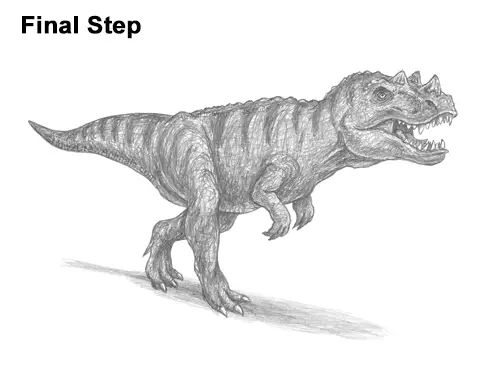
Final Step: Shade your drawing for extra detail. Nobody is exactly sure what Ceratosaurus looked like so you cna shade yours however you'd like. For this look, use a medium value all over the body. Don't shade too smoothly; use scribbly lines to create a rough texture. Add the scribbles so that they countour to the shape of the body. Use a dark value to create a striped pattern. Shade lightly at first and gradually build up to darker values. For light values, push down very lightly on your pencil and push down harder for darker values. Add a slightly darker value throughout the body to create shadows. Pick a light source as you shade so that the shadows are consistent across the body. Here the light source is coming from the top so most of the shadows will be on the underside of the shapes. Add a cast shadow at the bottom using a medium value. Shading can be time-consuming, so be patient and take breaks. For a more detailed guide on how to shade, check out this tutorial: How to shade.
Thanks for visiting! Subscribe to the How2DrawAnimals YouTube Channel for a new tutorial every week.
To learn how to draw popular cartoon characters, visit EasyDrawingTutorials.com.
To learn how to draw Manga, visit How2DrawManga.com.
RELATED TUTORIALS
 |
 |
 |
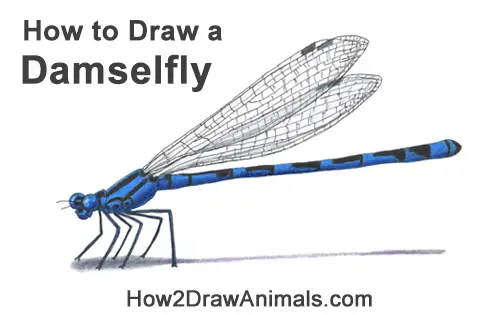
In this free art lesson, you'll learn how to draw a Damselfly step-by-step.
Stay tuned for more free drawing lessons by:
Liking us on Facebook>>
Subscribing on YouTube.com>>
Following us on Instagram>>
All of the tutorials on How2DrawAnimals.com are good drawing tutorials for beginners and experienced artists alike. The online tutorials are easy to follow; they teach you the how to draw basics while showing you how to draw animals step by step. Each animal has a video drawing tutorial option, as well as step-by-step photos and written text to follow.
RELATED TUTORIALS
 |
 |
 |
To draw this Damselfly step by step, follow along with the video tutorial below and pause the video after each step to draw at your own pace. You may find it easier to follow the step-by-step drawings below the video. The new lines in each step are shown in red, so you'll know exactly what to draw next. You may want to open the video in a new tab and use both drawing methods. Take your time and draw at your own pace.
Below you can watch a Narrated step-by-step video tutorial:
For the first few steps, don't press down too hard with your pencil. Use light, smooth strokes to begin so that it's easy to erase if you make a mistake.

Step 1: Start by drawing two circles as guides for the damselfly's head and front part of the body (thorax). The circle on the left side will be the head. To draw each circle, first make four marks to determine the height and width. Then connect the marks using curved lines. If you're struggling to draw the circles, just trace the outer rims of circular objects like coins or bottle caps. For a more detailed guide on the different ways to draw a circle check out this tutorial: Four simple ways to draw a circle. Pay attention the sizes and spacing of the circles.
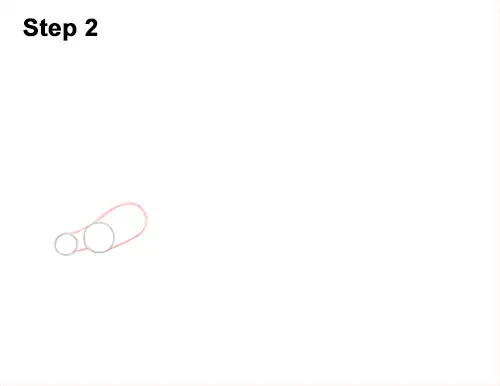
Step 2: Draw two short lines that connect the circles to extend the shape of the damselfly's thorax. On the right side, draw a curved line to complete the long shape of the thorax. The curved line on the right should be similar to an arc on its side. Pay attention to the size of the arc in relation to the circles.
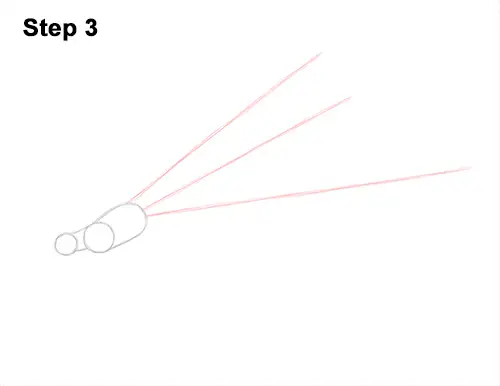
Step 3: On the right side of the thorax, draw three long lines as guides for the damselfly's wings and abdomen. The two lines at the top are for the wings and they should be shorter than the bottom line for the abdomen. Overall all three lines should be very long in relation to the thorax. The lines for the wings should also have a more diagonal orientation.
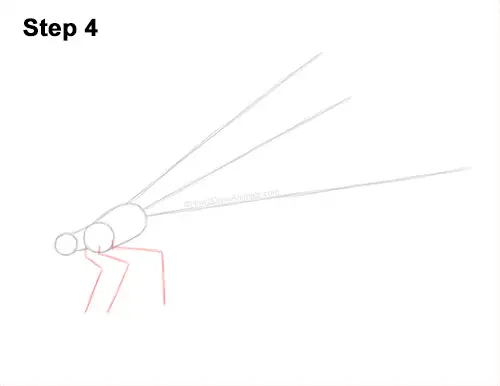
Step 4: Under the thorax, draw three angled lines as guides for the legs. Bend the lines to indicate the joints. Pay attention to how long these lines are in relation to the thorax. The line on the left for the hind leg should be the longest of these three lines.
That's it for the guidelines! From this point on, press down harder with your pencil for a more defined drawing of a Damselfly.
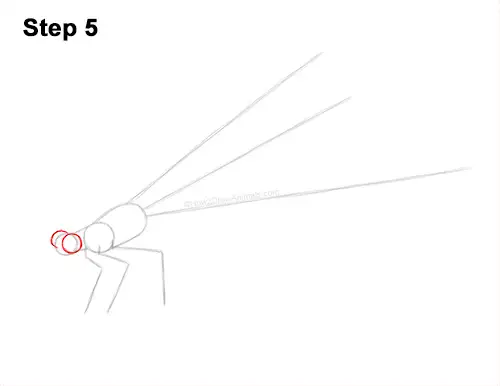
Step 5: To the right of the head circle, draw another circle as a guide for the damselfly's eye. This eye should be almost as big as the head. The right edge should be outside of the shape of the head. On the left side, draw a half-circle for the other eye.
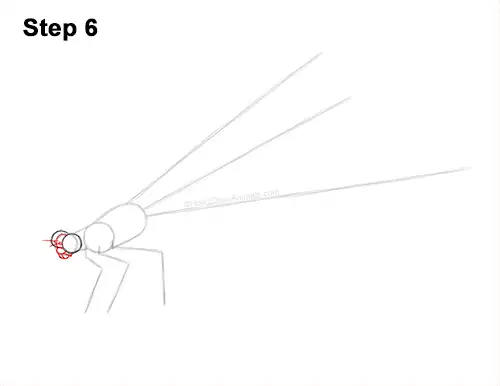
Step 6: Darken the initial circle to complete the damselfly's head. On the head, draw two short horizontal lines for the antennae. Under the head, draw a couple of curved lines for the mouth parts.
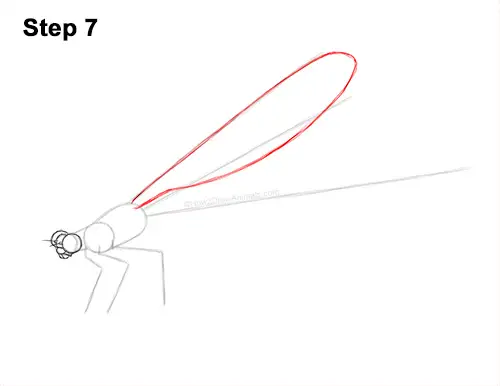
Step 7: Use the top-most diagonal line as a guide to draw the damselfly's forewing. Darken the guide and add a curved line at the bottom to make the shape thicker. The shape of the wing should be wide like an oval. On the left side, the wing should be thin.
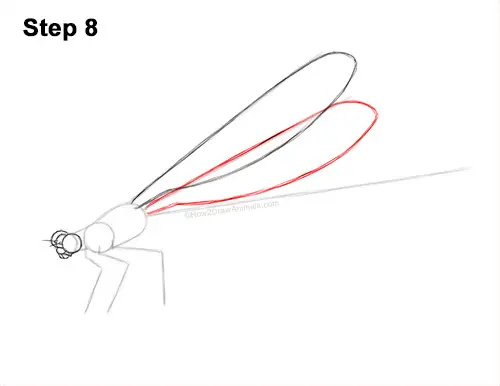
Step 8: Use the middle diagonal line as a guide to draw he damselfly's hindwing the same way. The wings are transparent so it's okay if the shapes overlap. Make the left tip of the wing thin and pointy.
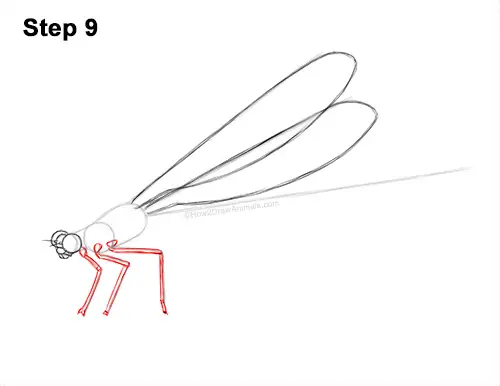
Step 9: Use the angled lines that are under the thorax as guides to draw the damselfly's legs. Darken the lines and make each leg thicker by adding another line next to it. At the top of each leg, draw a small triangular shape for the bases of the legs.
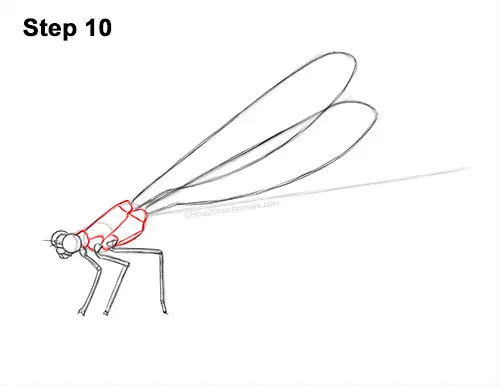
Step 10: Darken the outer edges of the guides in the middle to create the damselfly's thorax. Make the shapes more angular as you darken the lines. Inside the shape, draw a few short, curved lines to divide the thorax into segments.
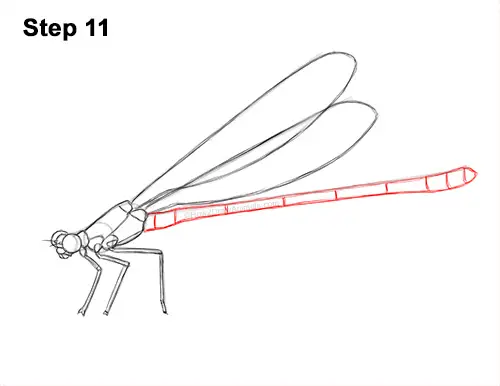
Step 11: Darken the horizontal line on the right for the top edge of the damselfly's abdomen. Add another line at the bottom to make the abdomen thicker. The right side of the abdomen should be curved and wide. Overall the abdomen should be very thin. Draw a series of short lines inside the shape to divide the abdomen into ten segments.
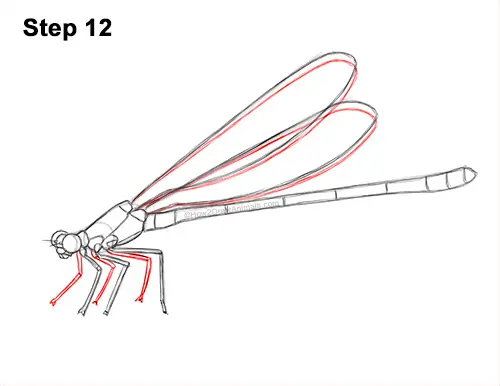
Step 12: Draw the damselfly's wings and legs that are on the other side by using the first set of wings and legs as templates. Sketch lightly at first and only darken the lines when you get the shapes right. Remember that the wings are transparent, so it's okay to overlap the shapes.
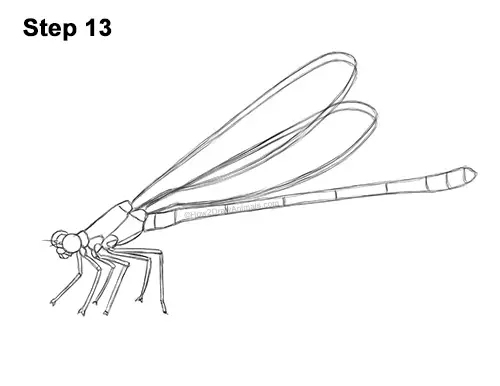
Step 13: For a cleaner look, erase as much as you can of the initial guide lines. Don't worry about erasing all of the guides. It's okay to leave some behind. Re-draw any final sketch lines you may have accidentally erased.
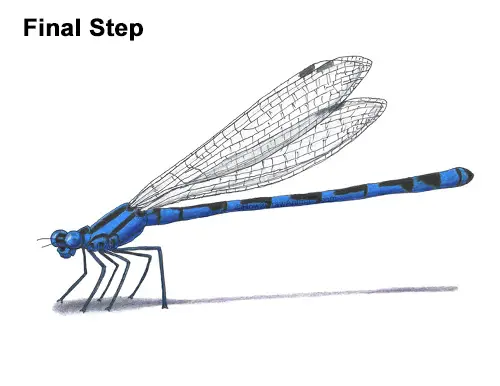
Step: Add a few lines inside the wings to create the veins. Use a series of long diagonal lines and then draw shorter vertical lines between the diagonal lines. Now color your damselfly drawing! Damselflies have different color patterns so you can color your drawing however you'd like. For this variety, use blue for most of the body but add a bit of black to create stripes. Use dark blue along the bottoms to create shadows and light blues along the tops for highlights. Add a bit of gray and black to the wings. Add a shadow underneath using gray and blue. Coloring can be time-consuming, so be patient and take breaks. It's a good idea to use reference as you color for a more accurate depiction of the damselfly species you're to drawing.
Thanks for visiting! Subscribe to the How2DrawAnimals YouTube Channel for a new tutorial every week.
To learn how to draw popular cartoon characters, visit EasyDrawingTutorials.com.
To learn how to draw Manga, visit How2DrawManga.com.
RELATED TUTORIALS
 |
 |
 |
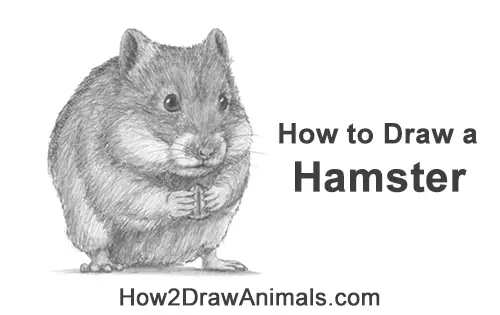
In this free art lesson, you'll learn how to draw a Golden Hamster Standing Up on its hind legs and eating step-by-step.
Stay tuned for more free drawing lessons by:
Liking us on Facebook>>
Subscribing on YouTube.com>>
Following us on Instagram>>
All of the tutorials on How2DrawAnimals.com are good drawing tutorials for beginners and experienced artists alike. The online tutorials are easy to follow; they teach you the how to draw basics while showing you how to draw animals step by step. Each animal has a video drawing tutorial option, as well as step-by-step photos and written text to follow.
RELATED TUTORIALS
 |
 |
 |
To draw this cute Hamster step by step, follow along with the video tutorial below and pause the video after each step to draw at your own pace. You may find it easier to follow the step-by-step drawings below the video. The new lines in each step are shown in red, so you'll know exactly what to draw next. You may want to open the video in a new tab and use both drawing methods. Take your time and draw at your own pace.
Below you can watch a Narrated step-by-step video tutorial:
For the first few steps, don't press down too hard with your pencil. Use light, smooth strokes to begin so that it's easy to erase if you make a mistake.
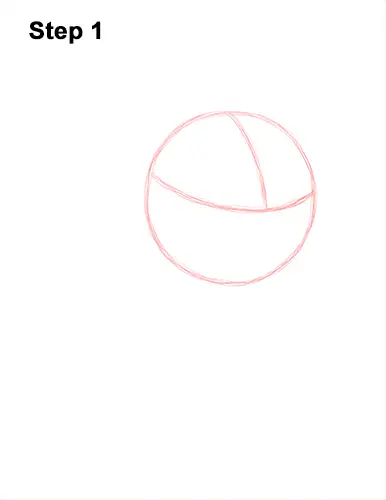
Step 1: Start by drawing a circle as a guide for the hamster's head. To draw the circle, first make four marks to determine its height and width. Then connect the marks using curved lines. If you're struggling to draw the circle, just trace the outer rim of a circular objects like a coin or a bottle cap. For a more detailed guide on the different ways to draw a circle check out this tutorial: Four simple ways to draw a circle. Inside the circle draw two curved lines as guides to help you place the facial features later on.
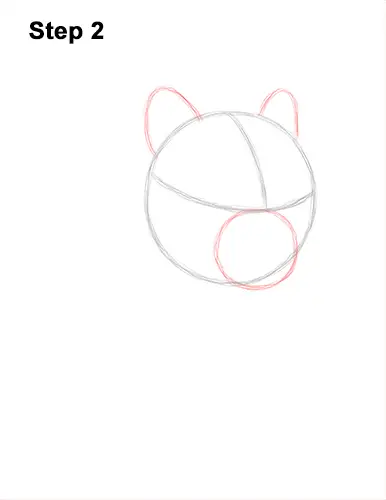
Step 2: On the bottom, right side of the head, draw a small circle as a guide for the hamster's muzzle. Pay attention to the size and position of the muzzle in relation to the head circle. At the top, draw two short arcs as guides for the ears. The ear on the right should be a bit smaller and thinner because the head is slightly turned.
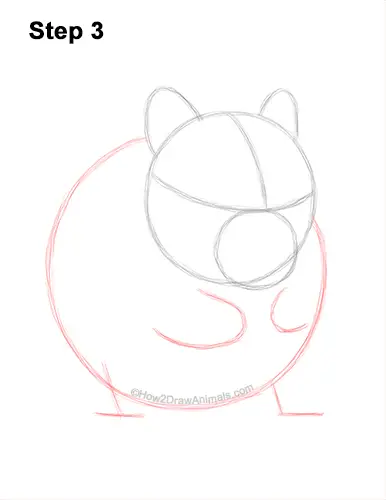
Step 3: Under the head, draw a big circle as a guide for the standing hamster's body. This circle should be about twice as big as the head circle. Inside the body, draw two Curved lines as guides for the front legs. Under the body, draw a series of short lines as guides for the hind legs. Pay attention to the sizes of the limbs in relation to the body.
That's it for the guidelines! From this point on, press down harder with your pencil for a more defined drawing of a hamster standing up.
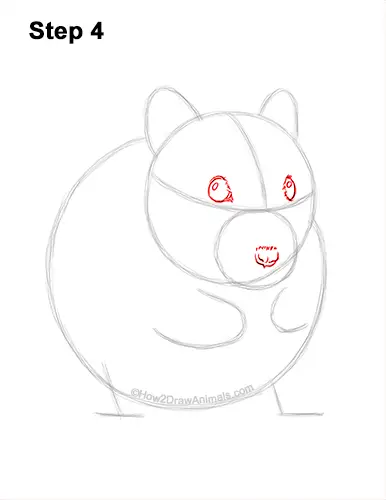
Step 4: Inside the head, draw two small circles for the hamster's eyes. Use the initial lines as guides to position the eyes inside the head. Add a few strokes on the sides of the eyes for fur. Inside each eye, draw a tiny circle for a highlights. Inside the muzzle, near the right side, draw a circular shape for the nose. Add a couple of curved lines on the sides for the nostrils. Use short strokes to darken the top of the nose for fur.
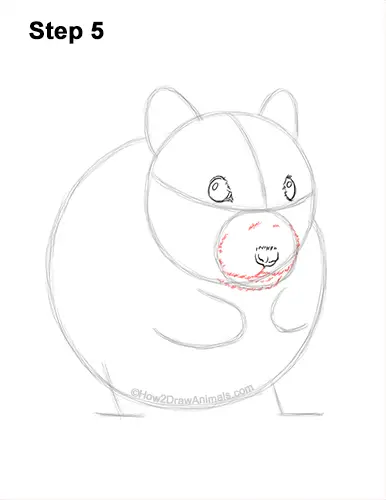
Step 5: Draw a line under the nose that splits into two at the bottom to create the hamster's mouth. Use short strokes to create a furry texture. Add a couple of lines under the mouth to create the furry chin. Draw a few short strokes along the path of the initial circle to create the rest of the muzzle.
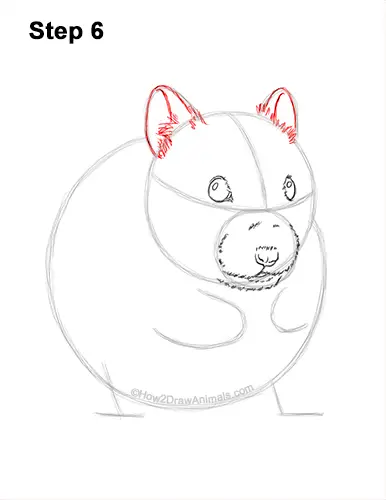
Step 6: Darken the arcs on top of the head to create the hamster's ears. Make the shapes slightly thinner at the top. Inside the ears, draw a series of short strokes for the ear's furry bases. Inside each ear, draw a longer, curved line for the ear's openings.
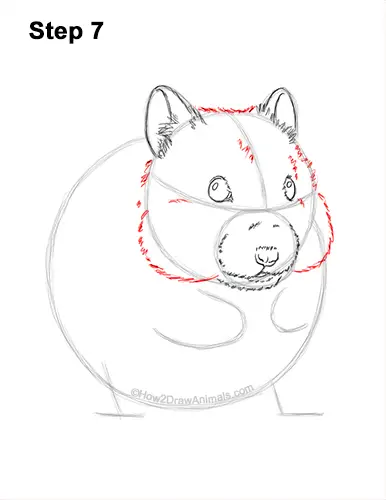
Step 7: Use the first circle as a guide to draw the rest of the hamster's head. Darken the basic path of the circle using short strokes to create the furry texture of the head. Make the bottom of the head wider than the initial circle to create the big cheeks. Add a few more strokes inside the head to emphasize the fur.
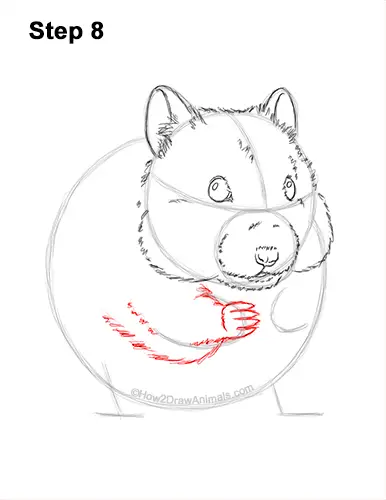
Step 8: Use the curved line that's under the head and on the left side as a guide to draw the hamster's first front leg. Draw four small, thin shapes along the right side of the guide for the toes. Make the toes pointy at the tips for the nails. Add a short, curved line to the left for the rest of the foot. Darken the basic path of the guide using short strokes to create the rest of the leg. Make the leg slightly bigger than the initial guide.
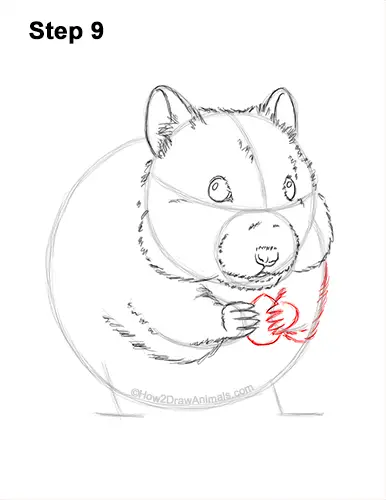
Step 9: Use the curved line on the right as a guide to draw the hamster's other front leg the same way. draw the toes as small, thin shapes with pointy tips along the edge of the guide. Draw the rest of he foot using a short, curved line. Use short strokes along the path of the guide to create the rest of the furry leg.
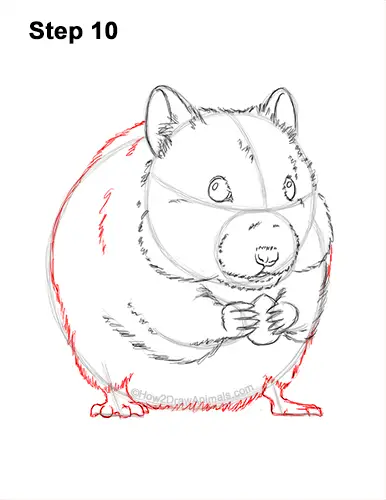
Step 10: Draw the shapes of the hamster's hind feet around the guide lines under the body. The toes on the on the foot on the left are made up of small, circular shapes because the toes are pointing toward the viewer. The toes of the foot on the right should be longer because they are pointing to the right. Use the big circle as a guide to draw the rest of the body. Darken the basic path of the circle using short strokes to create the furry shape of the body.
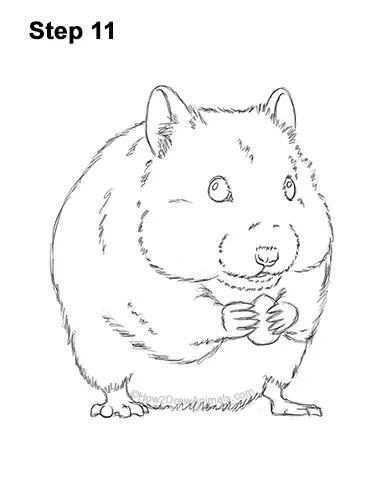
Step 11: For a cleaner look, erase as much as you can of the initial guide lines. Don't worry about erasing all of the guides. It's okay to leave some behind. Re-draw any final sketch lines you may have accidentally erased.
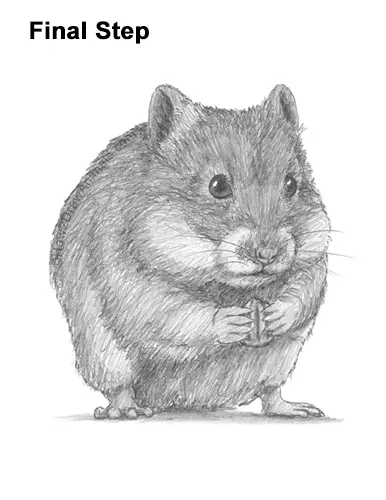
Final Step: Shade your drawing for extra detail. Hamsters can have a variety of coat patterns, so you can shade yours however you'd like. For this pattern, use a medium value all over the body except for the area under the head and on the underside of the body. Shade lightly at first and gradually build up to darker values. For light values, push down very lightly on your pencil and push down harder for darker values. As you shade the body, use strokes that go in the general direction of the fur. Separate each stroke a bit as you shade so that the white of the paper comes through and creates a more furry texture. Use a slightly darker value throughout the body for shadows. Add a cast shadow at the bottom using a medium value. Shading can be time-consuming, so be patient and take breaks. It's a good idea to use reference as you shade for a more accurate depiction of a hamster. If you have a pet hamster, try to duplicate its coat pattern on your drawing. For a more detailed guide on how to shade, check out this tutorial: How to shade.
Thanks for visiting! Subscribe to the How2DrawAnimals YouTube Channel for a new tutorial every week.
To learn how to draw popular cartoon characters, visit EasyDrawingTutorials.com.
To learn how to draw Manga, visit How2DrawManga.com.
RELATED TUTORIALS
 |
 |
 |


